Bench Grinder Basics
Learn how to use a conventional bench grinder for perfect bevels on your chisels and plane irons
You don’t need a high-priced, slow-speed, wet grinder to obtain perfect bevels on your chisels and plane irons. Learn how to use a conventional bench grinder to get the job done, without gouging your wallet.
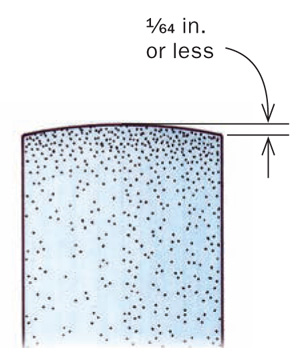
First, you probably need to make a few changes to your bench grinder. An aftermarket tool rest is the key to getting those perfect bevel angles quickly and easily. Next, you’ll need to outfit your grinder with a cooler-running “friable” wheel. The standard grey wheel that comes packaged with most grinders generates way too much heat for woodworking tools. Most firable wheels are white aluminum-oxide, but Norton’s newer ceramic alumina “3X” wheels stay just as cool but are more durable and don’t need to be dressed as often. Speaking of dressing the wheel, yes, you need to do it, but it’s easy with a diamond wheel dresser. The key to the grinding technique in this video is a slight curve across the edge of the wheel (see illustration below), as opposed to the flat edge most people think is right. You’ll need the wheel dresser to create that curve, and to reshape it when the center wears down.

Fix Damaged Chisels Before Grinding a Bevel
To fix chisels full of nicks along the cutting edge, or chisels whose cutting edges aren’t square, start by using a square and a fine-tip marker to draw a reference line. Set your tool rest to a 90-degree angle (as referenced to the wheel) and blunt the tip, working your way up to your line. Now re-set the tool rest to the desired angle (25-degrees is the most common angle) and grind the new bevel until the blunt edge has disappeared and you’ve achieved a nice burr along the back side of the tool.


Comments
The top of the "in rough shape" chisel is not parallel to the back but the top is being used as the reference for the bevel. This means the bevel angle will not be the desired angle. (Bevel angles are measured using the back as the reference) This becomes evident when you try to set up the chisel in a honing guide. For most users this won't be a big deal.
Can you please mention which grit of friable wheel to buy? I followed your advice but both types of friable wheels you mention come in multiple grits such as 60 and 100.
I've never seen anyone have a 100 grit on a grinder. Grinders are for removing a lot of material quickly, with 100 grit you're much more likely to scorch a blade. Get the 60 and don't look back!
The Veritas tool rest comes with a sliding device that allows you to slide the chisel left and right with precision and at exactly 90 degrees. The kit also includes the angle setting jig you showed.
Love this! Be thy not afraid: use the power of friable wheels!
I'd be happier to see Mr. Christiana using some personal protection equipment, such as safety goggles, a thick apron, and a dust mask (the grinder isn't connected to any dust collection system).
The grit size of a grinding wheel does matter, but what is somewhat more critical is the abrasive type and grade of the wheel, not grit size. Finer grits give finer finish, and coarser grits cut faster but leave deeper trails in the steel they cut. Because of that you will have to spend more time with hand honing to achieve a nice finish. That's the trade-off.
Wheels with a more "open" grade and structure (typically, say, 9A60J8V52) will do well in a woodworking shop environment. You can also work quite well with a 100 grit abrasive, as I prefer. A white aluminum oxide abrasive will wear more quickly, but because it is more friable, it will cut faster and cooler because the grains fracture easily. Thus, they are presenting new sharp cutting faces quickly. A "regular aluminum oxide" wheel is more apt to burn a woodworker's plane iron or chisel but lasts and lasts. Price? You get what you pay for: white abrasive wheels are more expensive. All that said, a ceramic grain abrasive wheel will provide even better results but the initial cost is more than many wood-shop people think they want to pay. Funny though, they would be surprised at how nice these wheels are to work with and how well they hold their shape.
I am using a diamond 8 inch wheel which is the best I have ever tried. Not cheap but as you say you get what you pay for. That is a lesson I learned when I put a carbide tipped blade on my bandsaw. So many things to learn.
I use that technique on chisels but I avoid going all the way to the edge for concern about over heating the thin metal. I then go to my honing guide to sharpen the very edge. Other than taking a bit longer are there any other problems with the way I'm doing it?
As a rule, I will square off and blunt the end of the chisel, if only a fraction so I always have that squared reference point to work to. I grind right up to the blunted end so I can just see a hairline of the blunting and then stop there. It is still very easy to put on a microbevel on a sharpening stone.
Otherwise, it is easier to end up with an out of square chisel...
Log in or create an account to post a comment.
Sign up Log in