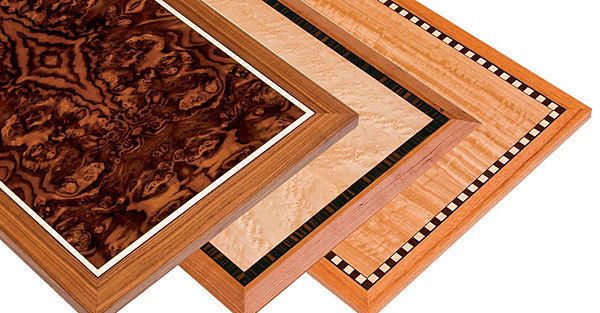
Synopsis: Beautiful patterns, dozens of wood species and grain varieties, and not too much money. These are just three reasons why making a veneered tabletop appeals to many woodworkers. In this Master Class, Craig Thibodeau focuses on using bandings and borders, and his method is both foolproof and easier than the traditional way. Since his tabletops are fully veneered on a stable substrate using a big vacuum bag, adding beautiful bandings and borders is as easy as cutting out pieces of veneer and taping them to a center field of veneer. After laying up the panel, he adds solid-wood edging to protect the veneer and complete the look.
Whether your tastes run traditional or contemporary, learning to do a veneered tabletop opens up all sorts of design possibilities. For one, you now have access to scores of new wood species and grain patterns, all widely available and affordable. Secondly, you can cut and arrange the veneers into beautiful patterns not possible with solid wood. That’s just the beginning. my focus here is bandings and borders. Veneer makes those easier, too.
The traditional way to make bandings is to start with a bricklike lamination and slice off layers. Then you inlay them, excavating a channel in solid wood, with issues when you go across the grain. But since my tabletops are fully veneered on a stable substrate using a big vacuum bag, adding beautiful bandings and borders is as easy as cutting out pieces of veneer and taping them to a center field of veneer. After laying up the panel, I add solid-wood edging to protect the veneer and complete the look. Last, I rout a groove along the glueline and inlay the final piece of stringing the traditional way, hiding the glueline and any inconsistencies there. It is a foolproof system.
I also sometimes veneer all the way to the edge of the table, by simply making the bandings wider. I often use crossbanding this way, banding the side of the tabletop with the same veneer for a waterfall effect.
Stringing and banding separate the center field from the edges of the tabletop, and add a dash of both complementary and contrasting color. While you can buy banding in varied patterns, it’s just as easy to create your own using small pieces of figured veneer that are too nice to throw away.
A few shopmade helpers
To make all of the bandings in this article, you’ll need a freshly sharpened veneer saw (see FineWoodworking.com/extras to learn how I sharpen my saw) and a few simple shopmade devices. First, make a 2- or 3-in.-wide straightedge from mdF to joint edges. Then you’ll need a banding-cutting board with a fixed stop that sticks up about 1 ⁄4 in. to 1 ⁄2 in. The board works in conjunction with a simple cutting guide that matches the width of your desired banding. Both the cutting guide and straightedge need 60- to 120-grit sandpaper stuck to the bottom to stop them from slipping. You’ll also need veneer tape. I recommend “water gum” tape from schurchwoodwork.com.
From Fine Woodworking #228
For the full article, download the PDF below:
Fine Woodworking Recommended Products

Estwing Dead-Blow Mallet
Bessey EKH Trigger Clamps

Festool DF 500 Q-Set Domino Joiner




Log in or create an account to post a comment.
Sign up Log in