Perfect Profiles on the Router Table
Shims are the secret to clean, accurate profiles and joinery cuts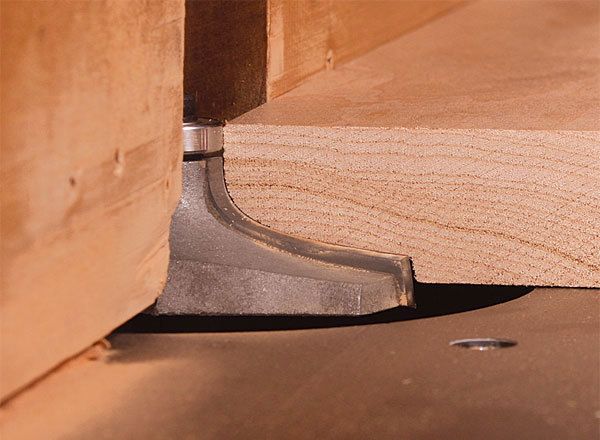
Synopsis: Alan Turner knows the secret to cutting perfect profiles on the router table. Set the fence and/or stop block just once, and then use precisely sized wood blocks to make subsequent cuts in other positions. It works great for joinery, especially when doing a number of identical parts. In this case, your ultimate goal is just one good cut—a clean, precise profile on the router table—and instead of blocks, you use shims.
This short article is a follow-up to “Speed Up Your Work with Spacer Blocks” in FWW #226. The basic concept is the same: You set your fence and/or stop block just once, and then use precisely sized wood blocks to make subsequent cuts in other positions. It works great for joinery, especially when doing a number of identical parts. In this case, your ultimate goal is just one good cut—a clean, precise profile on the router table—and instead of blocks, you use shims.
Because this technique is a little different, and because it is so helpful for a wide variety of routertable work, FWW decided to give it its own showcase here.
Router profiles are deceptively difficult. Router bits don’t do well at removing a lot of material at once, so for cleanest results you need to make several passes, moving the fence each time and leaving just a light cut for the final pass. The trouble is that you are often trying to end up at a precisely sized profile. So you dial that in on a scrap piece, and then proceed to move your fence for the preliminary passes, losing that perfect final setting.
Shims are the answer. You set the fence for the perfect profile, and then add the fence shims you need for the preliminary passes and a light final one. I use various materials for fence shims, including 3mm (1 ⁄8 in.) and 6mm (1 ⁄4 in.) Baltic-birch plywood, taking heavier cuts at first and then lighter ones as I near the end. Your final pass should be about 1 ⁄16 in. This is especially important if you are working with a wood that is prone to tearout, such as oak. So make that last shim from a piece of thin plastic laminate. If you are still getting tearout on the final pass, try a climb cut (holding the workpiece firmly) followed by a normal push cut to clean up any bumps.
From Fine Woodworking #228
For the full article, download the PDF below:
Fine Woodworking Recommended Products

Stanley Powerlock 16-ft. tape measure

Bosch 12V Trim Router

Festool Rotex FEQ-Plus Random Orbital Sander







Log in or create an account to post a comment.
Sign up Log in