How to Sharpen Your Turning Tools
Get an edge on the four essential turning tools for peak performance
Synopsis: For many woodworkers, learning to turn furniture parts, such as legs, pulls, or even columns, is a natural progression. It’s a fun journey, but to be successful you need to buy the right tools and keep them sharp. In this Fundamentals, Peter Galbert demonstrates his sharpening tricks and techniques. He also tells you which tools you need to buy (hint: don’t waste your money on an expensive “set”) and how to keep them performing at their peak.
For many woodworkers, learning to turn furniture parts, such as legs, pulls, or even columns, is a natural progression. It’s a fun journey, but to be successful you need to buy the right tools and keep them sharp.
Sharp tools take the frustration out of turning and ease the learning curve when using a lathe. and you need to sharpen frequently, since cutting so many linear feet of material at the lathe dulls cutting edges quickly. Here, I’ll show you my sharpening tricks and techniques.
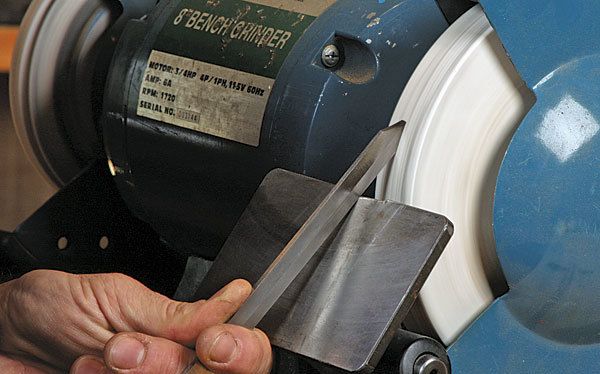
I use an 8-in. bench grinder and a set of commercial sharpening jigs made by Oneway. I also hone some of the tools with a couple of inexpensive sharpening accessories. These make sharpening fast and foolproof, and get you back to turning quickly.
Start with the parting tool. The diamond parting tool cuts straight, accurate diameters, like the ends of tapers or the shoulders of tenons. It’s a chisel beveled on two sides with a diamond-shaped cross section that ensures the chisel’s cutting edge is the widest part of the tool. The design lets you take deep cuts without the sides binding in the kerf. The key in regrinding this tool is to keep that geometry while removing material.
Turn on the grinder and lay the tool on the top edge of the rest so that the wheel contacts the heel of the bevel lightly. Then lower the top of the tool until the wheel contacts the middle of the bevel. Grind it evenly by flipping back and forth frequently between both sides.
It shouldn’t take much to refresh the edge. Stop as soon as the edge is square and a burr has formed. Don’t worry about the burr. It gets knocked off harmlessly when it touches a blank. There’s no need to hone the tool—grinding alone leaves a cutting edge that’s plenty sharp.
A roughing gouge can turn blanks into cylinders, and also cut some basic shapes like tapers. When sharpening, you need to polish the flute, regrind its bevel, and hone its edge. Start on the flute with a small DMT honing cone ($29, amazon. com) and then switch to a 5⁄8-in. dowel that’s been charged with jeweler’s rouge or a similar, fine-grit buffing compound. Work them up and down along the first 1⁄2 in. of the flute until you have a high polish along the tip. Then move on to grinding.
For the full article, download the PDF below.
Fine Woodworking Recommended Products

Wen Diamond Grinding Wheel

CrushGrind Pepper Mill Mechanism

Honing Compound


Log in or create an account to post a comment.
Sign up Log in