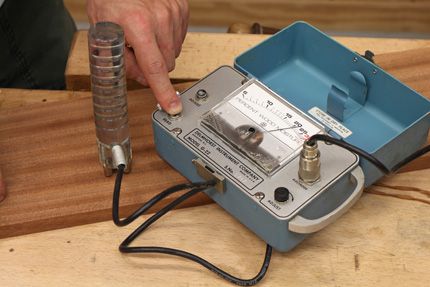
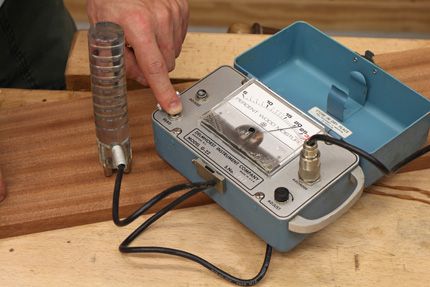
For a whopping $32, I became the proud owner of a vintage Delmhorst G-22 moisture meter that's built like a tank. Thanks eBay. That's considerably less than the meter's original price some 35 years ago, and Delmhorst is said to have stellar customer support for even their oldest meters.
For far too long now, I’ve gone about building my furniture and using what amounts to voodoo science and guesswork to account for seasonal changes in humidity that cause captured panels (be they drawer bottoms, inset drawer fronts, or cabinet backs) to swell or shrink depending on the season. That lack of science in my methodology resulted in a beautiful dovetailed cherry cabinet breaking apart when its pine cabinet back got a bit too big for it’s britches-er case sides-this summer. This was the first time that my efforts at “guesstimating” a panel size for seasonal changes resulted in a failure and I don’t want a repeat of the event.
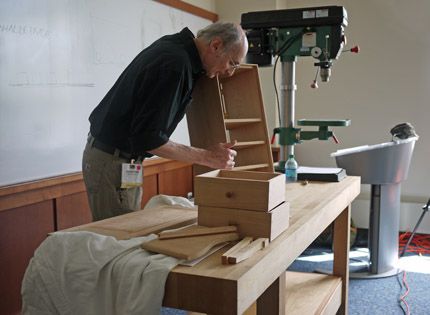
I’ve been nursing that wound for several weeks now, and still haven’t gotten around to fixing the case. In the meantime however, I was lucky enough to have run the camera for Chris Becksvoort’s class at Fine Woodworking Live 2013 titled 40 Years of Woodworking Tips. One of the topics covered by our resident Shaker expert was calculating panel widths to account for wood movement. After the class, I decided it was time to up my game and incorporate a bit of science, and some basic math, into my woodworking skillset-please don’t ask me why I didn’t do this earlier in my career.
Finding a Moisture Meter
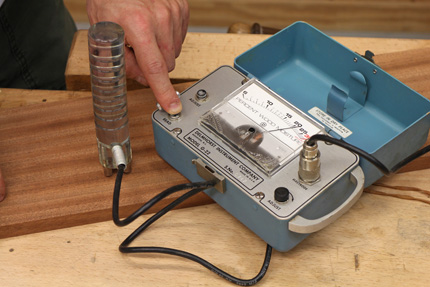 Confession: I’m a big fan of simple, old-technology tools, meters, and such that are made of metal and not chintzy plastic. During Chris’ seminar I noticed he was using a rather old Delmhorst G-22 moisture meter that was built like a Sherman tank. Nowadays, most meters are built of plastic-a lot of them are simply set atop the wood and the reading is taken directly from the surface. The older units like the G-22 used probes that are hammered about 5/16-in. into the wood. It just seems to me that this would yield a much more accurate reading. So I sprung for a G-22 on eBay for a whopping $32. That’s a heck of a deal on a meter that was a great deal more expensive than that when it was new. By the way, Delmhorst still makes a variety of meters with penetrating probes.
Putting the Meter to Work
Now to the science. Just how do I plan to incorporate a moisture meter into my woodworking? I consulted Chris’ article titled Stop Guessing at Wood Movement from issue #187. The article is clear, concise, and easy for the layman to understand. In fact, I’ve taken it upon myself to dub this the Ultimate Solution for Wood Movement. Here are the basics:
 For the purposes of this demonstration, let’s assume we’re trying to determine the final width of a flatsawn red-oak drawer front in the winter, in New England. Using my handy-dandy meter, I determine the moisture content to be 6%. The next number we need to know is a worst-case scenario moisture content (who knows where my furniture might end up in the future!). Chris tends to use 16%MC as his worst-case baseline. 16% minus 6% equals a 10% variance.
There’s one last number we need to calculate our final drawer width-the “movement value.” This number can be obtained by consulting a Wood Movement Reference Guide or by using the simple table included in the original article (see below). For flatsawn red-oak, the value is .0037.
Now we multiply those three values together. IE: [.0037 x 8 x 10] = .296-in., which is roughly 5/16-in. Therefore, my drawer fronts should be cut to a width of 8-in. minus 5/16. Final drawer front and side widths: 7-11/16-in.
Wood Movement Values Chart
This simple chart ought to be enough to get you started with regards to calculating movement for a variety of the most common wood species encountered by craftsmen here in North America.
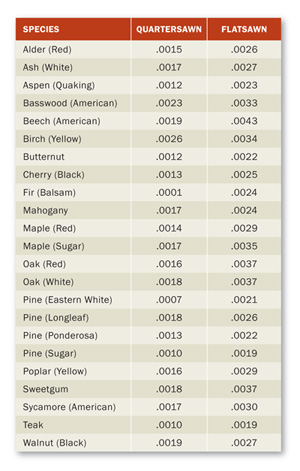 As stated in Chris’ article from 2006: If you’d rather not buy the guide, you can use this chart to obtain the movement value for various species. The formula and abbreviated chart are adapted from the Wood Handbook, published by the U.S. Department of Agriculture, Forest Products Laboratory. For the complete chart listing more than 120 species of wood, go to the Forest Products Laboratory website.
Ready to Work
This autumn I’ll be constructing a rather large white oak built-in at my home. You can be sure I’ll be putting these simple techniques to use as I size door panels and drawer parts. Never again will I invest hours upon hours in a project, only to find it “busted into oblivion” by the time summer arrives!







Comments
FYI if anyone is interested, I made an online calculator that uses the same data from the Forest Products Lab to calculate wood movement. Enter your starting and final moisture level (or approximate based on your city from the Table) and your lumber starting width and press Submit.
http://www.garagewoodworks.com/moisture.php
Thanks, GarageWoodworks!
Ed - No sweat. I hope you and other readers find it useful.
I use it a lot but I approximate starting and final moisture based on my city. I think I need to find a moisture meter too.
Check out the woodshopwidget.com. There is an app for smartphones that provide this information for many species of wood and for different cuts - plain, quarter and riff sawn wood.
I've got to say however, that I do love doing the math. There's something very satisfying about consulting the meter, the tables, and doing the multiplication. I'm really geeking out with this thing.
You like to do the math...
You have an error, although not really a math were, where you write 16% minus 10% equals 10%.
Arrrgh! Darn spell check. Retry:
You like to do the math...
You have an error, although not really a math error, where you write 16% minus 10% equals 10%. One of those 10%'s needs to be 6%, but you know that.
Ed, Nice article, thanks.
Just a comment, I'm puzzled by the apparent melting in the bottom corners of your meter - was that caused by something hot, or a solvent?
It obviously doesn't seem to have affected the accuracy so you got an excellent bargain there.
Regards - John
Sounds like it is time for FWW to do a tool comparison on the accuracy of moisture meters. Is it really more accurate to hammer a probe into the woot than measure at the surface? For a typical project, how much movement variation should I expect because my meter is inaccurate by 1%?
These meters work by measuring the conductance of the wood, which of course varies with the moisture content.
How about developing a method to use a simple multimeter, which you can get for $5 at discount hardware stores ?
Where you write, "IE: [.0037 x 8 x 10] = .296-in". where did the 8 and 10 come from? If 10 is the variance, what about the 8?
Ed:
Good article, however, I do have some questions.
From what 'starting time' are you calculating how much to deduct from your design width to allow for seasonal change? Are you assuming the middle of summer as your starting point? If so, and you calculate 5/16" of an inch to allow for expansion in the middle of winter, does that mean that constructing the piece half way between summer and winter you would only deduct 5/32" because your at a mid-point in the seasonal change? If you get your timing wrong will you end up with too much play or too little?
Will that depend on where you live? For instance, in many areas of North America the summer will be the driest, but in high humidity areas, the summer may be the wettest when it comes to humidity and therefore how much moisture the wood absorbs.
Will the design be affected by where it will end up? For instance, in a forced air heated house, winter humidity may be lower than during the summer when the furnace is shut down and the interior humidity is more akin to the exterior humidity.
This may work, but the result will be aesthetically unacceptable. Just imagine a gap of more than 1/8" top and bottom of the drawer.better to use realistic moisture differences, not worst case.
One way to accomplish this is to control the humidity in the shop at a level approximating the average humidity at the furniture's ultimate location. If it is actually going to be in a very high humidity region that does not mean it will be absent any climate control. So an item slated to go from Connecticut to Louisiana or sub-Saharan Africa will more than likely reside in an air conditioned space. If somebody were to purchase a Hack demilune and keep it at 16% humidity, there will be worse problems than sticky.
Controlling the shop's humidity can be as easy as using a portable humidifier and a hydrometer. You could automate that with a humidistat, or go whole hog and add humidity control to a forced air HVAC system.
Even when automated you still can use your meter to make sure that your lumber has reached equilibrium with the environment.
OK, all these suggestion and calculations are well and good but what if the furniture you are building is for the South West IE, Phoenix, Arizona. Humidity varies from 5% in the dry season and 95+% in the monsoons? Any suggestions for this dilemma?
It may be esthetically unpleasing to see an 1/8" gap in one season but it would be worse to not be able to open the drawers in the other season. Pretending or hoping wood doesn't move as much as it does just results in unhappy customers. Just built some 9" high drawers that have max gaps of close to 5/16" in one season and will be snug but still work in the other season. It really doesn't look offensive and the reasoning makes sense.
Perhaps it is time to update the article on building one's own meter. Should be even easier now than "way back when" the article was first published. I've been thinking of doing it since then but have not. Maybe now is the time - using 2013 technology, not 1990s'?
Moisture meters are great but only accurrate in the 8 to 20% moisture content range. The most accurrate method is drying a small piece in the oven(100 degrees F). Weigh the sample prior to drying. Keep weighting until the weight does not change. This is the point at which no moisture is left in the wood or oven dry. Subtract the differences in original and oven dry weight and divide that amount by the oven dry weight. The result is the moisture content of the original wood.
We all are aware that wood expands and contracts across the width relative to the length. What about the thickness?
Suppose I built a bench top of laminated rift-sawn 2x somethings and put it across a stretcher. I'm now concerned about width vs length movement. Is there any appreciable movement?
In this case, width would be height of the bench, nothing to worry about.
There's some debate here in the comments as to whether or not 16% is really a necessary number for the "worst case scenario. In fact, I had that very same debate with one of my colleagues here at FWW who felt it might be a bit high. For most folks, who don't plan to ship a piece from, say, New England to the tropics--16% probably would be a touch high. At the end of the day, folks will need to select a worst-case number they feel comfertabale with. Myself? I'm thinking of tacking up a few scraps of various wood species to my basement shop's wall. My basement has more moisture than the living spaces above. I'll be measuring that moisture change from month-to-month throughout a 12 month cycle to see what my specific conditions are like here in New England. I must say however that Chris Becksvoort mentioned to me during FWW LIve that he has NEVER had a call-back about an expansion/contraction related problem on any furniture he's ever built. That said, those of you who worry about 1/8-in. gaps - yeah, that's certainly a valid point. Anyhow, I'm glad I decided to veer towards using a touch of science in my woodworking. It just makes sense!
Best,
Ed
Oh, and someone asked about the "schmootz" on the clear plastic window of the meter's needle assembly. It's some sort of glue that was used to, well, glue something to the window at some point--sort of "rubbery" in nature. I've been peeling it off bit-by-bit. Haven't the foggiest idea what the heck that could have been!
E
It is important to keep in mind that the frame surrounding the drawers will also move, and the direction of the grain will obviously impact the relationship between the parts.
I built three inset drawer faces into a bathroom vanity and cut all the pieces from the same piece of wood with all the grain directions lined up between the drawers and frame. Gaps were 1/16", and stayed that way regardless of the humidity changes, and I live in Massachusetts and don't have air conditioning.
In addition to Garage Woodworks, there's also an app for your iPhone/Android called Woodshop Widget and available here: http://woodshopwidget.com/. I think I also downloaded mine from the App Store.
Hi 2Paul:
the question in my mind is: at what time of year did you build the vanity. If the 1/16-in. gap was sufficient, I'd be willing to wager you built it in the summer.
I would be very curious to find out.
Best,
-Ed
This article pretends to take out the "fudge" factor,but it still remains. Wood changes dimension at different rates (relative mc) tangentially (the most), radially (still considerably but less) and longitudinally (almost none) none of which seem to be taken into account here.
My apologies flat or rift take into account radial vs tangential differences.
I am building a bridge 30 feet long how much can the wood - white oak expand I live in the desert and it is dry
the finish will be oil and it will be outside with no shade
thanks for the article
When I was studying at the Rosewood Studio (in Almonte, ON, Canada and more recently moved to Perth, ON, Canada), we had woodworkers from Ontario, but some from Alberta, one from BC, one from South America (Costa Rica perhaps?) and one from Norway. I was just there for a week of hand tool work (couldn't afford the 12 weeks of time and money for the front end and most of the folks who were sticking for that length have to pay for a place to live and eat and so on... so the peeps from a long way along were really dedicated). Anyway, we talked a lot about the basics of wood, moisture, and techniques one must use in joinery and when one is creating slabs from smaller pieces of lumber.
One of the interesting things that came up was that, in the 1970s and early 1980s, a lot of well-to-do (formerly) families in the UK were selling off their manors and fancy antique cabinets, armoires, dressers, hutches, buffets, etc. and that caught the attention of buyers from New England down into New York and they sucked up anything they could buy to sell it into the East Coast of the US.
And what happened? Within a few years, these long lasting marvels that had soldiered on for decades and maybe centuries in a few cases, were rupturing and splitting.
Why? Because Northern parts of North America have a much larger seasonal variation than in England. As a result of this, British designers selling into (or being commissioned by someone in the UK) the British (esp English) market built with techniques sufficient for UK's smaller variance in humidity by season. When they arrived in the East Coast of North America, the variance in some places were more than twice what the English setting would have been. And thus, goodbye lovely old cabinetry.
So there is a lot to know when it comes to know in North America - from the right sorts of joinery (some joinery suffers worse from tightness in high variability areas than other) and you need to know the woods you are working with - Pine could be easily twice the variance than some hardwoods for example. But that's not all. Varnish (a sealer) tended to reduce the effects of seasonal variation by up to 50%. And then there is the reality that if you are in a dry area, something like a wood rub aimed at helping the wood hold more humidity are worth considering (regularly).
A place that has a higher seasonal variation will have designs which should still work when you go to an area with a lesser seasonal variation. But it isn't just your latitude or longitude. The particulars of the areas vegetation and the availability of water and the temperatures throughout the year and even where you sit on the continent - near the coast or in a dry area. So it isn't just a triviality.
For the fellow in AZ that goes from 5% to 95%... I'm gonna go with "built with metal and glass or some form of laminate". That's a huge range of variance. (Even some stone might not like huge differences in humidity or more pertinently perhaps the temperature variances in those cases).
I had the right idea when I started working on my very ignorant attempt to build a table. I did use Z-clips and they worked (but I needed to learn a lot more about making legs and ways to let them be adjustable as floors often aren't).
Good topic!
Log in or create an account to post a comment.
Sign up Log in