Get More from Your Miter Saw
Use it to break down rough stock, but get furniture-quality cuts, too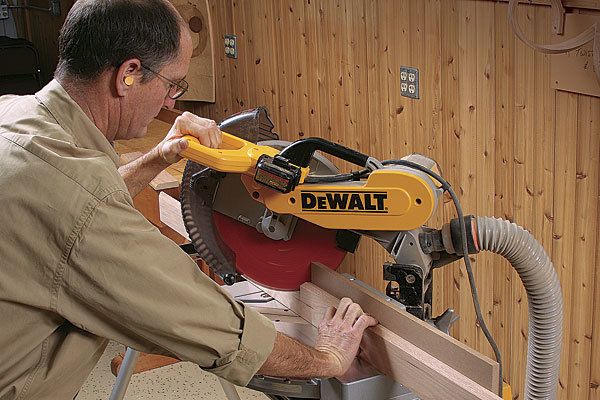
Synopsis: The relatively lightweight and portable miter saw is a valuable woodworking tool. It’s great for crosscutting and mitering, and it’s also the quickest way to cut rough lumber to size. But most people have not been trained in the proper way to get furniture-quality cuts safely on this machine. Woodworking teacher Marc Adams advises sticking with a basic chopsaw and not bother with sliding versions. Do, however, invest in a 12-in. model and a good blade. Add a zero-clearance throat plate and a sacrificial fence, and you will eliminate chipout and make the saw safer. Add a simple stop block and follow Adams’s tips for using the tool, and you will be rewarded with clean and accurate cuts every time.
Because miter saws were not around when many of us took a high school shop class (remember the radial-arm saw?), the majority of us were never taught how to use them. The hosts of those television DIY shows are no help.
Although relatively lightweight and portable, the “chopsaw” deserves as much respect as any machine in the shop. It certainly carries as much potential danger. On the other hand, it is capable of more than you might know.
With a few tips and upgrades, you’ll be able to do almost all of your crosscutting and mitering on the miter saw, like I do, getting furniture-quality cuts in half the time it takes to drag out your crosscut sled. Of course, the miter saw is also the quickest way to rough-cut lumber to size, and I have tips for that, too.
My tips and techniques are based on the type of saw that I favor, the simple chopsaw (see “Basic chopsaw is better for woodworking”), but many will work for sliding miter saws, too.
A few key upgrades
The first step is to replace the blade that came with your saw. It will struggle through big hardwood lumber, and it won’t have enough teeth for the finest cuts. You don’t have to buy the most expensive one, but do get a good blade designed for a miter saw.
With any crosscutting tool, you have to deal with tearout. One of the best ways to enhance your miter saw is to add a zero-clearance throat plate and a sacrificial fence. These simple upgrades do three great things: They eliminate chipout at the bottom and back edges of the cut; they show you exactly where the blade will cut, at any angle, making it easy to line up a mark accurately; and they make the saw safer, preventing small offcuts from getting trapped against the blade and kicking back at you.
For the full article, download the PDF below:
Fine Woodworking Recommended Products

Festool DF 500 Q-Set Domino Joiner

Stanley Powerlock 16-ft. tape measure
Makita SP6000J1 Track Saw





Comments
Wow - an outstanding article. I have used chopsaws for years and never thought to add a back fence to make it easier to add stops. I feel such a dummy now...
I would add that the DeWalt DWS780 sliding mitre saw does not seem to suffer from any of the flaws mentioned - it is a truly amazing tool that will cut very precise angles accurately. Even bevel cuts are rock solid.
It can also handle very large pieces of timber safely.
Log in or create an account to post a comment.
Sign up Log in