The Incredible L-Fence
Take your tablesaw to another level with this simple shopmade fence.

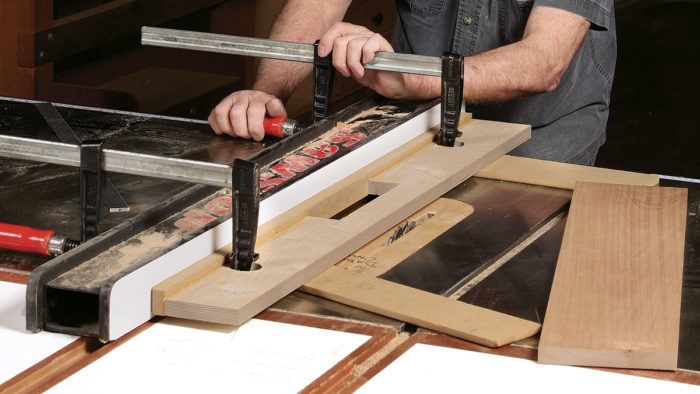
Synopsis: This is one tablesaw add-on that you won’t want to live without. The L-fence makes quick work of rabbets, tenons, and straight flush-cuts. It helps you to cut accurate miters, make precise cuts on awkward parts, and add versatility to your saw. In its simplest form, the L-fence is two boards fastened along their edges at a right angle. One side is clamped flat to the rip fence; the other side extends horizontally for a workpiece or template to ride against. But because this fence is raised slightly above the table, it doesn’t get damaged like a sacrificial fence would.
Adding jigs and auxiliary fences is a common way to increase your tablesaw’s capabilities. But the most clever tablesaw add-on might be one you’ve never heard of. The “L-fence” makes rabbets, tenons, and straight flush-cuts a breeze, and it will change the way you think about miters. Once you grasp the basics, the L-fence will become an indispensable fixture in your shop.
Check out Bob’s new and improved L-fence here!
In its simplest form, the L-fence is two boards fastened along their edges at a right angle. One side is clamped flat to the rip fence; the other side extends horizontally for a workpiece or template to ride against. It’s not hard to build (see opposite page) but once you do, it will make your tablesaw much more versatile.
Easier rabbets and tenons
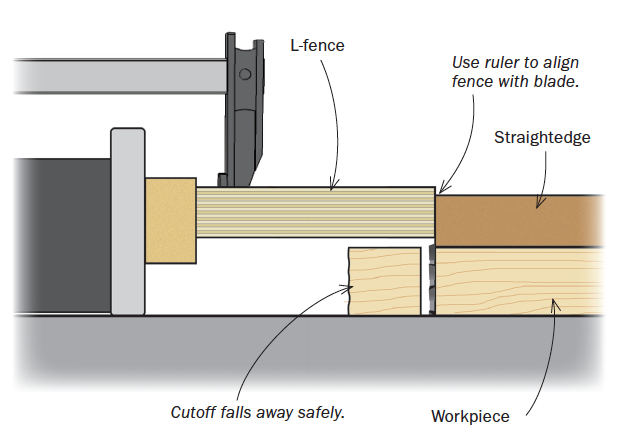
The L-fence excels at partial cuts into workpieces. As opposed to a sacrificial rip fence, an L-fence remains undamaged, and allows the offcuts to drop away harmlessly. To cut a rabbet, raise the dado blades up to the depth of the rabbet and clamp the L-fence to the rip fence, positioning it 1⁄16 in. above the blade, parallel to the table. As with a sacrificial fence, the width of the exposed blades equals the width of the rabbet. But unlike a sacrificial fence, the L-fence doesn’t need to be replaced.
You can make shoulder cuts on tenons the same way. Use the L-fence with a miter gauge (or push blocks, for wider tenons) to cut the shoulders, and the freed cutoff will fall away safely.
Add a straight edge to a waney board
Putting the first straight edge on rough lumber is usually a two-step process: Bandsaw close to a line, then run that edge over the jointer to clean up the cut. With the L-fence, you can do both steps at once. Lay out your cut line on the workpiece, then fasten a straight piece of wood on the line. Set the L-fence just above the blade, where it will make solid contact with the straightedge. To cut flush to the straightedge, set the L-fence’s bearing edge in line with the blade’s teeth. Keep the straightedge tight to the L-fence as you make the cut.

Put a straight edge The L-fence makes it easy to establish a straight reference edge at the tablesaw, safely, in one step. |
|
|
|
|
 |
|
|
Replicate any straight-sided pattern
Routers are great for pattern-cutting and trimming flush to a template, but for a pattern with straight sides, using the L-fence is often faster and more accurate. In fact, it’s often the best tool for making the template in the first place.
Once you’ve laid out your pattern on the template stock, use a straightedge as described above, but this time reposition the straightedge multiple times for multiple cuts, until the shape is complete. Now that you have your template, you can use the L-fence—again, set up for flush-cutting—to duplicate any straight-sided part. Trace the template on the workpiece, then use a bandsaw or jigsaw to trim the waste to within 1⁄4 in. of the line. No need to be fussy, but keep in mind that the waste side of the cut can’t be wider than the L-fence itself or the rip fence will be in the way. Big offcuts take up more space between the blade and the rip fence and need to be cleared out more often to eliminate the risk of kickback. You can use double-sided tape to attach the template, but I use screws when possible, placing them in areas that will be cut away later—like the through-mortises for the Arts and Crafts bookshelf below.
|
With the L-fence, you can use templates to reproduce any straight-sided shape. The sides of this bookcase are trapezoidal. Without parallel edges or square corners, you’d probably cut the rough shape at the bandsaw and then clean up the edges. But with the L-fence, you can cut both workpieces accurately in a fraction of the time. |
||
|
|
||
|
|
||
|
|
||

Make precise cuts on awkward parts |
||
|
|
||
|
A foolproof approach to case miters
The setup for case miters is really just another kind of flush cut. Provided you used care setting up, the L-fence will help you produce accurate miters that come together effortlessly.
Cutting case miters exactly to a final dimension can be tricky, but when using the L-fence you start by cutting the parts square, then add the miter in a second step.
Once you have the fence set up as shown on the opposite page, and you’ve cut the sides to final size, you attach straightedges flush to the edges. I cut the opposite side of my straightedges at 45° so they’ll work as clamping cauls during assembly. With the fence and blade set up as shown, run the case sides so the straightedges bear against the L-fence.

Perfect miters on big cases An L-fence takes the headaches out of case miters by allowing you to make cuts without trapping the case sides between the blade and the rip fence—eliminating the burning and scarring that can interfere with a clean, tight fit. |
||
|
||
|
|
||
|
|
||
|
|
Identical box miters made easy
For a quick and easy way to cut identical box sides, start with the same L-fence setup. Rough-cut the box sides close to the approximate final length, and use a miter gauge to miter one end. Cut gauge blocks to the finished length of the pieces you need. Tack a lip to one end of each block to create a hook. This will grab the knife edge of the first miter on each workpiece, and the block will bear against the L-fence as you make the cut on the other end.
The sides will be cut to the exact length of the block. Repeat the process with the other block, and your boxes will come together perfectly.
|
Using the same L-fence mitering setup and a simple “gauge hook” as a template, you can make endless identical box sides.
|
|
|
|
Gauge hook ensures perfect box sides |
|
|
To view the entire article, please click the View PDF button below:
Fine Woodworking Recommended Products

Grizzly G0495X Industrial Helical Cutterhead 8-in. Jointer

Rikon 10-3061 10-in. Deluxe Bandsaw
The saw has two speeds: 3,280 sfpm (surface feet per minute) for wood and 1,515 sfpm for soft metals and some plastics.

Veritas Micro-Adjust Wheel Marking Gauge


Comments
Fantastic. This solves so many problems. Thanks
I'm not sure I'd trust the carpet tape when gluing the corners
How great! I love it. Thank you for sharing.
Looks helpful. I'll be making one soon.
Thanks to STL 191 or I would have never guessed on this. Keep keeping it real.
Sometimes you read an FW article and it doesn't sink in. Now 5 years later, Bob's design is as Einstein was quoted as saying "don't make it simpler, make it simple." This is a wonderful simple jig that replaces a whole bunch of specific one function jigs that were taking up too much space in my crowed basement workshop! Thank you so much.
Some of my projects require odd-shaped blanks like his trapezoidal piece. I am making this fence to eliminate the use of my bandsaw followed by cleaning up the minor wavy cuts!
Thanks!
I just made this in about 30 minutes this morning after hearing about "The L Fence" all the time. I used it all day. This simple jig is a game changer for sure. I just kept thinking about how genius it is in all of its simplistic glory. Thank you!
some safety advice: be very careful to not restrict the outfeed by doing a proper level setup of your fence height. ensure your cutoffs don't get pinched by a bad fence setup. Also make sure your clamps don't stick out below the fence.
I made these two mistakes on my first day with my new L-fence, and took a nasty kickback in the hand. Luckily the cuts were minor.
Log in or create an account to post a comment.
Sign up Log in