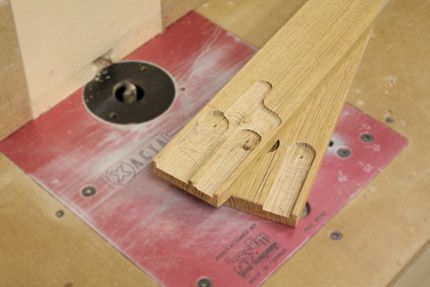
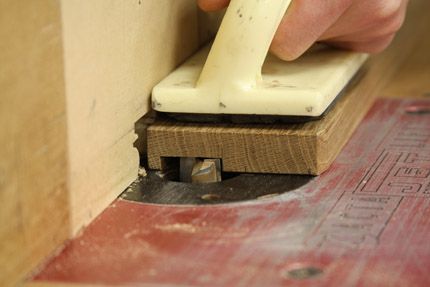
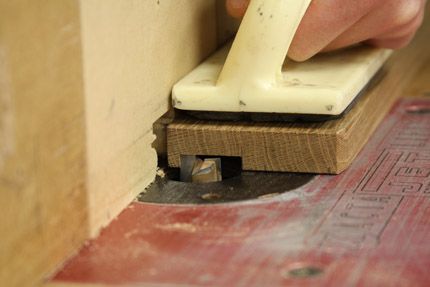
1) Ouch! While making these stopped grooves on some oak workpieces recently, I found myself staring straight down the barrel of a nasty climb cut. Read on to find out what went wrong.
Here’s proof that no matter how many times you’ve done something, mistakes still happen in the workshop.
Recently I found myself reproducing a couple of replacement parts for a friend’s loom. The pieces required a 1-in. wide stopped groovet to be cut in the ends of each of two oak workpieces. OK, no problem. I began by defining the end of the grooves with a 1-in. wide Forstner bit at the drill press and then headed to the router table where I planned on taking out the rest of the waste with two passes of a 1/2-in. wide straight cutting bit.
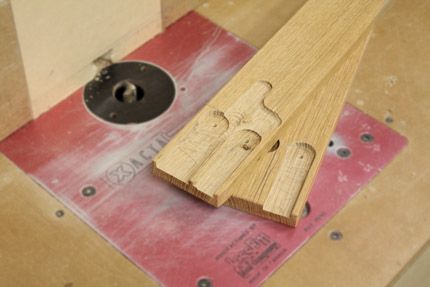
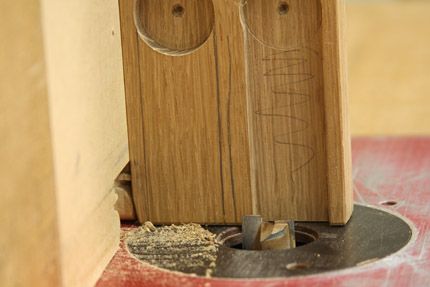
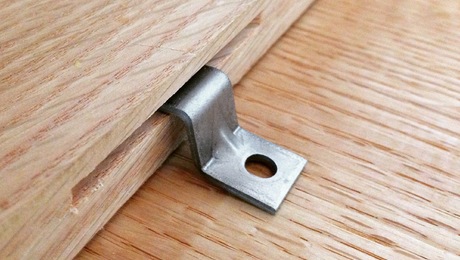
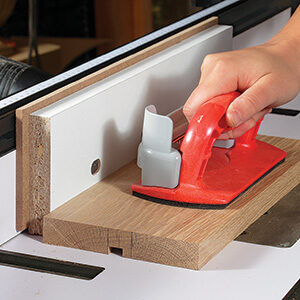
Cut to the router table: I’ve got the bit in place, the fence is set for my first cut, and I’m feeding from right to left so no climb cut issues, right? Wrong! I forgot to remember that I wasn’t making a simple profiled cut along an edge. Rather, I was making a buried cut in two passes. As I went in for the second pass, things went awry and the workpiece nearly got away from me. Check out the zig-zaggy trail it left in my workpiece (photos above). Luckily, I use push pads at the router table to keep my hands out of the danger zone.
What Went Wrong?
I believe I made my first pass through the wood on the side of the groove that was “away” from the fence. Then–and here’s the boneheaded move–I made my second pass (right next to the first) on the side of the groove “closest” to the fence, using the portion of the bit that was spinning away from me, which produced a climb cut.
How Could it Have Been Avoided?
The first of the two passes should have been made on the side of the groove that was closest to the fence, with the second pass coming along the side of the groove further from the fence. In addition, A featherboard would have been a smart addition to this set-up.
When using a router table, a lot of folks are conditioned to think that when moving from right to left, climb cuts are avoided, but this is really only true when your making cuts along the outer edge of a workpiece. This was an exceptional situation which required additional thought–which it didn’t get. Food for thought. Hopefully, this little blog will save someone else from a ruined workpiece–or worse–a chewed up finger.
Happy routing!




Comments
I think you've got a double whammy. Not only are you climb cutting, but you've got the workpiece trapped between the bit and fence while climb cutting. This means there's no way for the piece to "bounce off" the bit. I've done this, usually at the end of long day, and it's really scary. I can still count to 10 however.
Its a more common error than you might think when using the router table to make a groove (or a slot - say for a router template guide) wider than the bit being used.
Simply stated - you MUST cut the first pass closest to the fence, then move the fence back for the second cut. Always. And to avoid a climb cut, in both cases, move the workpiece in the 'usual' manner - to the left, so the spinning bit cuts into the workpiece.
Doing it the other way results in the workpiece essentially being trapped between the bit and the Fence - a big NONO. You have created a 'baseball throwing machine' - and the piece will violently move to the left - potentially taking your fingers/hand with it.
Easy way to remember on the second cut - the bit is cutting 'closest to you' standing in front. Or think of it as if there were an 'invisible fence' sitting thru or behind the bit - which essentially there is (being provided further back by the workpiece riding against the 'real' fence.).
This is worth a Video Tips episode. Good example - using a 1/2" bit to make a 3/4" slot in 1/2' MDF for a 3/4" router guide bushing template.
I have done this very thing, and have the holes in my wall insulation to prove it!
This is an easy mistake to make, in part because it is so hard to describe the critical elements concisely. The author does a great job in the long description.
Then in his summary paragraph, he says, "When using a router table, a lot of folks are conditioned to think that when moving from right to left, climb cuts are avoided, but this is really only true when your making cuts along the outer edge of a workpiece."
"Outer edge" could be taken to mean the edge farthest from the fence. This may be a process that can't be summarized unambiguously. It might also be worth remembering the case of adding a rabbet to a glued up picture frame. The usual rabbet will be on the inside edge of the frame, which is likely to dictate moving the workpiece past the bit in the opposite direction. It's easy to get the mind thinking backwards on these things.
I think I'm going to paint direction-of-bit-rotation circular arrows around the hole in my table inserts. That should help me visualize what is going on before I start cutting. If you are not moving the edge of the piece you are routing against the arrow heads, you are going for a ride. Yes, you can just look at the bit before turning the router on, but once its spinning, it is just a directionless blur.
I find the most confidence and precision comes from using hold-down block guides or finger boards; one pressing the work laterally against the fence and another holding the work down against the table. Finger boards work best I feel as they also provide a measure of anti-kickback security. Either way, the work can be held and advanced confidently and any cut machined accurately and repeatably.
In this case, you moved the fence closer to the bit for the second pass. If you have to move the fence for multiple passes, never move the fence closer to the bit.
The same exact thing happened to me. I was kicking myself for not catching my mistake. Unfortunately, my situation involved a trip to the ER. Although I have a permantly disfigured finger tip, I still keep my mistake piece of wood nearby to remind me.
Good article and comments.
Another way to do what several have mentioned, move the fence away from the bit for the second cut, would be to set the fence for the second cut but use a spacer the correct thickness for the first cut, then remove the spacer for the second cut.
I second the motion for a Video Tips episode.
Ed, thanks for reminding all of us of this serious mistake. I don't use my INCRA table often enough to stay in practice but I'm about to undertake a project that will require its use.
This is one of those things that most all of use know, BUT, it's way too easy to forget it like you did.
Wade
hold downs, hold ins, push blocks and any other device would not prevent what happened here. Thankfully no one was hurt. Many years ago, with the listed devices being used, along with making the same mistake, I lost the best router I ever owned-( an old Craftsman with the rack and pinion adjustment-) a piece of waste got jammed between the stock and the bit. Before I could pull the plug, I smoked the router....... Climb cutting has a place, but, never with the stock between the bit and the fence
Lutro: Indeed, this is SUCH an easy mistake to make!!
CAHudson: Yes, I think some sort of video might be in order in the near future, again, simply because it's so easy to loose sight of the cutting mechanics in this situation. It's one of those things that, after you do it, you stand there for a moment and then shout to yourself: "DUH!"
Cheers all,
-Ed
Thanks Ed. This is timely advice, as I am just about to do a similar operation cutting grooves into frame-and-panel legs (to accept the panels). I'm using 1/4" plywood in the panels, so a 1/4" bit would make for a real sloppy fit. So, I was going to sneak up on the fit using an 1/8" bit in a few passes. While I likely would have started with the "close fence cut" first and moved the fence further away for subsequent cuts, it would have never occurred to me that doing it the other way would pose a problem. Now that I see it, it makes perfect sense. Thanks for posting stuff like this. While it's nice to watch how-to videos where operations are perfectly executed all the time, it's also very valuable (especially for us beginners) to see how potentially dangerous and costly mistakes can easily happen. So, keep them forehead-slappers comin'! Thanks again.
Thanks for the great tip Ed. I am a novice woodworker and this is something that could very easily have happened to me. I just have not had that much opportunity to use my router table. Hopefully your experience will help me (as well as others) to avoid making a costly and serious mistake!
Ed, since you started at the drill press anyway, why not hog out the waste with the Forstner bit all the way down the groove and then clean it up with a chisel and, if necessary, a router plane? That way you'd avoid the router table altogether.
I would suggest that "rules" like: "When making a groove wider than the bit, always start with the fence closer to the bit and then move it away for the second pass" is the WRONG way to think about these things. There are situation where this is the WRONG thing to do. Consider making a plunge cut moving the workpiece in the opposite direction to what seems to be the typical way in this thread. In that case the rule above is backward, and you will end up with a climb cut if you follow it (granted it would be a climb cut trapped to the fence, but an unexpected climb is not good in any case). I have always been trained, and pass it along the same way, that it is FAR better to understand the mechanics of what is going on, and think it through. It is not that hard to see it is a climb cut. If you think through what you are doing, and don't recognize it, maybe you should consider a different a/vocation. The important thing to do is too think through EVERY operation before putting wood to high speed bit. I am not saying the author should not be woodworking. What I heard him say is "tho is what I did, and this is what happened." I did not read that he thought it through ahead of time, bit direction, what part of wood would be engaged with bit, and went ahead anyway. It is not said, and therefore I am making the huge mistake of assuming, that he did not do that analysis, and had a bad outcome. To me the lesson should: be sure you have analyzed the operation carefully before proceeding. Pros that do this work day in and day out can do it in their heads in seconds. Hobbyists need to take a few minutes (or more), but careful analysis is the solution, not a simple rule.
Router tables have a fundamental safety flaw. The cutter and the surfaces being cut are concealed by the workpiece because the router is mounted on the table underneath the workpiece. This makes inadvertent climb cuts likely as this article points out. The solution is to mount the router above the workpiece. Doing so would expose both the cutter and the surface being cut making climb cuts more readily observable and avoidable.
Opinions on whether the exposed cutter presents a greater safety hazard may differ. However, such an arrangement is used in milling machines. While I do not have data on cutter injuries, my intuition is that the cutter contact human injury accident rate on router tables is much higher than on milling machines. If my intuition is correct, other factors may complicate comparison including operator training, workpiece motion and workpiece holding.
Overhead router together with feather board, push stick(s),and maybe a stop block.Nice thing about overhead router is that you can see what you are doing. It is generally an industrial machine so that is why it is not generally used in small shops. Or hand tools. If you have only a couple of joints to do it is sometimes quicker to do it by hand.
Log in or create an account to post a comment.
Sign up Log in