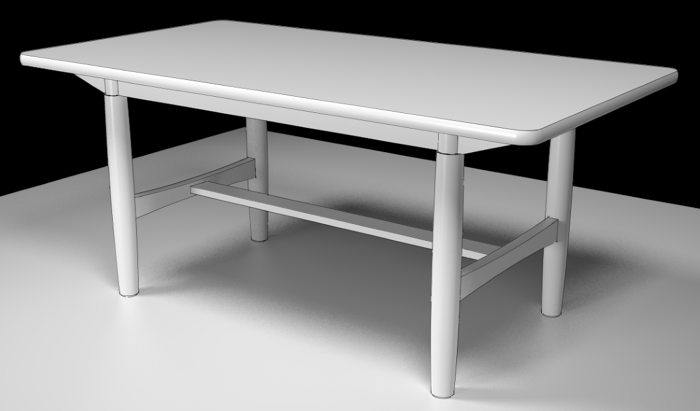
Generally, when I create SketchUp models of furniture, I like to get the bulk of the modeling completed and then go back and add joinery. As I’ve demonstrated in many of my blog posts, I make the drawing process more efficient, by drawing parts in situ so I can use parts I’ve already drawn as references for the next parts I need to draw. I use this same idea for the joinery using one half of the joint to guide me in making the other half. As an example, when I need to cut a mortise in square leg to receive the tenon on an apron or stretcher, I trace the base of the tenon on the leg and use Push/Pull to push in the mortise. That’s very fast and accurate and requires no layout for the mortise.
When the geometry gets more complicated a simple Push/Pull operation may not be an option. In those situations we need to find other methods to get the work done. The round and slightly bulged legs of Mario Rodriguez’s Scandinavian Kitchen Table is a case in point. The shoulders of the stretchers land on flats cut into the legs and then there’s a mortise for the tenon. Once the flat is cut the mortise could be made with Push/Pull but it’s easy enough to make the flat and mortise in one process.
If you are using the pro version of SketchUp you could use the Trim tool from the Solid Tools set. This would allow you to use the stretcher to cut the flat and mortise. I’m not all that fond of the Solid Tools, though. Currently the tools convert modified components into groups. On this table the legs are instances of the same component. Using the Trim tool would get me a mortise in one leg but the other three would still need to be dealt with. That’s not any better than making them out of real wood in the shop! 🙂
There is an alternative for those of us using the pro version, though. Jim Foltz wrote a plugin some time back called Trim and Keep. It utilizes the Trim tool from the Solid Tools set but it keeps the modified component as a component and as such, all other instances get modified, too. Note: this is a pro-only plugin because it requires the Trim function of the Solid Tools which isn’t available in the free version.
For those of you using the free version, you can, of course, still draw the joinery but you’ll use Intersect Faces. The process I show in the video utilizes copying the involved geometry from the stretcher and using Edit>Paste in place to paste it into the leg component. Then Intersect Faces followed by a little clean up. You might run into some tutorials on Intersect Faces that would suggest you could just use that tool to intersect the stretcher with the leg. And you could, too, but you wouldn’t get the faces or any of the edges that fall inside the leg. You really need to have the faces and edges pasted into the component or you’ll still be constructing a lot of the joint by hand.
So here’s a video that shows using Trim and Keep as well as doing it the manual way.
–Dave


Comments
Hi Dave,
Thanks for the blog on mortises in round legs. I tried to install the trim and keep plugin in to Sketchup pro 2014 and was unable to find it in tools menu. I seem to have problems with 2014 plugins. Can you help?
Thank you for all the great articles you write.
John Hansey
John, I expect I can help you with getting the plugin installed. Drop me an e-mail by clicking on my name at the end of the blog post. Tell me what operating system you have while you're at it.
When you say Tiny Faces, don't you really mean "Small Faces"?
TKWW2 wrote: "When you say Tiny Faces, don't you really mean "Small Faces"?"
Perhaps if it were a "Lazy Sunday". ;)
Log in or create an account to post a comment.
Sign up Log in