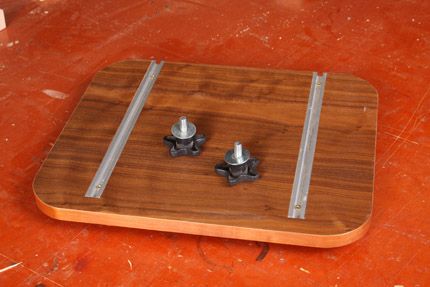
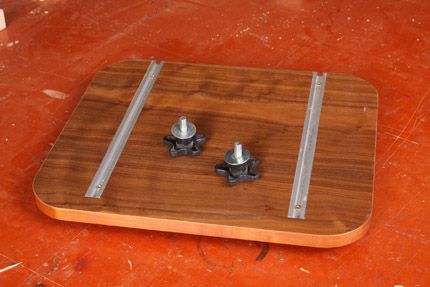
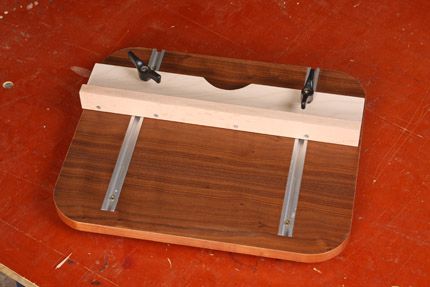
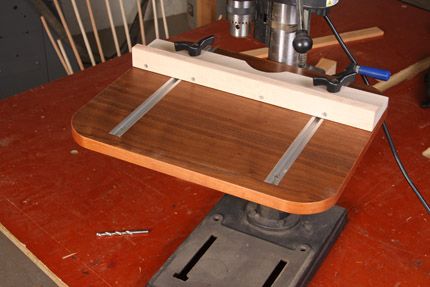
T-Track is used for maneuvering of the fence assembly. Two star knobs are used to secure the plywood table to the drill press' steel table from down below.
When I first began my journey into working, it took me a while before I realized that the stock metal tables that come standard with just about any drill press aren’t adequate. That’s why most folks build their own auxiliary tables and attach them to the stock tables. This allows a woodworker to add hold-downs, fences, stop blocks-basically just a wide variety of accessories.
After having recently acquired a new (used) drill press from a friend (thanks Matt Kenney), I went to work building a simple table for more accurate drilling. With any luck, these humble ramblings will help those of you on the start of your woodworking journey.
Keep in mind that I’m not a fan of removable inserts through which the drill bit passes after it exits the workpiece. Too often, the thickness of plywood varies from sheet to sheet–and that can lead to an insert that doesn’t quite come up flush with the work surface–and that leads to blowout. Instead, I prefer laying a scrap sheet of hardboard down on the table to absorb the bit–and prevent blowout–as it passes through the workpiece you happen to be drilling.
Elements of a Basic Drill Press Table
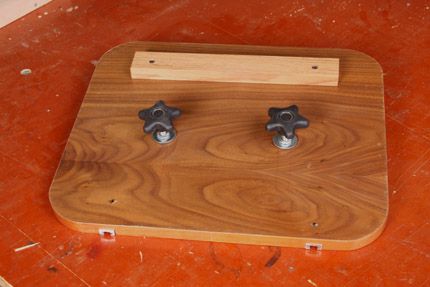
Build a Better Base-The metal table that came with my drill press measures in at a puny 8-3/4-in. x 8-3/4-in. That’s just not enough room to handle most furniture components easily. I sourced a larger 16-1/2-in. x 14-in. scrap of 3/4-in. plywood to serve as my new base, giving me lots more real estate to set workpieces on. A couple of star knobs and washers secure the plywood to the metal table from below. I cut two small square mortises in the base and used two-part epoxy to glue in some nuts. You could also use threaded sleeves for this (a better solution) but these simple nuts were all I had on-hand. The plywood was radiused at each corner to keep me from getting jabbed by sharp edges. A bit of iron-on edging was applied for no other reason than to make it look spiffy.
T-Track Comes Next-Next, I cut two dadoes into the plywood’s top, and screwed in some lengths of T-Track to house a fence (that comes next). Truth-be-told, this step really isn’t totally necessary. A straight, square piece of stock clamped to the plywood top would serve just as well for a fence. The T-Track, coupled with two knobs, just makes fence adjustments a bit easier.
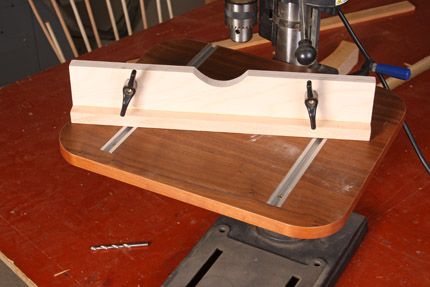
No-Frills Fence-My fence was made by gluing and screwing a piece of quartersawn oak to the edge of some 1/2-in. plywood. I chose a quartersawn scrap for its ability to resist movement, since a dead square fence is always the goal. Two holes drilled into the plywood portion allow the T-Track nuts to pass through, and two knobs make adjustments a cinch. I also chose to cut a half-circle in the fence’s back edge. This allows me to get the fence further away (nestled against the drill press’ post) from the bit. In the rare cases where I need to push the fence even closer to the post, I can always detach the fence and clamp on a scrap block for a fence-the old-fashioned way.
The last step in the process was to add a few coats of polyurethane-again, not necessary but hey, it looks nice!
What About Inserts?
Sharp-eyed readers will notice I didn’t add removable plywood inserts for directly beneath the drill bit’s path of travel. I tend to juse slap a piece of scrap 1/4-in. plywood on my table to prevent blowout on the underside of holes. I’ve always found that due to the fact that the specific thickness of sheet goods varies ever so slightly from sheet to sheet, that removable inserts either end up causing my workpiece to rock (too thick) or not provide enough blowout protection (too thin).
Got a Cool Drill Press Table?
If you’ve built a clever table for your drill press, we’d love to see it. Post your shopmade tables in our Jigs Gallery and tag them with the phrase “drill press table.”



Comments
Nice table. I've been meaning to build something like this and it seems easy and useful. I think I'll drop t-nuts into Forstner bit holes in the top to give it a bit more strength. I build things to last. But otherwise it looks fine.
Maybe someone would be interested to learn about my drill press setup. About 20 years ago I acquired a heavy duty bench drill press. Not the lightweight crap you usually see, but heavily built and with a 3/4 hp motor. I had no available bench space at the time and needed mobility, anyway, so I built what turned out to be the most useful drilling station I've ever worked at. Here's how:
I bought one of those bright red tool chests with wheels on the bottom. Decent quality - not a cheap crappy one or a Mercedes. It should have good a good loaded weight rating. I also bought the extra drawer set that attaches onto the side, though it isn't absolutely necessary. And I put wheels below this part, too. If you do get the side drawers, drill extra holes and attach with extra bolts. They are not adequate as sold.
I wanted to lay a sheet of plywood across the top, but those tool chests have a lip around the sides and back. So I marked and cut a piece of 3/4" plywood to fit tightly inside of the lip. Use a jigsaw and make it fit well so any weight is spread all the way to the edge to prevent sagging. Then I cut a 3/4" plywood top to cover the whole unit. I drilled a bunch of holes in the metal top of the chest and screwed the first layer of plywood from the bottom with 3/4" round head screws and washers. Then I glued and screwed the top piece down to the lower sheets, making a very strong top.
I attached a "backsplash" at the rear to keep things from falling off into the void and put some edging on the plywood. Use decent edging, not iron on stuff. It's not to protect you, it's to keep the plywood from splintering off. I usually get that 1/4 x 3/4 inch oak screen molding for things like this; glue with type II, drill pilot holes and put in some screws. #6 round head is fine unless you want to get fancy.
The base of most drill presses - bench or floor ones - comes with holes to bolt it down. So do it. Bolt your drill press to the bench top, using large 3/4" plywood disks or fender washers below. There is usually plenty of space for this above the top drawer, but do make sure the drawer will still open. Don't scrimp on this. Make them good, strong bolts with proper washers and use those nuts with the plastic inserts so they don't come loose. Do it right once and it will last you for at least 21 years, as I can testify to.
Now fill those drawers with all of your drill bits and other drilling accessories. Put lots of metal in there. The mass will make this a rock solid base for the drill press. This is why you don't want a cheap chest for your base! I have my general purpose and carbide bits in the top drawer, my nicer Forstner, brad point, and high quality bit sets in the next drawer, all of my hand drills in the third drawer, and Dremel tools and drill table accessories in the large bottom drawer. My little side drawer setup has thin drawers where I put all of my wood carving chisels and such and more drill press accessories.
Because my table is so long (about 5' or so) I mounted my drill press at one end and a bench shear at the other end. (I cut a lot of 1/8" rod.) This leaves a nice large work space in the center. I also used 5/4 stock for the backsplash and mounted a WIremold metal power strip along the top of it. This makes it very easy to plug in the drill press or any other tools I wish to use.
A bit about stability. Look at the size of the base. And the weight when loaded. This is a much more stable setup than a normal drill press. It is great for long and/or awkward pieces. I frequently cut so many pieces of rod at a time with my shear that I have to hang quite a bit of my 200 pounds on the shear handle. And the bench does not tip. But there is some play in the wheels that come with these chests, so it can wiggle and jiggle a little bit. In my new shop I no longer need mobility so I have thought about making a wood base to get the bench up off of its wheels, making it even more stable.
Sorry, no pictures. Hope someone finds this helpful. It's a bit of work and expense, but some of the best money I've spent in my shop. Sometimes it's the mundane things that make life so much easier.
I really like that you used an exquisite piece of beautiful and rare Koa wood from the Wanna Huka Lugee Valley.
It's OK, he used a fancy word to go with it. Most people dig a piece of scrap out of the bin or stack. But he "sourced" the koa. :-)
Nice Ed!
Simple and straight forward auxiliary drill press table, you have inspired me to finally build mine.
Thanks for sharing.
By the way – that last podcast may go down as the funniest one of all times, everyone was on their A-Game that day.
A.J.
About the insert thickness issue, I solved this by using a thinner insert resting on a small edge similar to a router table and hot melt glue. Yes hot melt glue is the magic trick. 4 dots of glue take up the gap and set the height dead on. I just push the insert flush to top as it is drying with a straight edge. A little wax on the shelf ensures the glue dots only stick to the insert. I do this on the table saw inserts as well.
Several years ago I made an upgrade for my radial drill press. I used a piece of 3/4" mdf that I countersunk 4 holes for 1/4" bolts to mount it to the small table on the press. For a fence I used a 3" front edge of a scrap plywood shelf that already had a hardwood edge glued to it. A 5/16" hole in the right end of the fence and several more on the right side of the mdf base for a 1/4" bolt and wing nut, then grabbed my original 3" C-clamp that I have used for over 60 years and I was in business.
For the most part, an articulating fence is plenty adequate to make repetitive holes and to keep small parts from spinning.
Probably took less time than cleaning the varnish out of the brush, but does not look as good.
Periodically I get some body filler and fill the holes in the press and the kerf in the radial saw table.
Log in or create an account to post a comment.
Sign up Log in