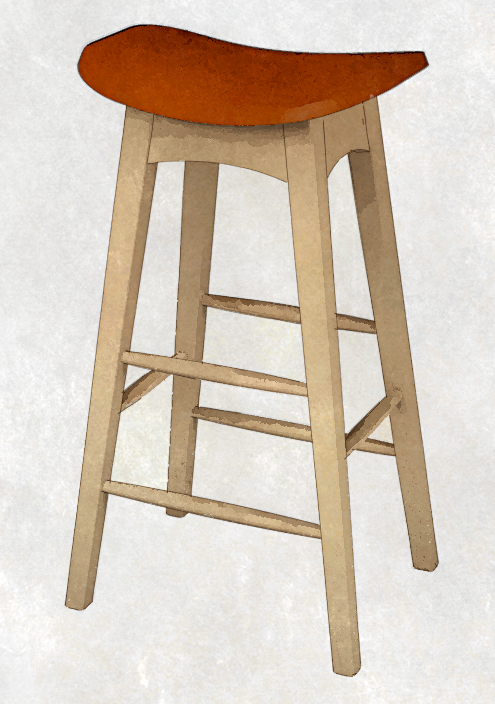
Stools commonly have legs that are splayed in both directions: raked and splayed. Drawing legs at these compound angles in SketchUp can be a bit challenging but there’s a plugin called, of all things, Rake and Splay be Steve Baumgartner that does all the heavy lifting for you. Here’s a video showing how I use it. I’m using the legs from Christian Becksvoort’s Sturdy Stool for this example.
I left out what would normally be the next step after getting the legs into place and cleaning up the model. That is adjusting the component axes to align with the legs correctly so the bounding box fits tightly and represents the size of the blank from which you’d cut the legs.
–Dave


Comments
Dave
That is a very cool plugin. I'm sure it will come in handy.
On another matter totally off subject, I just don't know where else to ask it.
When using Cutlist you can produce a great cutting layout diagram, however if I want to add the picture to my Sketchup drawing I can't seem to accomplish that. Is it possible or do I have to redraw the diagram on my own. I can print it no problem but I can't seem to work with it in the SU drawing itself. Any help would be appreciated.
Is there somewhere else I should be contacting you rather that through this comment section?
Bruce
Hi Bruce,
You could e-mail me directly but this works, too.
In the first window for the CutList plugin there is a box labeled SVG. If you tick it, the layout diagrams are exported as Scalable Vector Graphics (SVG) files. These can be opened in a program like Inkscape or Photoshop from which you can export a JPG or PNG image file.
After you have the JPGs or PNGs created, those can be imported into SketchUp as images. Keep in mind that they are images so the Dimension tool won't be useful for adding dimensions.
An alternative would be to use the layout images as reference for placing copies of the components in SketchUp. Doing that would also show details like notches and curves. This would give you more details in the resulting views.
-Dave
Wow that was quick. I will give that a try, thank you very much. I knew you would have the answer.
Bruce
Dave
You mentioned you use a Shortcut for the flip along process I think this would be very useful to have but I cant find it in the shortcuts menu
Thanks
@teamman, in order to set shortcuts for Context menu items, you need to have something selected in the model space on which that menu item could act. So to create shortcuts for Flip Along>Component's [axis color], you need to select a component first.
If you select loose, ungrouped/componentized geometry or more than one component, the options will be Flip Along>Red Direction, Green Direction, etc.
I use F2, F3, and F4 for Flip Along>Component's Red, Green, and Blue respectively. I use Shit+F2, Shift+F3, and Shift+F4. for Flip Along>[Axis color] Direction. Since I don't use groups, I've never seen a need to set shortcuts for flipping them.
Dave
Good lesson. Cool plug-in! Solves a serious hassle. Thanks.
In looking at the drawing of the stool, what may be a stupid question occurs: how do you draw the double taper on the round cross pieces that run between the legs?
Richard
Further to my previous post: I managed to do it (double tapered round piece) by drawing a couple of circles at whatever distance from each other, then drawing an appropriate face between the two, extruding the face with Follow-me using one of the circles as the path. This works well, particularly if you then pull the ends out a bit with the move tool. But, is there a better way?
Richard
Thank you, Richard.
As for drawing the double tapered rungs, I drew a profile--half cross section--with a single circle at one end and used Follow Me. I'm not sure exactly what you are doing with the Move tool, though.
This is a rare occasion when Scale was useful for changing the size of the part. The rungs are all the same diameter but different lengths. By using Make Unique on copies of the run component and then scaling the geometry inside, I was able to make the four different length rungs from a single component.
-Dave
Dave,
I just found that the rung looked better if I pulled the ends out a little, and Move seemed an easy way to do it. No doubt a function of the profile I drew.
Thanks for the tip re Scale to make the other rungs.
R.
Love the rake and splay but how do you make the top and bottom parallel with the ground? I just add the lines using the axis is there a better way?
@Tom8021, If the faces are on axis, you can just draw the lines but typically, if the legs are both raked and splayed, the faces won't be on axis. this stool is a good example of that. If the legs are turned, that would also make it more difficult. I would draw a cutting plane at the ground plane and copy it up to the height at the top of the leg and use Intersect Faces.
A good topic for a blog post.
Dave
Log in or create an account to post a comment.
Sign up Log in