Turn a Spindle
The right game plan eliminates troublesome vibration and ensures crisp details
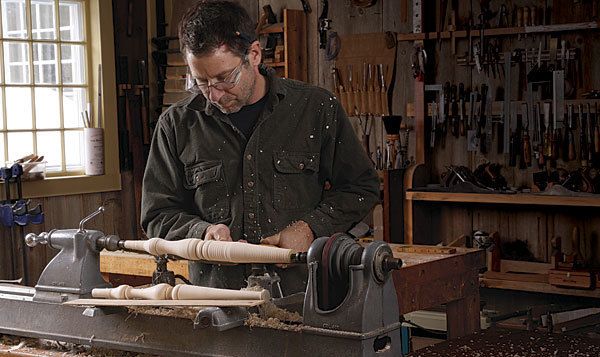
Synopsis: There’s an art to turning a spindle with clean, well-defined details. Peter Galbert breaks down the process into a series of steps: shaping the center details, trimming away excess material, shaping features across the length of the spindle, working toward the tailstock and then toward the headstock. By developing each section in relation to the others, he eliminates vibration and ensures accurate, repeatable results.
Any spindle turning can be broken down into a series of recognizable shapes, but there’s an art to making those shapes cleanly and with well-defined details. Over the years, I’ve developed a method that not only gives great results but also speeds up the process.
To demonstrate, I’ll use a traditional baluster leg design from a Windsor chair. With multiple repeated details and shapes, this classic leg is the perfect candidate to illustrate all of the challenges of spindle turning. I’ll use it to show the best order of operation.
After rough-turning the spindle, I start shaping the details in the center of the workpiece. Then I gradually trim away the excess material and shape the other features across the full length of the spindle, working toward the tailstock and then toward the headstock. This allows me to develop each section in relation to the others, which helps ensure good proportions. I use a full-size pattern to help me stay on track as I work.
Turning a spindle this way not only eliminates troublesome vibration that can mar the work, but it also ensures accurate, repeatable results, making it a whole lot easier to turn matching furniture parts like chair legs.
You’ll come out with better looking turnings if you can visualize the overall design as you work, so develop a concrete idea of what you want to make before you start. I usually use a full-size drawing to create a pattern that I keep near the lathe while I’m turning. If you’re replicating an existing part, use that instead.
As you develop the details, periodically check your progress against the drawing, and note the sizes and spacing between each part of the turning—it will help you maintain nice proportions.
Start with a square turning blank a little thicker than the size of the final turning. Mount it between centers on the lathe. Set the lathe speed to 1,000 rpm and use a roughing gouge to shape the blank to a completely round cylinder. Now ramp up the speed to 1,200 to 1,500 rpm and target the largest feature of the turning. In this example it’s the large vase. Set calipers to that diameter, then make a few sizing cuts across the blank with the parting tool and calipers. After that, use the roughing gouge to trim the whole blank uniformly to that diameter.
For the full article, download the PDF below.
Fine Woodworking Recommended Products

CrushGrind Pepper Mill Mechanism


Log in or create an account to post a comment.
Sign up Log in