Tool Chest with Surprise Storage
This wall-mounted tool chest has space for every conceivable hand tool.
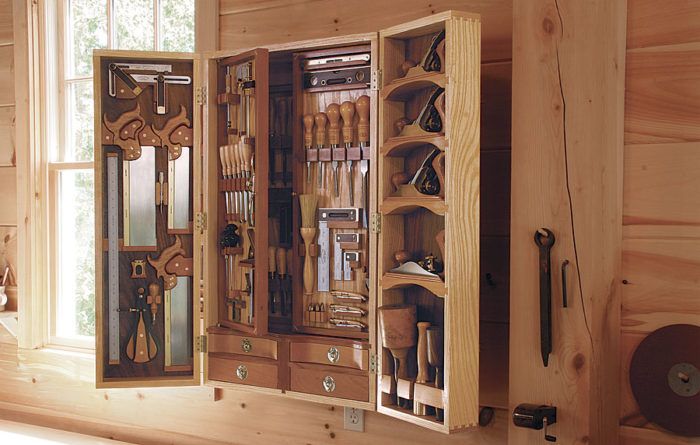
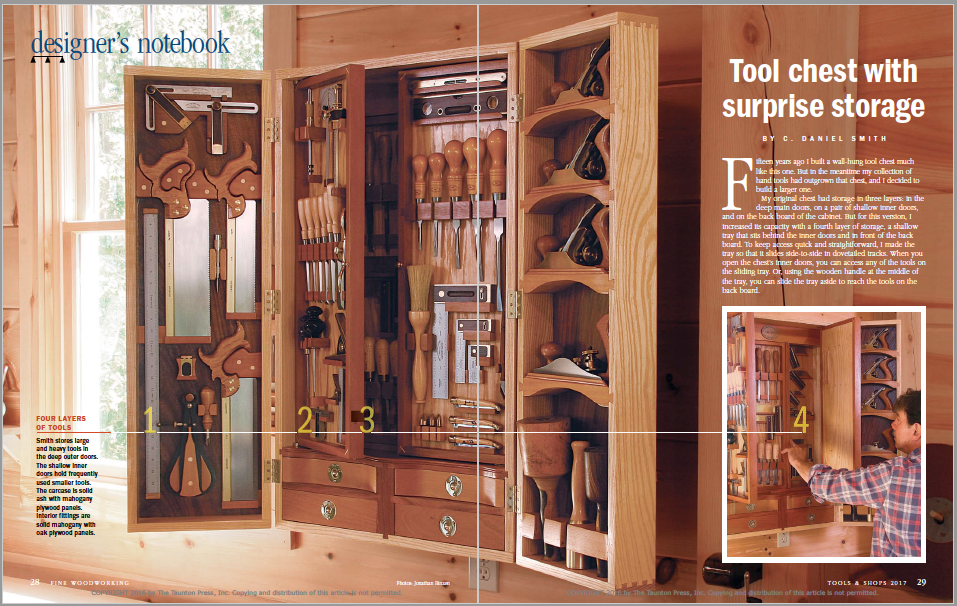
Synopsis: This wall-mounted tool chest has space for every conceivable hand tool. Four layers of storage, to be exact: in the deep main doors, on a pair of shallow inner doors, on the back board of the cabinet, and in a shallow, removable tray that sits behind the inner doors and in front of the back board. To keep access quick and straightforward, the tray slides side-to-side in dovetailed tracks.
Fifteen years ago I built a wall-hung tool chest much like this one. But in the meantime my collection of hand tools had outgrown that chest, and I decided to build a larger one.
My original chest had storage in three layers: in the deep main doors, on a pair of shallow inner doors, and on the back board of the cabinet. But for this version, I increased its capacity with a fourth layer of storage, a shallow tray that sits behind the inner doors and in front of the back board. To keep access quick and straightforward, I made the tray so that it slides side-to-side in dovetailed tracks. When you open the chest’s inner doors, you can access any of the tools on the sliding tray. Or, using the wooden handle at the middle of the tray, you can slide the tray aside to reach the tools on the back board.
More from FineWoodworking.com: |
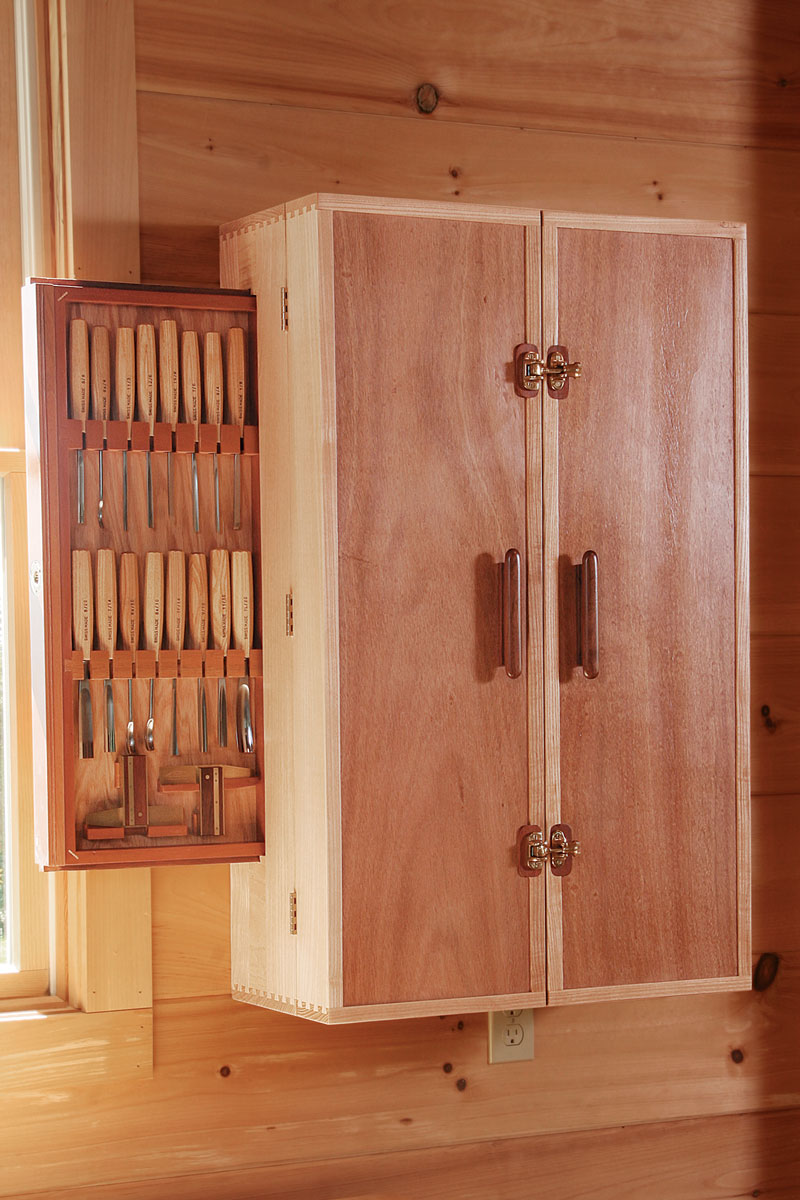
When you do slide the tray aside, it travels right out the side of the chest. This means you can also access the tools in the tray without ever opening the doors: Just pull the brass ring on either side of the chest, and the tray slides out. The wooden handle on the front of the tray acts as a stop, so the tray slides just halfway out either side of the chest.
To determine the placement of tools, I cut scraps of plywood to the size of the various components and laid out the tools until I had arrangements I liked. I placed the heaviest and deepest tools in the front doors. I put some of my most frequently needed tools on the shallow inner doors. The sliding tray, with no extra depth to spare, became home to carving and bench chisels and some layout tools. I reserved the back board for tools that I use less frequently.
Knowing how my tool kit continues to grow and change, I built the chest so its main components can be disassembled, and I made all the tool mounts removable—screwing them in from behind—so I can alter their arrangement when I need to. I made the handle on the front of the sliding tray removable too, so the tray can be slid right out of the chest if need be. I used French cleats top and bottom in the back of the carcase to secure the chest to the wall.
 From Fine Woodworking #258
For the full article, download the PDF below:
Fine Woodworking Recommended Products
Drafting Tools

Woodriver Rechargeable Desiccant Bag
WoodRiver Router Bit Storage Case


Comments
Daniel, this is a cleverly designed tool cabinet. I enjoyed your departure from the usual methods of tool holding.
Thanks for the comment. It was a fun project to build.
-Dan
Great cabinet! Any plans available?
No plans. Just what's in the article.
Second on the plans. As soon as I saw it in the magazine I wanted to make it a project.
Yep, Nice project. I too was hoping for plans...
Beautiful tool cabinet! Would like the plans plany plans....please.
I aspire to reach your level of craftsmanship, but also your vision as it applies to design. Stunning!!
I too, would welcome the opportunity to purchase plans.
Nice, saw first on dream shop U tube, expected to see plans available here
plans, plans, plans. the beauty og the design and functionality are stunning. this is a great inspiration for newer members to learn the craft so that we can create this level of excellence. i realize that this is intimidating for a beginner, but a good challenge for an intermediate.
Daniel, I congratulate you on a stunning evocation of the Studley tool chest we all aspire to, re-imagined for the 21st century. Brothers...never mind plans, the thing is to make your own, just to suit your own space and requirements.Daniel, I'm guessing your work in the OR is just as spectacular. Kudos, & Happy Holidays!
Plans would be nice
As one surgeon to another, I admire your craftsmanship and fully expect that your work in the OR is no less exceptional.
ya! plans mang!
everyone is asking for plans. Are they going to be made available?
@user-6525250, I understood from Ben's comment back in November there'd be no plans offered.
Great example of why print magazines are failing to cross digital divide: there is no online extra, just a pdf of article. And indeed the log in process is so FUBAR (even on this page I am asked to subscribe despite being a logged on Member" that you'll loose to Youtube everyday.
If you scroll down a little, you'll see the online extra video on the right.
Why are there no replies to any of these questions? Has everyone at Fine Woodworking been wiped out like the movie 3 Days of The Condor?
@Bobpringle
I am from FWW, replying to almost every comment on the site. I just can't keep replying individually to requests for plans over and over.
I'm here though!
Just where is the video referenced as on the third page of the PDF?
"For a video visit to Dan Smith’s shop
and a look inside his tool chest, go to
FineWoodworking.com/258."
It's on the page you mentioned, under "online extras", named "Dan Smith's Dream Shop and Tool Chest".
Beautiful work ! I am using several of Dan's ideas for my cabinet
There are numerous pics and plans available to use so you can design and build a cabinet specifically suitable for you. Have at it !!!!!!!
Where are the plans?
To user-7326896, Ben wrote back on November 23rd of 2017 "No plans. Just what's in the article." It's unlikely anything has changed.
Why does everyone look for plans…?
Do you all have the exact same tools?
Seriously, can you not just look at the chest for inspiration and then make something similar to your desired dimensions?
Three questions. All rhetorical.
Love this, don't want the plans. I am interested in the hinges for the internal doors. It looks like they are flush with the sides but don't need an extension piece to allow for rotation. Buildig a tool cabinet at the moment and am working on the internal doors.
Log in or create an account to post a comment.
Sign up Log in