Museum Bench
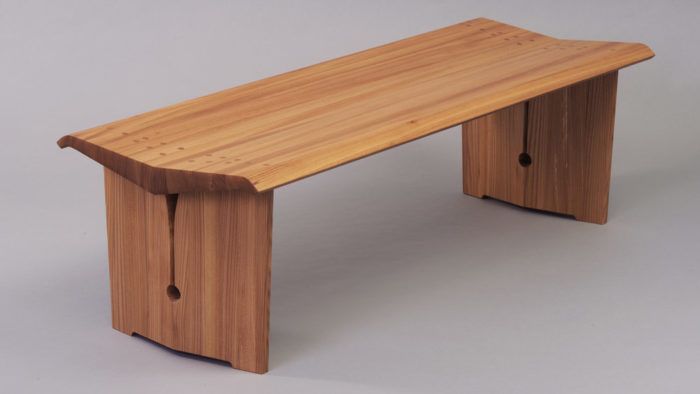
Simple but not boring was the goal for this bench, which incorporates two tilted planes for the seat and wide, solid legs pierced with a keyhole slot at the center.

Synopsis: Simple but not boring was the goal for this bench, which incorporates two tilted planes for the seat and wide, solid legs pierced with a keyhole slot at the center. Hurwitz refined the design in scale models and made a one-seat mockup to test the seat for comfort before he and his assistant built the real thing out of red elm.
I designed this bench as public seating for a contemporary art museum. I was aiming for something comfortable and visually interesting but quiet enough not to compete with the artwork. Simple was the goal—but not boring. As it turned out, the museum chose not to have me build the benches, but I decided to ask my assistant, Zack Deluca, to make a couple anyway.
My sketching began with the expression of a rudimentary idea: two planks to form a seat, two monolithic legs, maybe a stretcher. While playing with other concepts on paper—including a bench with an S-shaped seat and a bench with a bridge-like arch underneath—I arrived at an end view I liked for the original bench: the seat’s two tilted planes shaped to curves top and bottom, and the wide, solid leg pierced with a keyhole slot at the center. After working out the cross-section of the leg and the tenon joinery to the top in another sketch, I moved on to scale models and then a mockup.
For the mockup, we used poplar for the legs and 2x stock for the seat. We made it long enough for one person, which let us test it for comfort and work out the construction without making it full length. I liked the way the seat came out in the mockup—it was comfortable, and I was happy with the look. But I was disappointed that you couldn’t easily read the shape of the leg. I wanted to see a shadow line where the two angled planes of the leg met, and we had to keep beefing up the thickness of the mockup’s leg to get the visual effect I wanted. The mockup made it clear that the keyhole slots did what I had hoped, breaking up the broad width of the leg and giving an indication of its cross section.
Then it was on to building the real thing out of red elm. I had a big pile of elm that I’d been tripping over for years, avoiding it because there’s so much tension in elm that it requires double or triple milling, and its rowed grain tears out easily and requires a lot of sanding after milling. We couldn’t avoid the extra milling, but I had recently purchased a thickness sander, which took the dread out of all that sanding. Zack shaped the convex curves at the edge of the seat with a combination of chamfer cuts on the tablesaw and fairing cuts with a handplane. And he created the concave curves on the underside of the seat by cove-cutting with the tablesaw. I like using cove cuts to create hollow curves because the shape of the parabola is infinitely variable, and you don’t have to order expensive tooling.
For the full article, download the PDF below:
Fine Woodworking Recommended Products

Dividers


Stanley Powerlock 16-ft. tape measure


Comments
How are the legs attached?
Log in or create an account to post a comment.
Sign up Log in