Shopmade Cutting Gauge
Build your own cutting gauge and get better joints from the start, with cleaner, more accurate layout lines.

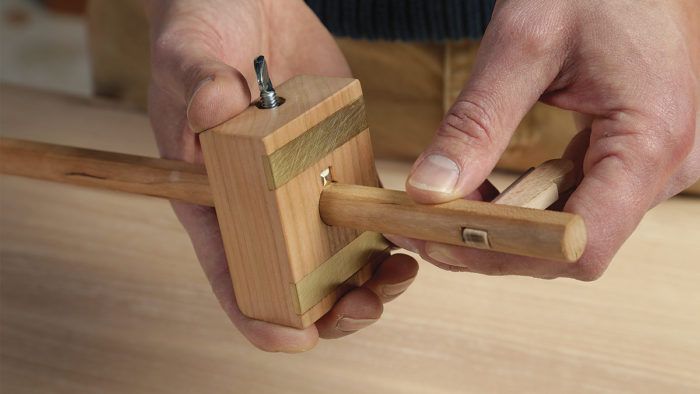
Synopsis: One of the best tools for a precise layout line—and as a result, accurate joinery—is a cutting gauge. This shopmade version has a single-bevel knife for a blade, a large and comfortable fence, and a round beam that locks securely and doesn’t move during use.
Accurate joinery is a matter of cutting to a line but not beyond it. So it’s necessary to begin with precise layout. One of the best tools for this is a cutting gauge. This precision tool severs the fibers on the surface of the board, creating a clean, deep, and well-defined layout line that is easy to see.
The design I prefer is one by my friend Will Neptune, who made his while a student at North Bennet Street School in Boston. It has a good single-bevel knife for a blade, a large and comfortable fence, and a round beam. The round beam has several benefits. First, it’s easy to see where you are starting and stopping the cut, and the mortise in the gauge’s head is drilled rather than chopped, simplifying construction.
Make and mortise the head
Mill a block of hardwood—cherry, tiger maple, and walnut are good choices—to the head’s final dimensions. Mill a setup piece to the same dimensions to help dial in machine settings.
It is important to follow this drilling and mortising sequence: Drill a hole to receive the threaded insert. This should be in the exact center of the end of the head blank and about halfway down. Lay out a 5 ⁄8-in.- dia. circle on the face, and then a 1⁄4-in.- square mortise tangent to the circle. I cut the mortise with a hollow-chisel mortiser. I cut in halfway from both faces, using a stop clamped to the fence to locate the head accurately. Back at the drill press, drill the hole for the beam. Make sure to back up the piece with a fresh piece of plywood or MDF to prevent blowout as the bit exits the hole. For safety and accuracy, use a right-angle fence to support the head.
Install the threaded insert now. I use an unplugged drill press to ensure that it goes in straight. Insert the driver bit and turn the chuck by hand while keeping downward pressure on the drill-press handles. I finish recessing the insert with a ratchet (see bottom photos, left).
Now rout the dadoes for the brass wear strips. Make them shallow enough that the strips sit just proud of the surface. Because these dadoes are routed across the grain, knife the edges of the cuts before running them on the router table. Back up the block so it does not blow out as the bit exits the cut. Glue the brass wear strips into the head with epoxy. After the glue dries, sand the strips flush and remove any squeeze-out. Finally, round over the back side of the head.
For the full article, download the PDF below:
Fine Woodworking Recommended Products

Bahco 6-Inch Card Scraper

Lie-Nielsen No. 102 Low Angle Block Plane

Starrett 12-in. combination square


Comments
Love the design. Any downsides in making the cutting edge out of an old planer blade instead of spending $30+ for the Hock tool?
Cant watch the video from the e-magazine. Can't watch it from the pdf. Damn...
Lie-Nielsen has a panel gauge blade that screws to the end of the rod. Have you ever tried using that instead of mortising in the Hock blade?
Maybe I'm missing something but the "Simple Jig for mortising" shows the angle cut as a straight diagonal from bottom corner to top corner. but the side view shows the angle cut from the bottom corner to 1-1/2" from the top. My goof or yours?
Ironically, Hock makes a beading plane with four extra blades for about $35. Rather than buy the suggested steel, but his beading plane and use one of the spare blades for this.
I used part of an old kitchen Knife until I can find better steel. I also used ebony rather than brass for the rub straps. Works great, looks good.
bbernsee I suppose you could use just about any hard metal to make a cutting edge. I thought of an old circular saw blade chopped into small pieces or an old file or even a leftover old hex wrench. I guess it really depends on how much work you're willing to do for a small sharp blade v just buying one premade.
Log in or create an account to post a comment.
Sign up Log in