Add Bushings to Your Router Kit
These inexpensive accessories increase control and make the router even more versatile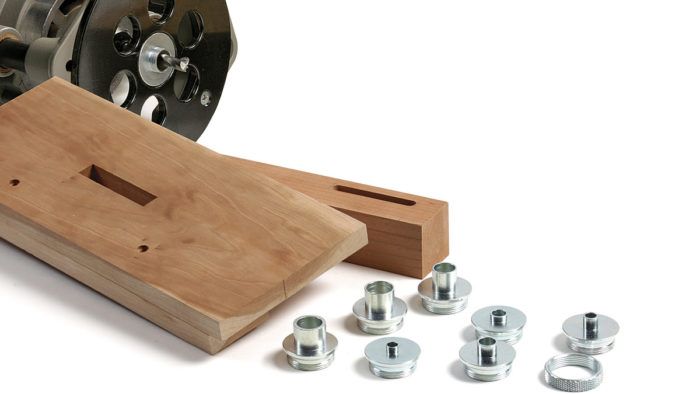
Synopsis: One of the most versatile ways to control a router’s path is with guide bushings, which surround the bit and provide a bearing surface for jigs and templates. Bushings make it easier to use the router to cut mortises, tenons, pockets for inlay, dovetails, dadoes, and sliding dovetails. Learn the basics of bushings and make some easy templates: one for mortising, one for dadoes and dovetails, and one that combines multiple joints.
Routers are among the most versatile tools in the shop once you learn to control them, and one of the most versatile ways to gain this control is with guide bushings. These surround a router bit and provide a bearing surface that works with all kinds of shopmade templates and commercial jigs, making it easy to cut mortises, tenons, pockets for inlay, dovetails, dadoes, and sliding dovetails. More complex templates can include multiple joints, so you can rout all of the mortises in a chair or bed leg at one time.
The bushing itself is a metal tube attached to a plate. The predominant style of bushing is the one originated by Porter-Cable, which can be used in a number of different brands of router. A few companies have base designs that require their own bushings. Some routers allow for adjusting the guide bushings to be sure they are perfectly concentric to the router bits. Mine don’t, so I make sure to keep the orientation of the router consistent as I work.
The key to working with guide bushings is understanding the offset between the bushing and the bit. A straight router bit must be smaller than the inside of the bushing. Calculating the difference between the outside diameters of the bit and the bushing and then dividing that number in half gives you the offset. For example, with a 1⁄2-in. bushing and a 3⁄8-in. bit, the offset is 1⁄16 in. Pay attention, though, because in many cases, you need to subtract this offset from both sides of a cut.
The art of template-making
There are many kinds of templates and many good ways to make them, depending on your tools, the materials you have lying around, and the task at hand. I’ll cover two of my favorite methods in this article. The first method is building up the template from separate pieces of solid wood, glued together and guided by the bushing size. I also sometimes cut slots in plywood or MDF. Because MDF is softer, you may want to toughen up the reference edges by painting them with thin cyanoacrylate glue.
For the full article, download the PDF below:
Fine Woodworking Recommended Products
Dustopper Pro

Craftsman Random Orbit Sander
Ridgid EB4424 Oscillating Spindle/Belt Sander






Log in or create an account to post a comment.
Sign up Log in