Carve a Greenwood Bowl
Pleasure in the making—and every day thereafter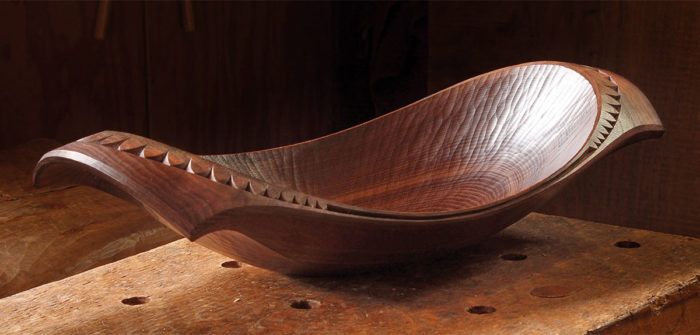
Synopsis: Start with a greenwood log, split it, and do some preliminary layout. Then begin the process of carving a bowl that will be as rewarding in the attempt as it is after completion. You’ll need some basic layout tools, an adze, an ax, a spokeshave, and some gouges. Then follow along as David Fisher shows you the fun.

Carving a bowl is like hiking through the woods: Your body is moving, your blood is flowing, and your senses are alive with pleasure. Grab an ax and an adze, a drawknife and a spokeshave, and follow me on a journey from log to bowl. The first step is to find a green log with a cooperative disposition. A good size log for this bowl is around 10 in. dia. and 18 in. long. Bowls can be carved from just about any species, but some woods are more agreeable than others. Soft, tight-grained hardwoods without a persistent aroma are traditional for bowl carving—woods like birch, poplar, soft maple, and willow. Harder woods require a bit more work, but they take a beautiful finish and are less absorbent; cherry, hard maple, and fruitwoods are all excellent. Don’t limit yourself, though. I’ve carved bowls from walnut, butternut, sassafras, oak, chestnut, and more. Look for a log that is free of knots and other defects. If you read the bark and the end grain carefully, you can often avoid trouble down the road. Split the log through the pith with a maul and wedges and feel the coolness of the newly revealed surface with your hands. Breathe in the aroma, and consider the gift you have been given. Then sharpen your hewing ax.
Before you dig in with sharp steel, take time to make some marks with a pencil. Traditionally, bowls were made by splitting a log in half and hollowing it out. But a the hollow of the bowl using the two-nails and-a-string method. Then I define the outer sweep of the handles by striking arcs from the center point of the blank. After I decide how wide I want the handles to be, I use the compass to mark all four corners, pivoting on the intersection of the centerline and the end of the handles. To establish the sides of the rim, I sketch a shallow S-curve from the widest part of the bowl to the corners of the handles.
Now it’s time to make the chips fly: Out comes the adze. I don’t secure the bowl blank for hollowing. Instead, I simply set it on a sturdy bench about 2 ft. high and brace it against my thigh. The weight of the blank keeps it from jumping around too much, and having no restraints allows me to flip it around easily. If you prefer to secure it, you can do so with a simple arrangement of pegs and wedges.
For the full article, download the PDF below:
Fine Woodworking Recommended Products
Veritas Micro-Adjust Wheel Marking Gauge

Veritas Precision Square

Suizan Japanese Pull Saw








Comments
Just wondering- why use "green wood"?
thanks
Green wood, or wood from a tree that was just cut down hasn't dried out making it much easier to carve.
Where is the Video????
If you're referring to the Axes and Adzes video, it is at the link published in the magazine, ( https://www.finewoodworking.com/263 ) , below in the related articles section, or can be found here.
As a retired technical teacher,I recognize excellence in teaching,and David exhibits this as he works and talks. The photographer makes effective use of his equipment,showing the entire carving process while avoiding the artsy approach of showing the craftsman's face while an intricate operation is performed with his hands. Kudos to Fine Woodworking!
Log in or create an account to post a comment.
Sign up Log in