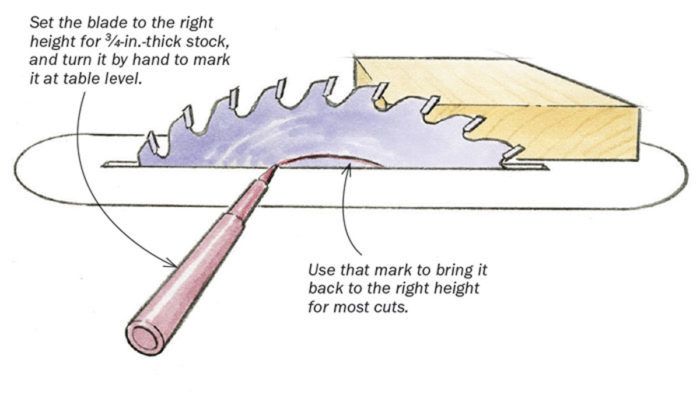
I use my tablesaw most often to cut 3⁄4-in.-thick stock. To set the blade to the proper height without measuring, I mark both sides of the blade with a Sharpie at table height. Just raise the blade to the optimum height for your average workpiece (the best balance between safety and efficient cutting is to have the bottom of the gullets just above the top of the stock), place the marker on the throat plate, and spin the blade by hand. The mark will work just as well when you are using a crosscut sled.
—David Gleason, Houston, Pa.
Drawing: Dan Thornton
Issue #263 Sep/Oct 2017
Note: Reader Suburbanguy points out in the comments below that the marker shown should be right above the arbor.
Regardless of the board’s grain, this jointer produced excellent results. Its fence was totally flat, worked smoothly, and locked well, staying in place even after jointing multiple edges. Getting the fence to 90° was very easy, but the 90° stop was a little tricky to set and the fence did not go back to square when using it. For those who would use it, there is also a digital depth-of-cut scale.
The gauge has a quick and easy method for fitting the guide bar precisely to your tablesaw’s miter slot. This means the gauge can be recalibrated if necessary for continued accuracy. The face of the protractor head can be adjusted square to the table and also square to the guide bar. This ensures accurate cuts, and it, too, can be readjusted if the need arises. The protractor head has stainless-steel knobs and fittings and high-contrast, easy-to-read white numbers and increments.
Priced nearly $300 less than the DeWalt 735X, the Ridgid R4331 is an excellent value. Its three-knife cutterhead left wonderfully clean surfaces on plainsawn white oak and white pine. It did not perform nearly as well on curly maple as the 735X.
I think that part of what is missing in the explanation is that the sharpie should be right above the arbor. The sharpie is shown out toward the circumference and of course the circle that is drawn simply approaches that of the bottom of the gullet. One should also allow for the radius of the sharpie (3/4 + rad) in this setup and then just raise the blade until the circle shows.
Such a great idea to use the saw plate. I'd imagine it doesn't contact the work so the marks last a while. Easily expand this to using, say, two colors at different diameters to account for stock with and without a sled base thickness.
I noticed the above-the-arbor thing right away. But this does make me wonder: could saw blade manufacturers engrave thin grooves or cut small markers into the metal, at regular intervals from the tooth tips? Or would this weaken the blade and make them dangerous?
With its graceful curves, cabriole legs, and ornamental back splat, a Queen Anne side chair is a bucket list build for many woodworkers. Dan Faia had a very specific Queen…
Become an UNLIMITED member and get it all: searchable online archive of every issue, how-to videos, Complete Illustrated Guide to Woodworking digital series, print magazine, e-newsletter, and more.
We use cookies, pixels, script and other tracking technologies to analyze and improve our service, to improve and personalize content, and for advertising to you.
We also share information about your use of our site with third-party social media, advertising and analytics partners.
You can view our Privacy Policy
here and our Terms of Use here.


Comments
I think that part of what is missing in the explanation is that the sharpie should be right above the arbor. The sharpie is shown out toward the circumference and of course the circle that is drawn simply approaches that of the bottom of the gullet. One should also allow for the radius of the sharpie (3/4 + rad) in this setup and then just raise the blade until the circle shows.
Good catch.
Such a great idea to use the saw plate. I'd imagine it doesn't contact the work so the marks last a while. Easily expand this to using, say, two colors at different diameters to account for stock with and without a sled base thickness.
I noticed the above-the-arbor thing right away. But this does make me wonder: could saw blade manufacturers engrave thin grooves or cut small markers into the metal, at regular intervals from the tooth tips? Or would this weaken the blade and make them dangerous?
Uh, I don't get it. Seems it's at least as easy to just raise the blade until one can see the bottom of the gullets clear the top of the wood.
Log in or create an account to post a comment.
Sign up Log in