How to get a cutlist from your SketchUp model
A cutlist isn't that difficult to create by hand, but if you're modeling your projects in SketchUp, there's a far easier wayYou’ve probably already discovered that SketchUp is a great tool for designing your project. You can sketch out your ideas to get a good feel for how they will look making it easy for you and your client to get on the same page with a design. Once you have the model drawn, though, what next? Well, after you’ve drawn the model, and have the visible details worked out, you can add the joinery and other bits to the model to create a plan to take to the shop. Typically I find that I don’t need a formal plan for myself, although it’s certainly possible to make one. I use SketchUp and LayOut to make the digital and printed plans for many of the projects featured in Fine Woodworking Magazine. For my own use, a few images exported from the SketchUp file usually suffice. It is handy, though, to have a cutlist so I have the overall sizes of the parts at hand as well as a shopping list when I go to the store for parts.
Now, a cutlist isn’t that difficult to create by hand. I know a woodworker and SketchUp user who would draw his project and then sit down with the Tape Measure tool, paper, and pencil and make up his cutlist. There’s a better way, of course. When I showed him he was amazed.
There are a number of extensions for SketchUp that will create cutlists. I’ve tried a few of them and found they all do what they do quite well. Many of them seem like they are aimed more at the kitchen and bath cabinet makers. The one I prefer is simply called CutList. As with all of them, CutList generates the list based on the dimensions of the bounding boxes of the components and groups in your model. It does ignore ungrouped geometry so you need to consider that. I advocate using components for a long list of reasons. In regards to creating a cutlist, there are two primary benefits of components. First, you are prompted to name them as you create them. That makes it easier to know which part’s dimensions you’re looking at. If all the parts are named ‘Group’, it’s hard to know which is which. (You can go back and rename groups after creation if you wish but it takes extra steps.) Another benefit to components as related to the cutlist is that you can change the axes to align them to angled parts. You’ll see how that comes into play in the video.
Of course, you’ll want to have detailed your model and drawn it accurately. Since the cutlist shows the overall dimensions of the parts in your project, you’ll need to include details such as tenons and dovetails. Negative spaces such as mortises and the spaces between the dovetail pins don’t come into play with the cutlist so you can include them or not as you desire. Remember, this is a computer program and GIGO(garbage in, garbage out) applies. The more precisely you create your model, the more accurate your cutlist will be.
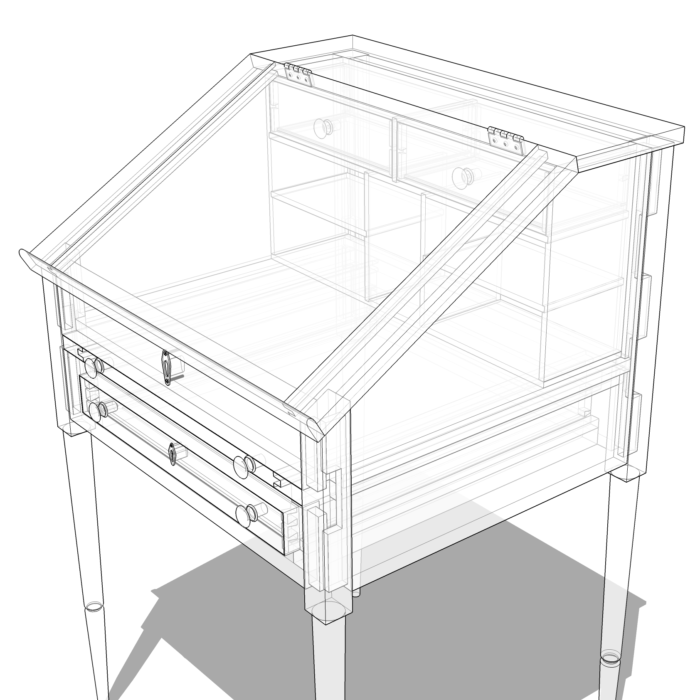
I used this model of a colonial stand up desk as an example in the video. As you can see in the X-ray view, all the wooden parts are fully detailed with tenons, dovetails, and so on.
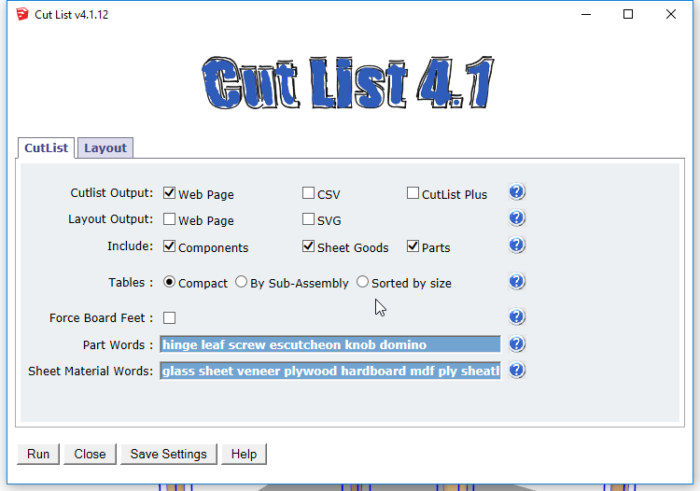
CutList was written by Steve Racz and is freely available in the Extension Warehouse. Access the Extension Warehouse directly from SketchUp and install it automatically. After you’ve installed it you’ll want to do a little bit of setup to customize it for your use. The first window of the user interface looks like this. There are sections for selecting the things you want to show in the output and determining how they look. The text boxes after ‘Part Words’ and ‘Sheet Material Words’ are for words you’ve used in your component definition names that help the extension sort the components into the right sections of the list. You can add words to these windows as I’ve done in the following image. If your components don’t include words from either of these lists, they are assumed to be solid wood. After you make any changes to the settings, you can save them so you don’t have to make those changes again. The question marks in the blue circles are help buttons. Click on the button and a window opens to give you some information about the settings in that line.
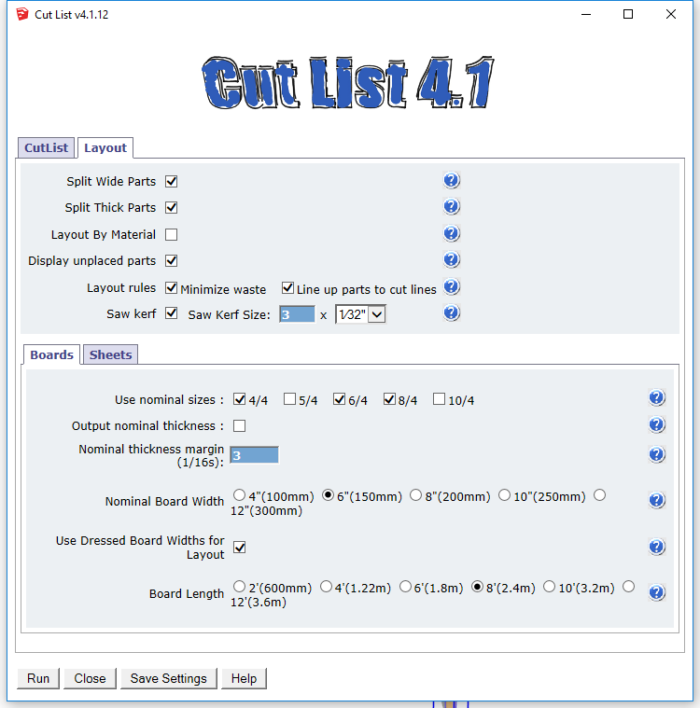
Under the Layout tab you’ll find more settings which are useful for determining how the extension deals with the solid wood and sheet material components in the model for the layout output. These settings have no impact on the cutlist, though.
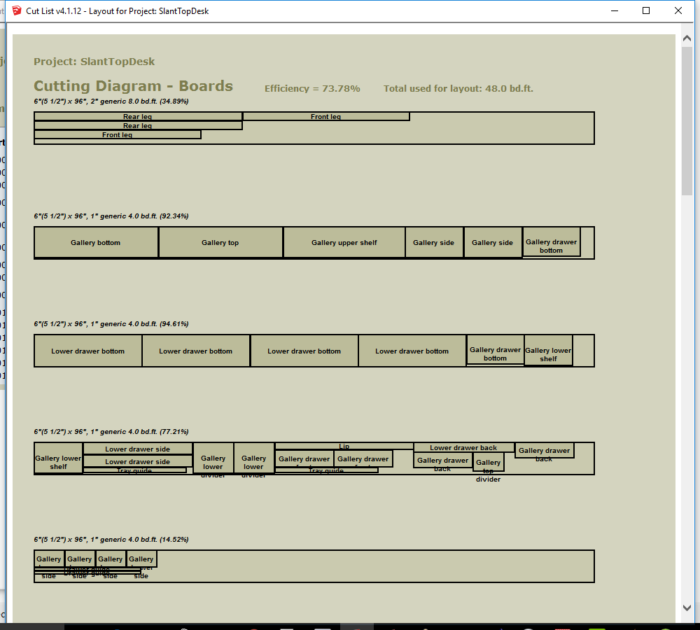
When you click Run, the extension will process through the model and generate the parts layouts as well as the cutlist. The processing should be nearly instantaneous. When I create a model for a plan, I actually have several copies of the parts in the model space so I select just the assembled model before running the cutlist so I don’t get multiples of the parts in the list.
The first part of the layout looks like this:
And the first part of the cutlist looks like this:
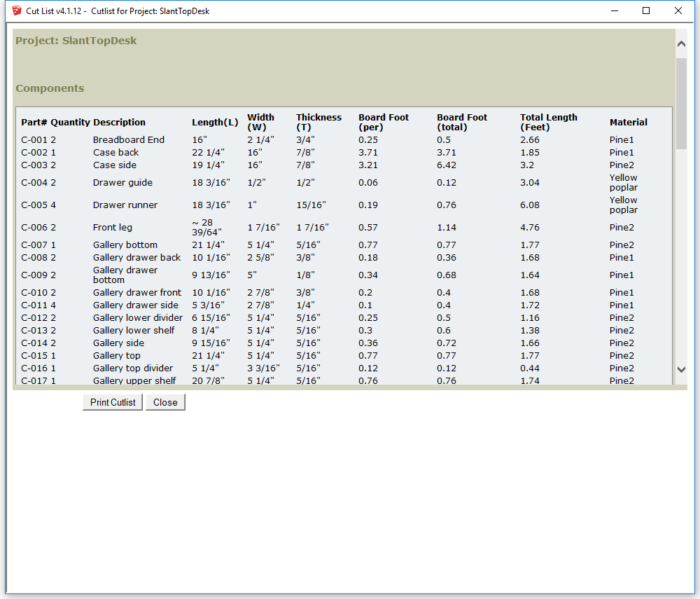
I also find the cutlist to be useful for identifying potential errors in the model. I find it best to set model precision as high as it will go for the units I’m using. When I’m working in Fractional units, I set Precision to 1/64 in. I wouldn’t ever intentionally draw parts to 64ths so I wouldn’t expect to see 64ths in my cutlist. If I do, that raises a red flag for me. As you can see in the screen shot of the cutlist, the front legs show as ~28-39/64″ long. Both the tilde and the 64 catch my attention. In this case, the top of the leg is cut to match the angle of the top so this dimension has a reasonable explanation. Using the 64th-in. precision helps to avoid round errors, too.
So take a look at the video. Hopefully you’ll get a better feel for how this useful extension can work for you.
–Dave
More on FineWoodworking.com:


Comments
Dave,
Great synopsis of a great extension. Thanks to you, I've used it successfully.
Thanks Dave. Your blogs are so helpful. Even though I'm on a Mac, I use Cutlist Plus via VMWare Fusion and Windows. I simply go to the file generated by CutList in SU and import the parts. Works pretty well. Since I have the cheaper version of Cutlist Plus, the Silver version, I can only deal a limited number of parts. When the project has too many parts, I use SU scene manager to separate the parts so I can use CutList Plus on the project. For example, I may put drawers on a scene, and the carcase on other. Then run CutList on each scene.
Many thanks for highlighting this extension. In case your unaware future issues may occur as SketchUp upgrades, as sadly Steve G passed away in 2014 and I believe no one is currently updating the extension.
Thank you FlyingSawdust and Jim,
@user-4775652, you're right. The author, Steve R (not G) did pass away. It was an unpleasant surprise for me because he was a friend and I had spoken with him not a week before that.
There is a potential that this extension might have problems someday due to updates in Ruby but so far that hasn't happened. Unlike many extensions that did need updating to meet requirements of Ruby 2.0 when SketchUp started using it, the CutList extension was already up to date. It's not likely that it'll quit working any time soon. There is another extension author who has been looking into taking over work on it, anyway.
-Dave
Dave,
Thanks for highlighting this extension and nice job on the video this is very helpful. I will give it a try.
Regards,
-Kirk
Dave,
As you might have seen on the SketchUp forum, I recently submitted an issue of a problem of getting Cutlist to run. The problem was Cutlist would not run if the field for "nominal thickness margin" was left blank. It turned out to be a small problem in the Cutlist ruby code. A fellow by the name of Steve Baumgartner fixed the issue. He sent me an updated gui.rb for Cutlist. It runs correctly now. I don't know if the extension will be updated or not.
Yes, Jim, I know about that situation. Steve has been in touch with me about the changes in the extension, too.
In general, the best thing to use the default value of 3 in the Nominal thickness margin box and enter a multiplier for Kerf width.
Dave,
Have you tried the plugin from L'Air du Bois?
https://extensions.sketchup.com/en/content/lair-du-bois-sketchup-toolbox-0
It has a few very nice features like oversizing, material definitions that can be saved, CSV export. It knows about the material by letting you add properties to Sketchup Material.
It computes parts lists not cutlists, that is it does not try to figure out how to layout your parts on sheet good. But it has a more refined handling of material (Solid Wood, Sheet Good and Dimensional).
Martin, I have tried your extension. The UI is nice and there are a few features I like such as the ability to control the order of the parts as listed. I prefer to use the extension I showed in this blog post because I want to sort components into solid wood, sheet materials and parts without having to apply materials to the components. The vast majority of models for which I create materials lists have no textures/colors applied to them and I don't want to be forced to add them in order to get a useful materials list.
Thanks for mentioning the extension, though. I expect some readers might find it useful.
-Dave
Dave, thanks for these feedbacks. I'm the initial developer of the L'Air du Bois extension. I ear your remark on applying materials just for cutlist.
Let me explain why I decided to use material instead of part of name (like Cutlist).
- First, applying a SU material/color is by definition a natural way to define the real part material. And in this way the model is closer to reality.
- Second, materials are visual. Just by navigating through your model you can view what part is made of what. And for that we don't need textures, colors are enough.
- Materials can be defined to a tree of entity and the plugin understand it. You can apply material to a group and all its children are considered with this material or apply to a selection of parts in one clic. You don't need to apply it part by part.
- Material can contain more infos than just its nature. It can contain, for exemple, "cut options" specific to this material. And as materials are saved into you model, these cut options are saved in your SKP file. Then everyone who open your file can export the same Cut list than your because you did the job !
In my opinion, materials is not the only one benefit of using this extension. The main thing that push me to write this plugin is to print a well formatted cut list where I can easily choose the content in one click.
I know that it could be ridiculous to try to convince you. But try it again I promise that you will save times. And if you have remarks again, let me know and we will see if it possible to improve it.
Have a nice day !
Boris, I understand your justifications for using materials or textures but for the vast majority of the projects I create, adding materials to the components just so they will sort into the right section of the materials list would require extra time that I don't currently need to spend. The illustrations in the plans are black lines with a white background. This is required for the printing process. With my current workflow using CutList 4, it's a simple matter of adding keywords from component definition names to either the Sheet words or Part words fields to get the components to show in the desired location.
As I said, others may find your workflow suits them.
Best,
Dave
Is it compatible with 2018 version. It is not marked as so.
Rob, I've been using it with 2018 Pro since last year and it works just fine.
Dave, when you suggested to create components, do you mean that every board/part should be a named component? And then for manageability, you can later group your components but the cut list will be developed on the components.
Thanks,
Aaron
Using Make 2017
Hi Aaron, every part you would make in the shop needs to be modeled as an object (group or component). My suggestion would be to use components and give them useful names so you can identify them in the cutlist. If you use groups and they are all called "Group" the cutlist is not going to be very useful.
If you want to collect the components into nested groups, you can certainly do that. That's a useful thing for gathering the parts of drawers and doors and such. Personally I use nested components instead of groups but different strokes.
The cutlist reports the lowest level objects so the door panel and frame components will get listed even if they are all contained within a "door" group or component.
Best,
Dave
Thank you for replying to a several years old article!
Thank you for replying to a several years old article!
You're quite welcome. Thank you for reading an old article. ;)
Log in or create an account to post a comment.
Sign up Log in