Adirondack Chair Plans
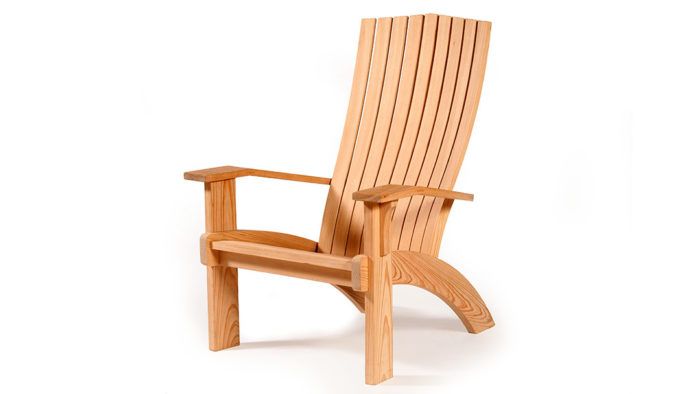
Build this contemporary take on a classic design: the Adirondack lawn chair. These Adirondack chair plans show you how to cut a comfortable curve into the seat and back of this chair. The mitered joint on the arm rest is an additional detail which makes for a smooth, slanting arm that resolves into a drink holder. Expect to enjoy time outdoors in this updated version of an old favorite.
Watch the Complete Episode on how to build this chair here.
From Classic Woodworking: Episode 4 with Tom McLaughlin







Comments
Gorgeous project. I much admired it at Fine Woodworking Live. When do you think you will post the plans?
Me too! I've built such a chair in the past using Norm's plan, but I do like the addition of the curves in your plan. I'd like to begin building ASAP but...the plans are a necessary first step. I even have the black locust wood standing by.
When will the plans be available? These chairs are on my to-do list for this summer. But I can't get started until y'all post them.
It has been several weeks since this episode aired, when will the plans be posted? The show is very well done. The host is very good. Please, do not spoil this by not following through. When will the full episode be posted?
Thank you for posting the plans!
Thanks for getting these out there.
Any guidance on the dimensions of the two "Arm Supports" in back? I see from the video they are glued and clamped to the back of each outside back slat.
In the January/February 2019 FW magazine, there are detailed photo's of building the chair. on page 39 Tom shows using a 14 degree wedge when cutting the back seat rail. I understand the ends of the rail are cut at a 6 degree angle, (like the front seat rail), but for the life of me I can't figure out what the need is for the 14 degree wedge. I've built the legs and mocked them up and it seems to me the wedge isn't needed. The mortise slot in the legs is at 14 degrees, per the plans, but I don't know why the back rail needs a compound cut on the ends. Any insight would be appreciated. Thanks.
Is there a .skp file for this plan?
“[Deleted]”
The construction of this chair looked complicated enough that I built a prototype/practice chair first and I am glad I did. I did not have the issue with the 14 degree wedge that Chuck Coleman had, but I did have another issue with the connection of the Back slats to the Rear seat rail. I have two questions. 1) Which end of the Back slat is up and which is down? I finally ended up installing the Back slat upside down to what is shown in the profile detail on page 36 of the FW article, i.e. what is shown at the top of the page is the bottom of the slat installed. 2) in order to make either end of the Back slat fit, I had to cut about a 6 degree angle on the 27 1/2 radius of the Rear seat rail. I don't believe that an angle is shown in the video either. How did McLaughlin make his fit? The Back slat fits well to the 17 degree angle on the arm rail.
Log in or create an account to post a comment.
Sign up Log in