How to Fit Hinges on a Shaker Blanket Chest
In this video, Tom McLaughlin shows you how he installs hinges and his method for dialing them in for a perfect fitI use three butt hinges for this blanket chest design, with 3/4” wide leaves x 2 1/2” long.In the past, I have made jigs to easily rout the recess, using a guide collar in the router and a straight bit. If I’m making one blanket chest, it’s more direct and efficient to locate the hinge placement, knife around them, rout the recess close to the knife line, and clean up to the knife line with a sharp chisel.
First, I lay out the spacing of the hinges on the top back edge of the blanket chest. Then knife the length of the hinge, and rout the recess with a straight 1/4” bit using a laminate trimmer with a large enough base attached to span the recess as it is routed. The routing is stopped short of the knife line, and the mortise is cleaned up with a sharp chisel.
After the hinge recesses are cleaned up on the top back of the blanket chest, I set the top in place, flush with the chest back and equal overhangs at each end. Then transfer the hinge locations from the recesses, knife marking them into the top. The marking is done from the back as the previously cut hinge recesses are clearly visible.
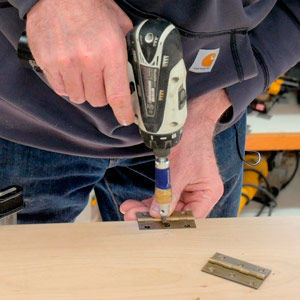 Then I mark the complete hinge leaf outline in the underside of the top, setting the depth with a marking gauge equal to the thickness of the chest back. Again, I rout as close as I can to the knife lines and clean up recess with a chisel. All that’s left is to set the screws, in a way that aligns the back of the chest flush with the back edge of the top.
More on FineWoodworking.com:
- Pick the Perfect Hinges for Your Boxes – The right choice will help you design and build better boxes
- Installing Strap Hinges on a Blanket Chest – Testing and adjustments yield a perfect fit
- Flawless Hinges in Fine Furniture – Install precise butt hinges in projects of all kinds
Watch the episode Classic Woodworking: Shaker-inspired Blanket Chest.




Comments
I see the old router plane hanging in the tool cabinet behind you! Using this "old" plane is so much more fun that a screaming, fine dust making palm router. Just sayin'.
I feel like the shakers didn't fuss that much over hinges. They must have had a faster and simpler way of doing this operation.
The hinges were antiqued, but the Phillips screws looked odd compared to slotted screws.
Lee Valley sells self-centering spring loaded punches and drill bits for working with countersunk hinges. I mention because he mentioned how important accuracy was, but used a standard awl and drill bit.
Finally, holding that lid the entire time would get old fast. I wonder if he could have mounted the hinges to the lid first, place the chest on it's back and on some risers taken from cutoffs from the lid, and then just slide the lid up to the top edge of the back, flip the hinges up, and knife in their location. You could even shim those risers a little higher, clamp the edges down to the bench, and then you could deal with centering and drilling the hinges all while using both hands.
Tom is so very inspirational, a woodworker myself on and off for over for over 60 years so proud to own one of his hand crafted wall cabinet ash bowed front designs. My dad and grandfather were carpenters but not cabinet makers, designers or good teachers; so nice to know Tom and learn the highly skilled trade from him.
Where did the measurement for the marking gauge come from?
Log in or create an account to post a comment.
Sign up Log in