The Illustrated Cutlist
Innovative approach turbocharges this staid staple fo the craft
Synopsis: With its listing of parts, dimensions, and quantities, the cutlist is an invaluable tool for any furniture maker setting out to build a project. It should come as no surprise, though, that Hank Gilpin takes his cutlist to a higher level. In addition to the list of parts, Gilpin’s cutlist includes a three-quarter view sketch of the project, drawings of selected details that may need more information, and notes about unusual aspects of the piece. With this list in hand, anyone can head to the lumber rack knowing they are making choices with a clear view of the finished piece and all of its parts.
A couple of years ago I asked a friend of mine, an excellent craftsman with decades of experience, to build a piece of furniture that I had designed. In addition to measured drawings of the piece, I gave him a cutlist. The next time we talked he said, “Yow, Gilpin, that cutlist of yours is an incredible tool! It made planning and building way simpler. Anyone in the shop could pick up the job at any point and understand it.” I was a little surprised, and it made me think about the method I developed for doing cutlists. So here it is.
The illustration is essential
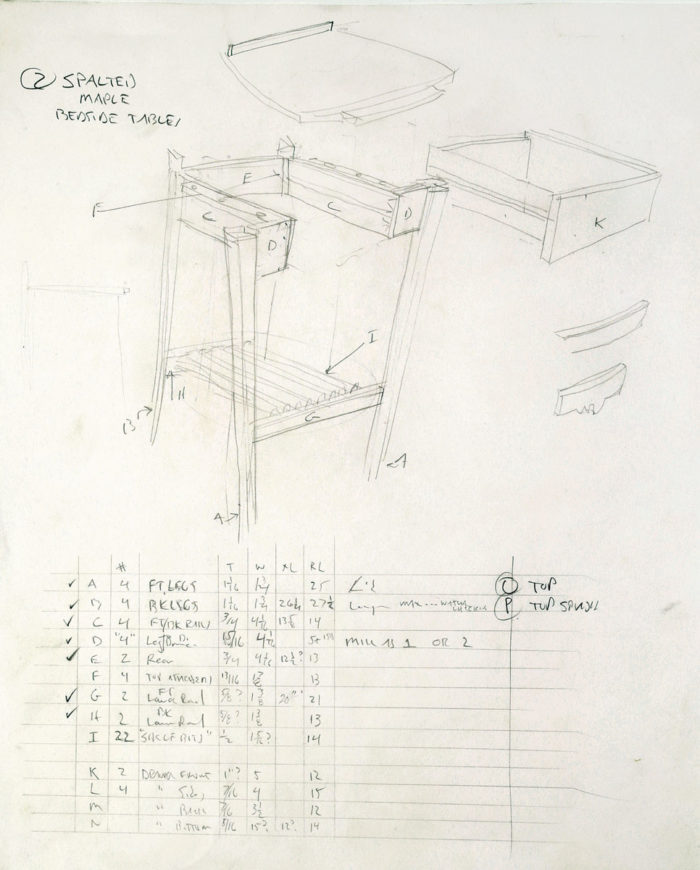
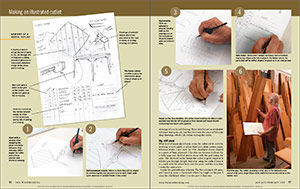
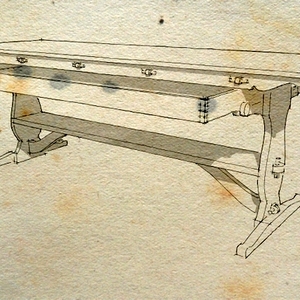
The most important element is a three-quarter-view freehand sketch of the piece on the same page with the parts list. Having that sketch right there makes it much easier to envision each part. It’s also very helpful when I’m selecting the wood and as I’m milling, cutting, shaping, and joining it. I include quick detail drawings of joinery and shaping. These sketches are an invaluable reference during the job, but they don’t take the place of full-scale shop drawings, which I do before making the cutlist.
See how resident SketchUp guru Dave Richards
gets his cutlists straight from the computer
Big, stiff sheet
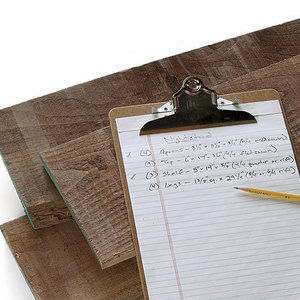
What kind of paper should you create the cutlist on? It could be anything: scratch paper, a yellow lined pad, white printer paper, whatever works. I use 14-in. by 17-in. sketchpad sheets clipped to a piece of 1⁄4-in. plywood. I like this size because it allows for a fairly large and detailed sketch along with the grid listing the parts. The plywood backer keeps the cutlist in good shape as it follows you through the job. And after using the cutlist I keep it in a stack with the others from over the years until the next time I make the same piece.
I make the grid with nine columns. The first column is left open, and I use it to make a checkmark when I’ve rough-cut the part. I cross the checkmark when I cut the part to final size.
 Alphabetize the furniture
The most important column is the second one, the Item column. I label each part in the piece with a letter. Parts that are exactly alike—the drawer dividers in a chest, for example—all get the same letter. The letters show up on the drawing, in column two on the cutlist, and on the parts themselves. Instead of having to write out the name of each part on dozens of workpieces, a single letter on each does the job. I sometimes prioritize the parts, putting the more complex or prominent ones at the top of the list.
The column marked with a number symbol (#) tallies the like parts you’ll make, and the Description column names the parts, tying the letter to the specific part.
Dimensions
In addition to columns for thickness and width, I usually include one for exact length and another for rough length. Many parts in a piece of furniture have angled ends—legs, stretchers, drawer fronts, etc.—and determining exact final length can be vexing. So I find that adding some extra length to the workpiece simplifies the thing. I sometimes have a column for rough width, but not often.
Notes to self
The last column is a vital one. My assistants call it Notes, and it’s where you make little reminders to yourself. You might write: “mill to 13⁄16’s and cut down after joinery.” Or remind yourself to “laminate to achieve final thickness,” “leave extra width for joinery,” “cut angled shoulders before tenons,” “mill AFTER joinery.” Or the note could be that the drawer parts are of a different species than the rest of the chest. Often this column is empty, but it is valuable for those times when you really need to take note. □
Hank Gilpin, a student of Tage Frid, has been making furniture since 1974.
To view the entire article, please click the View PDF button below.
From Fine Woodworking #273
More on FineWoodworking.com:
- Scaling Furniture from Photos by Miguel Gómez-Ibáñez #170–May/June 2004 Issue
- Fine-Tune Designs Before You Build by Gary Rogowski #189–Jan/Feb 2007 Issue
- Cutlists are a waste of space by Matthew Kenney
Fine Woodworking Recommended Products
Drafting Tools
Ridgid R4331 Planer
DeWalt 735X Planer






Log in or create an account to post a comment.
Sign up Log in