STL199: In Defense of Tail Vises
Bob, Mike, and Ben discuss workbenches and vises, a listener's walnut dilemma, spline jigs, and their all-time favorite toolsQuestion 1:
From Max:
You had me convinced that a tail vise was unnecessary, and that it would languish at the end of my bench, a $250 mistake, and that as I worked I would be able to do without it just fine. Well I say that’s “codswollop!” So often when I’m working I think to myself, “you know what I’d like right now? A tail vise.” How can I rectify this? It’s basically the same bench Mike and Matt built, so adding a tail vise probably isn’t an option since the apron is attached to the base the way it is.
 |
THE WORKBENCH BOOKby Scott Landis In The Workbench Book, Scott Landis examines benches for all kinds of woodworking–from a traditional Shaker bench to a mass-produced Workmate. There are benches for cabinetmakers, boatbuilders, carvers, and country chairmakers. In each case, detailed photos and illustrations show how the bench works and help guide you through the tough parts in its construction. |
Question 2:
From Nicholas:
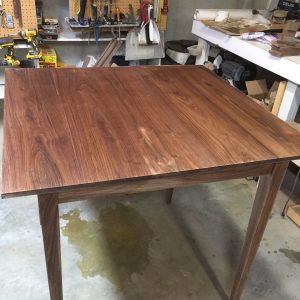
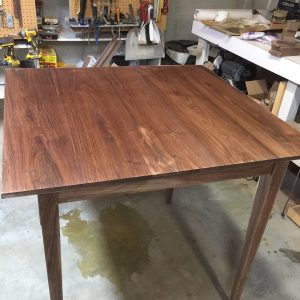
I’ve been working on a new solid walnut bar-height dining table. The top is made up of edge glued flat sawn walnut. Everything was going well, glue-up of the panel is complete and I started to do surface prep on the top. Did some hand planing and scraping – just enough to remove all the glue and major defects. I still have a lot of sanding to go, but it’s fairly close. I was getting a little ahead of myself and wanted to preview the grain with a finish on it so I just wiped it down with some mineral spirits. While it looked just fine with bare wood (no light spots at all) the mineral spirits revealed a significantly lighter blotchy spot in one of the boards. It doesn’t really follow a grain pattern it seems – it kind of looks like there was wax or something on it preventing the mineral spirits from soaking in, but I’m pretty certain I’ve not gotten anything on it. (The apron below is just dried mineral spirits, that piece is fine, it’s just the table top)
- Was it ok to wipe down with mineral spirits or was this a bad idea?
- Is it safe to assume that if it did this with mineral spirits it will do this with the wipe on poly that I was planning to finish it with (I assume this is an ok choice for a finish? Is there a better choice?)
- Is there anything I can do to the wood prior to finish that would prevent this from being a permanent “feature”?
 |
 |
Segment: All-Time Favorite Tool
Bob: Pekovich Woodworks™ Blue Dovetail Tape
Mike: His new-to-him refurbished Stanley #4
Ben: Setup blocks
Question 3:
From Ken:
In May/June 2016 Stow and Go Sharpening Box article, Bob uses a jig with table saw and flat top blade to cut the spline grooves. Is this jig an accessory that somehow works alongside his amazing multi-use rip fence? Perhaps it hooks over a tall fence like the tenon jig attachment? Or does it just ride along the saws rip fence. It doesn’t seem to be a sled jig.
What jig do each of the STL crew use for spline grooves on table saw or do you use a router table? Any recommendations you would have for a jig for boxes of this size?
The Doug Stowe jig that Mike discusses can be found in this article:
 |
A version of the over-the-top biscuit spline jig that Ben mentioned:
 |
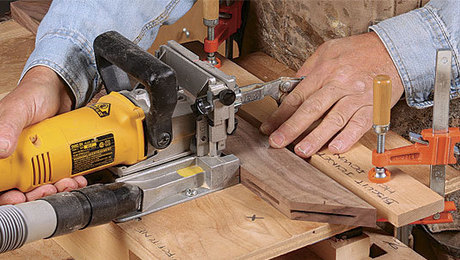
The biscuit joiner setup that Ben used for his splines:
 |
Recommendations:
Ben – MadeForAMuseum on Instagram
Mike – Fastest Car on Netflix
Every two weeks, a team of Fine Woodworking staffers answers questions from readers on Shop Talk Live, Fine Woodworking‘s biweekly podcast. Send your woodworking questions to [email protected] for consideration in the regular broadcast! Our continued existence relies upon listener support. So if you enjoy the show, be sure to leave us a five-star rating and maybe even a nice comment on our iTunes page.


Comments
bend it like becksvoort
Well, that was quick considering I hit publish on it five minutes ago! Shoot me an address to [email protected]!
Ben Rules!!!!
50 year old recycled yellow pine beams with wagon & leg vices made with cheap vice screws from Lee Valley.
Love them
In reference to the tail vise question, here’s my take. In my first workbench, I integrated a wagon vise into the end. Maybe I would’ve liked it better if it was a true tail vise, but I ended up not using it all that much. So in my second workbench that was more or less of the same design I opted not to put a tail vise in. After a couple months I added the Veritas Wonder Dog and along a row of bench dog holes. Works like a charm for holding log stock flat against the bench (ie table legs). So if you aren’t going to go full out with a full tail vise (with great hardware), skip the wagon vise and go with something that is simply surface mounted.
I think the discolored Walnut on the table top looks like decay, which can be minor and still be solid wood. JReed
Setup Blocks. Good discussion. I have a miscellaneous collection of key stock (mostly 1/8, 1/4, 3/8 inch) and researched extending the range. McMaster-Carr is overpriced but convenient. Steel has good dimensional accuracy, +/- 0.001, but is prone to rust. Brass is a suitable choice, but +/- 0.003 to 4. The problem is stacking several coupons--especially the smaller dimensions tend to roll or otherwise manage. The rectangular cross section Veritas and Infinity blocks are much better for stacking. Perhaps another alternative is precision bar stock available in aluminum for $10 to 30 for 2X24 sticks. Good tolerance, but only 1/4 and thicker. Infinity also has a brass set, basically McM-C cut to length and marked though still suffers from the same stacking problem. Either Veritas with the expansion sets or Infinity seems like a good choice for ~$100 when you balance cost, time, and utility. Or maybe purchase two Veritas basic sets for duplicate sizes. --DKH
Interesting to hear the mention of the Veritas Surface Vise. I was the original designer and co-patented it along with Veritas :) Actually, the original design was as a substitute for a tail vise, hence the two post design. Years ago, I was seeking an alternative to a tail vise as I did not want to modify my existing bench. So I came up with the design. The product then evolved into the Surface Vise for reasons of versatility. Thanks for the mention and plug, Norman Pirollo
I have dealt with some whitewood issues on both cherry and walnut bu using Transtint dyes to bring the lighter areas to match the rest. Brown mahogany works best for me on walnut; don't recall what I used on the cherry.
In your case, first make sure its not wax, etc. on the surface by placing a few drops of water, if it does not bead up on the surface, you're good.
I have used both an airbrush and artists' brushes. Mix the dye at 1/3 or 1/2 strength, as it is necessary to sneak up on the color. Remember that these stains seem to get darker when the finish hits them, so go slow and allow each application to dry. If you have a scrap that shows the light color, practice.
Apply the stain, working from the center out, and be very careful at the edges to keep the stain off the "good" wood - otherwise you might get a dark outline of the repaired area. I generally apply the overall dye diluted much more than the instructions suggest - this lets me sneak up on the color. Once you have dealt with the problem areas, do the overall staining. Here you could apply an oil based stain over the entire piece including the repaired areas. Or, you could do as I and spray much diluted Transtint over everything. The trick is to keep the dye in the repaired areas from moving.
I use these dyes exclusively as I love the transparency and the way they bring out the grain. I have also used them on maple and made it look a lot like cherry (see https://www.lumberjocks.com/projects/276114 for a queen Anne table in maple).
If it goes right, nobody but you will ever know there was an issue. This also allows us to use wood that would otherwise be called worthless.
CM
Log in or create an account to post a comment.
Sign up Log in