A Cabinetmaker’s Tool Cabinet
To hold his cabinetmaking tools in a convenient and organized way, David Powell built this tool cabinet, making maximum use of its interior space.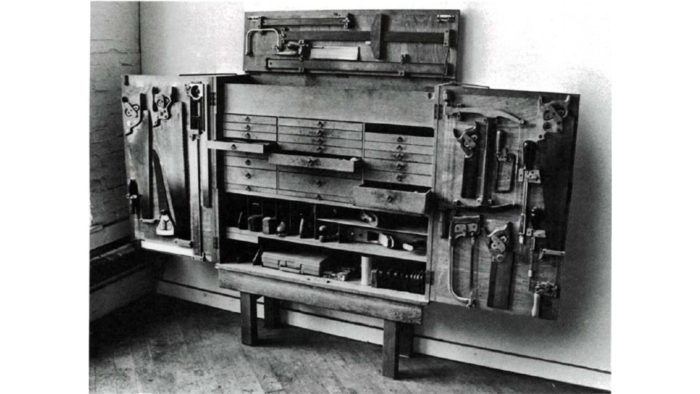
From FWW#30– Sept/Oct 1981:
When I first started making furniture in Edward Barnsley’s workshop , the tool chests used by the craftsmen there were of the traditional sort. They were simplified versions of a design that had developed over centuries, originating probably as medieval oak chests or coffers. All of them were rectangular boxes that sat directly on the floor. Their lids were hinged in the rear and locked in the front to discourage borrowing and pilfering. The underside of the lid was fitted to hold tools, and the inside of the chest contained one or two banks of drawers which faced each other and opened into a central well (see drawing below). Under the drawers there was usually a space to hold tools too large or awkward to fit into any of the drawers or to hang from the lid. These tools might fit into partitioned compartments or just be wrapped in cloth and placed into an undivided bin. At the bottom of some chests there would be a wide drawer that opened to the outside, so a person could get at its contents without having to rummage inside the main part of the chest.
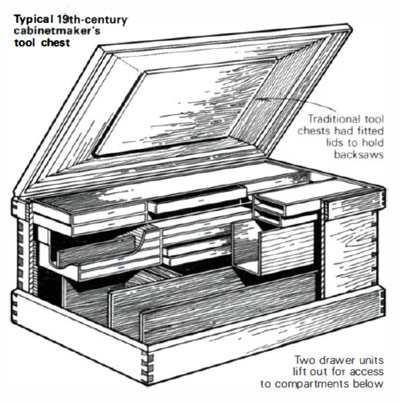 By the late 18th century cabinetmaker’s chests had evolved into refined pieces of furniture. Though outside they remained plain and unadorned, the interiors of these chests were often finely fitted, veneered , inlaid and otherwise decorated. Such refinements proclaimed the skill of the maker to a prospective customer or employer, and no doubt brought a sense of satisfaction to the cabinetmaker who had to live with the chest and work out of it.
When I decided to make my own tool case about 25 years ago, the chests I saw around me in Barnsley’s shop were superbly straightforward and well made, but without any interior inlaying, decoration or veneering. Looking at these chests, it seemed to me that their big disadvantage was that too many of the tools they held were not easily accessible. A lot of the tools were stored below the drawer cases, which could mean having to move a whole bank of four to six drawers to get the shoulder plane you wanted. And then perhaps you ‘d have to go to the added trouble of unwrapping it. Retrieving a tool from the bottom of the chest was about like resurrecting a mummy.
Another disadvantage with these chests was that they were low to the ground. You had to do considerable bending and crouching to fetch and replace your tools. Finally, I felt that there was much wasted space in an already confined area inside these chests, because the well between the facing drawer units had to be left clear to allow the drawers to be opened .
I wanted to have my tools as readily accessible as possible, while still having a case that I could close and lock. I also wanted it to be reasonably transportable, and to fit into my workplace unobtrusively. An upright tool cabinet seemed to be the answer. Sitting on a squat base, such a cabinet when fitted with a bank of drawers would hold all my tools at a comfortable height and would minimize the amount of stooping I’d have to do, and I wouldn’t have to remove some tools to get at others. Having a pair of doors would give me two large surfaces on which I could mount saws. And below the drawers, I decided to build pigeonholes for my planes.
Initially, I tried to measure every tool or set of tools I owned and to assign a place in the chest or a drawer for each. This, of course, proved impossibly complex, and couldn’t take into account future acquisitions. So I designed the bank of drawers to general dimensions that seemed likely to accommodate my smaller tools, and in particular to keep together sets of related tools such as squares, chisels and gauges in a single drawer, or in a group of drawers. Then I estimated what further small tools I was likely to buy and added drawers for these. This estimate has fallen sadly short of the mark, and after 25 years the drawers are overflowing with tools.
Next, I got out all my planes and lined them up, measured them and assigned each a place in the bin below the drawer case. I also made allowance in this allotment of space for planes I knew I would buy later, and have found to my pleasure that all my planes still fit neatly where I planned for them to go. Then I fell into the trap of including an open well above the drawers. At the time I conceived the design, I reasoned that this space could contain tools that didn’t fit conveniently anywhere else in the cabinet, and I could use the underside of the lid for hanging more tools. Over the years this well has collected a pile of tools and dust, and has become something of a junk heap from which it is difficult to disentangle a tool I want. This is exactly the feature in the traditional tool chests that I had wanted to avoid.
Now I’m redesigning the cabinet and will make a new one without the well in the top. The area it would have occupied will be taken up by additional drawers. The drawers’ basic dimensions won’t change, and I will still provide fitted spaces for indispensable tools, but will create more in the way of flexible space for new tools.
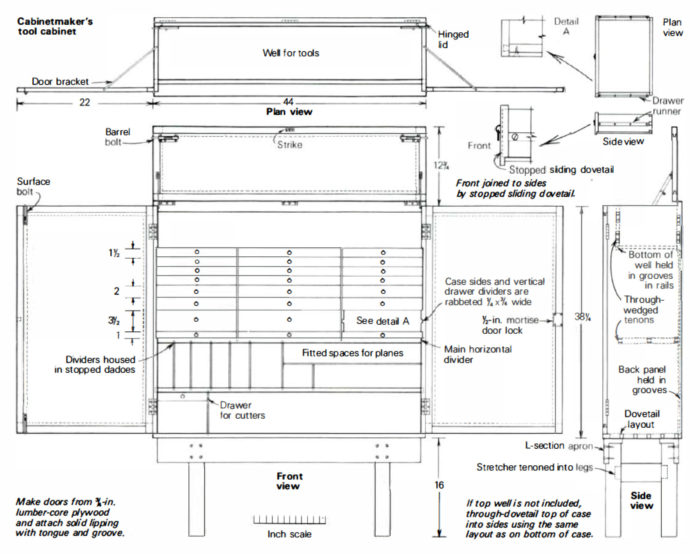
Building a tool cabinet brings all of your joinery skills into play, and gives you the chance to make one large case and a lot of little drawers. Make the main case from 4/4 pine. If you want to omit the upper tool well and devote this space to drawers as I plan to do , then you can through-dovetail the four sides of the case together, cutting the pins on the top and bottom pieces. Groove the inner rear edges of the case to receive a 1/4-in. plywood back panel. The main horizontal divider, which separates the drawer unit from the pigeonhole section below, is through-tenoned into the case sides, with three wedged tenons on each end. This divider stiffens the sides of the case and supports the drawer unit as well.
If you are tidy, you might find the upper well useful. To make it you must let two wide rails into the sides of the case with through wedged tenons on each side as shown in the drawing on the next page. The bottom inner edges of these rails must be grooved to house the bottom panel, which is best made from 1/2-in. plywood. Also, the bottom edge of the rear rail is grooved to accept the 1/4-in. plywood back panel.
The drawer unit includes two vertical dividers which are housed at the bottom in dadoes cut across the horizontal divider and in dadoes in the top of the case (in notches in the two rails if you build in the top well). These dividers are made from 3/4-in. thick stock, and have 1/4-in. deep, 3/4-in. wide rabbets cut along both of their front edges. These rabbets accommodate the 3/4-in. thick drawer fronts, which overlap the drawer sides 1/4 in. The side of the case must also be rabbeted in the same amount to make room for the overlapping drawer fronts at the extreme ends of the unit.
The drawers slide in 1/4-in. deep, 1/2-in. wide dadoes cut into the two vertical dividers and in the case sides. The dadoes are hidden by the overlapping drawer fronts, which also obscure the drawer runners. These are 1/4-in. thick, 1/2-in. wide strips that are screwed to the sides of the drawers. When fitting the runners in the grooves, you ‘ ll probably need to plane a shaving or two off their width to get an easy sliding fit.
The drawers themselves are joined in a straightforward way. The sides fit into vertical stopped sliding-dovetail housings in the drawer front, and the back is joined to the sides with through dovetails. The 1/4-in. plywood bottom is glued and bradded in a rabbet cut into the drawer front. The back and sides are cut narrow to ride entirely over the bottom, and therefore don’t need to be rabbeted.
The three drawers across the bottom are really not drawers at all, but French-fitted trays for holding drill bits and wrenches. It’s frustrating to go rummaging through a pile of wrenches when you’ re looking for just one, but in a fitted drawer, you can pick out the right wrench at a glance. I used 1/2-in. thick pine for the tray, and cut out the spaces for the wrenches and other items with a jigsaw. Then I applied the fitted tray over a 1/4-in. plywood bottom, and edged both sides with solid lipping to which the runners are attached. The front edge of the tray fits into a groove in the drawer front.
The pigeonhole unit has two levels, and the top one is divided into nine bins that are dimensioned to hold planes of various sizes. The shelf that separates the upper and lower sections is housed in dadoes in the sides of the case, and the vertical dividers are secured in stopped dadoes in the shelf below and in the main horizontal divider above. The bottom half of this area is left unpartitioned, except for a single pigeonhole on the left and a little drawer I built to hold cutters for my router plane and electric router. Note that the drawer fronts and pigeonhole dividers are recessed 2-in. into the case to make room for the tools that will be mounted on the inside of the cabinet doors.
I made the two doors from lumber-core plywood and edged them on all four sides with solid wood. This lipping has a tongue milled onto one edge that fits into a corresponding groove cut in the edges of the plywood. The solid lipping wears better than the raw edge of the plywood and keeps the face veneer from snagging on a shirtsleeve and tearing up. Also, it’s more attractive. and will hold screws better. The doors are hung to overlap the sides of the case and are secured with butt hinges mortised into the edges of the case and the door. If you choose to make a top well, then edge its lid with solid lipping and attach it with inlet butt hinges.
To hold the doors open so they don’t flop around when you remove and replace the tools mounted on them , you can fashion brackets by bending the ends of a 3/16 in. dia. metal rod to fit into sockets in the top edge of the case and the top edge of the door, as shown in the drawing above. These brackets can be put away when the cabinet is closed. The lid for the top well is secured by a pair of barrel bolts (one on each side) , and the left-hand door locks top and bottom by means of two surface bolts (the strike for the top one is screwed on the underside of the lid). A half-mortise drawer lock installed on the right-hand door secures the entire cabinet.
The base I made from pine lumber also. The side stretchers are tenoned into the legs and the L-section aprons are held with screws and glue in notches cut into the tops of the legs. You could add a shelf to the base for holding tools and other items you don’t mind having exposed to the outside. The cabinet sits unattached on the base; its weight is sufficient to keep it stable and in one place. This arrangement makes it easier for me (with some help) to move the cabinet whenever the need arises.
Fine Woodworking Recommended Products
Woodriver Rechargeable Desiccant Bag
WoodRiver Router Bit Storage Case





Comments
Thank you for the article and plan. This is a project I would like to tackle some day. I realize this plan is only a reference for a cabinet the user may want to build,however, it would be nice to have a clearer image to work with. You have provided a scale so I would assume you meant to be able to take direct measurements from the drawing.
Chuck
At Barnsley there would have been no room for tool cabinets like Powell's for each cabinetmaker. There probably still isn't.
I like Powell's design, but there is (was) a reason that chests were used. There seems to be an insinuation that a chest being a compromise was somehow lost on the cabinetmakers of the past. This is highly doubtful given ingenuity evidenced by their work. In a working, for-profit shop, space was almost always at a premium. Bench rooms ideally featured a lot of windows, and this obviated standing cabinets for each worker set against walls.
For the sole practitioner cabinetmaker, with all the wall space to himself or herself, simply hanging the tools on the wall in some fashion seems the most direct approach, and this would take Mr. Powell's idea to its logical conclusion: if not a chest, then a cabinet, then simply the wall.
A photo of Gimson's shop is attached (didn't have one of Barnsley handy).
Where would one put tool cabinets?
Log in or create an account to post a comment.
Sign up Log in