Centering a groove on a router table
Bob Van Dyke demonstrates how to precisely set your router table fence for perfectly centered groove.This is an excerpt from episode 2 of Bob Van Dyke’s Router Table Fundamentals video workshop:
Sometimes you need to set a router table fence for a centered groove or mortise, and it must be dead center. You can get the fence setting pretty close by eye, and maybe a bit closer with setup blocks, but there are times when you need to be absolutely certain that the groove is in the center of the stock. Here’s how Bob Van Dyke centers a groove on a router table.
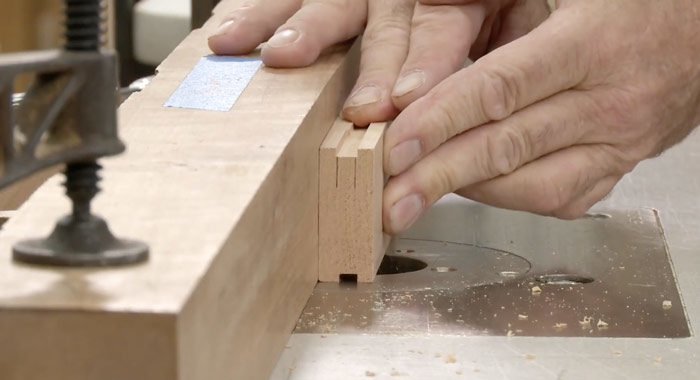
First get the fence as close as you can by eye. You just need it close. Next, run a groove in a piece of setup stock the same thickness as your project stock.
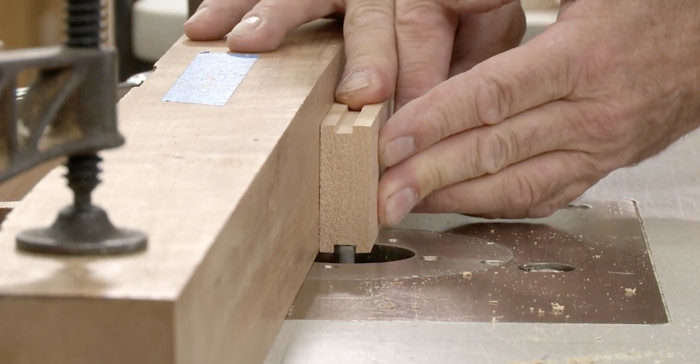
Now, flip the stock and run it again, this time stopping halfway. If your piece is not truly centered, you’ll see a ridge at the halfway mark where you stopped.
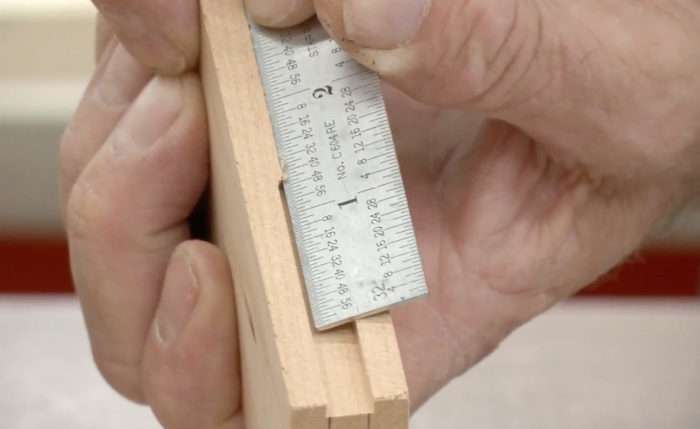
Now keep in mind that this offset is double the actual adjustment that is needed. Usually it takes a few fence adjustments to get it perfect. You’ll know you’ve got it when you don’t feel any resistance at all on the second pass. Your groove is perfectly centered and you didn’t measure anything.
 |
Ep 2: Router Table Fundamentals – Adjustments |
 |
Customize Your Router for Centered Mortisesby Ed Pirnik |
 |
Router table basicsby Bob Van Dyke |




Comments
Yet another pearl of wisdom from BVD. Brilliant. I was watching and thinking that I would run out of test pieces, and then Bob just made the cut deeper on the same piece.
I had the same feeling when we were filming it. I was like... "oh no, we're out of test pieces and screwed". That BVD is a mart one!
This method may be fine for BVD. But I wouldn't do it this way in my shop. Those fingers are just way too close to the spinning bit. Brings to mind a film title, "There Will Be Blood". I know, I am squeamish.
Well, you can use the same technique but set up a featherboard and use a push stick, which would have made it harder for Ben to film.
The number one technique for shop safety is not using more safety equipment, it is paying attention to what you are doing.
Sorry but you DID measure it. That is what was happening when a line was drawn on the table and the fence was tapped towards it. you measure it, just not with a numbered rule…! I know Mr Van Dyke does not like the Incra Fence System and the likes, but all that stopping, mistake making and starting over has just demonstrated the best reason for using one. In his own words "it happens all the time".
It may not even be worth mentioning... but I'm really not impressed with the safety practices used here. Fingers WAY too close to bit. Never pass your fingers over the bit. If you have a kickback, a knot explosion, anything your wiping you butt with a hook the rest of your life. Measuring and adjusting height with a socket wrench while the machine is running is asking for trouble too. I realize BVD is a pro and an EXPERT but every woodworker I have met who is missing digits or parts of digits had their accidents after getting too comfortable with their abilities. No matter how much expertise you have, a carbide blade spinning at 20,000RPM is WAY better at showing you who's boss. Keeping hammers and wrenches and stacks of stock on your router table while your running ittiy bitty 2-3inch pieces, making adjustments with the router on, and crowding that blade is asking for a trip to urgent care. I get BVD is making a video, and time/ video screen real estate etc pose limitations, but sacrificing safety, particularly when making an instructional videos is probably bad form. Just my 2 cents. Much respect for the knowledge and I'm sure BVD is experienced enough to keep working like this for the rest of his life. But Joe Beginner who just got his first router and watches this needs to know: That will get you hurt.
Incra Fence +1. been using it on my table for 15+ years. Worth every penny and makes this a snap. Woodpecker's center marking gauge also gets my center channels dead nuts marked and aligned before I even turn the router on. Nice trick for ill equipped shop though. For about what you pay for that 3X3 rock maple stock he uses and a pair of those clamps... you'd have a Incra Fence paid for.
All Hail the Great Van Dyke. Ever since seeing his "L Fence" I have been a disciple. Frankly, I cannot understand why that L fence is not all over the net. It's the danged cleverest thing I've ever seen. So, when I see The Great Van D, I drop everything and focus. If he's listening, it shows a big man to record and laugh off goofs. Seeing them means so much to us beginners. If "the gods" can goof, it makes us feel less hopeless. Also, if Ben Strano is listening, I wish I could afford to send him champagne for his FABULOUS 90 degree cutting table he showed us how to make out of plywood. That has transformed my woodworking. When I made mine, I didn't trust my thin drafting triangle. I went to a big box and got a giant ceramic floor tile to lay against the fence to establish the 90 degree. Flawless. Tell him he's an ACE.
Same applies to using a morticer and cutting rebates on circular saw. Reverse the wood and creep up to the required dimension. It’s easier with a micro fence if you have one. Regarding safety, I just recommend watching safety warning videos on YouTube and make your own decisions. Most woodturning videos by experts make me cringe.
To save a step (or two) and eliminate moving the fence the wrong way -
1) Complete the second cut instead of stopping halfway...no need to mark which edge was against the fence.
2) Put the board back over the stopped router bit and turn the bit to its widest orientation within the completed groove.
3) When you squat down and look through the groove, you'll see that the bit will be against one edge of the groove...to center the board, just move the fence around until you see equal daylight on each side of the bit.
4) If you're persnickety, turn the board over and repeat the pair of cuts...after this second pair of cuts, the bit will be in a significantly narrower groove than the first set of cuts, and centering the board will leave a just few thousandths' daylight on both sides of the bit, making it easy to judge dead center.
Mark Mueller
INCRA Precision Tools
Taylor Design Group, Inc
Sorry but that is a lot of arsing around. Just decide on the distance for the cut from your reference face, (you should only be referencing off one face regardless of it being in the centre or not) and setup the fence from the cutter at that distance. Everything else is folly.
I'd been woodworking for at least half a century. Love my router! I feel obliged to comment on Bob's technique and the picture used to promote this video.
I was doing something similar on my router table. Small piece of wood, I wasn't using the push-stick because "I didn't have as good control". Well, for the first time, something snagged, shooting the workpiece out of the way. Before I could react, the pressure I was using to hold the workpiece against the fence moved two of my fingers into the blade. I was relatively lucky. I only broke one bone, didn't cut through it. The other finger had a only a router-bit shaped flap of skin cut that bled worse than the really damaged one.
ER didn't have to amputate, but, having cut the nerve on the damaged side of my finger left me with limited feeling on that side.
It is irresponsible to show videos with such a hazardous technique. It gives the rest of us a false sense of immunity. I see other woodworkers be just as cavalier or macho. In my case, I re-live the accident every time I use a sharp tool. It makes me re-think difficult-to-control situations that look "so easy I can just use my fingers" and re-think a safer jig or push-stick. I wish it hadn't taken my cutting my own finger for me to realize how vulnerable we humans are.
Get your mortise gauge/gage and set the pins to the width you want. Then set the fence so it looks in the middle and then get it so it IS in the middle by the same method, first one side then the other.
Then mark the face and offer it up with the mark dead centre. Do it a little at one end. Compare to marks (it will leave one and destroy the other) then adjust and try the other end.
OR put your router depth gauge/gage (you have one, right?) on the piece and set the rule to the inside edge of your centred marks. Then transfer that to the router table. MUCH easier.
Though I am trying to do much more stuff with hand tools since I find I do NOT enjoy feeding wood into noisy, sawdust producing machines. I would do the above with my mortise gauge/gage then mark the length of the groove. Drill clearance holes if it is stopped. Then use my rip tenon saw to cut inside the lines before removing the waste in lovely curls with my router plane (a modern one, though for small things I have an antique version which still works very well.
Oh and I can listen to the radio or the birdsong while I'm doing all this. I don't have to wear ear defenders as Bog is not unless he has plugs in (you don't get your hearing back) or protection goggles as you should or a cartridge face mask for the dust, as you should.
Producing long curls (they are really tight spirals) is VERY therapeutic. It's good for your arm muscles as well. As is sawing the sides. I'm doing this at the moment in my shop. Double stopped grooves inside the full length tenons of the bearers for my big six legged planter. This includes the grooves (open from mortise to mortise) in the legs. The grooves are for the tongue and groove panel pieces. The tongue and grooves will be cut with my antique matched pair of wooden tongue and groove planes. More lovely shavings.
The planes cost me a fraction of a router tongue and groove set. I just lapped them with a rebate cutter in the router table in the past. Once set up I can run through long treated boards in no time before cutting the sections out.
I run a wood shop at a retirement community and although the technique for centering is valid and worth sharing I would not show this video because of the lack of safety techniques. Fingers so close to the bit...no, no,no. I have a couple of guys in the shop who are very experienced who do similar things and make it hard to enforce safety in the shop for the majority of the members. In my mind experience is no excuse for overlooking such basic safety techniques.
I would endorse all the safety advice given in the comments above. It only takes a blink of the eye for something to go wrong when you become used to not following all the safe practice we have had passed onto us by the experts. That is not the main reason for this post.
I am sure we all have blunt or broken ¼ in twist drills. If you use ½ in router bits then a simple collar adaptor can be bought to fit the ¼ in drill. It is a simple matter to grind an acute angle point onto the end of the drill and to keep this to one side to be used as a setup tool. After scribing a centre line on spare piece of stock, use the repurposed drill in the table router to line up with the scribed line on the spare stock. Once aligned, then swap the repurposed drill for the correct router bit and proceed with your grooving. Safe woodworking everyone.
Log in or create an account to post a comment.
Sign up Log in