Shopmade Racks Simplify Finishing
Bob Miller shares the racks he made to hold parts while finishing and drying.
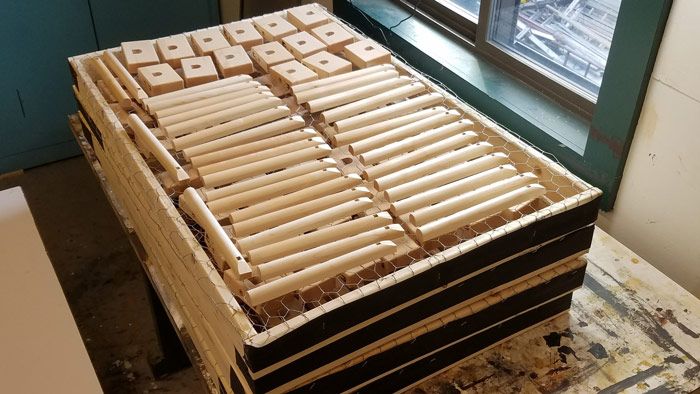
Lets face it: Finishing is nobody’s favorite thing to do in the shop. One of the reasons many people detest finishing is that they are struggling to hold the work in a way that makes it easy to finish, limits contact with the work as much as possible, and allows the finish to dry properly.
Here are two methods among many that I use for holding work in the finishing room.
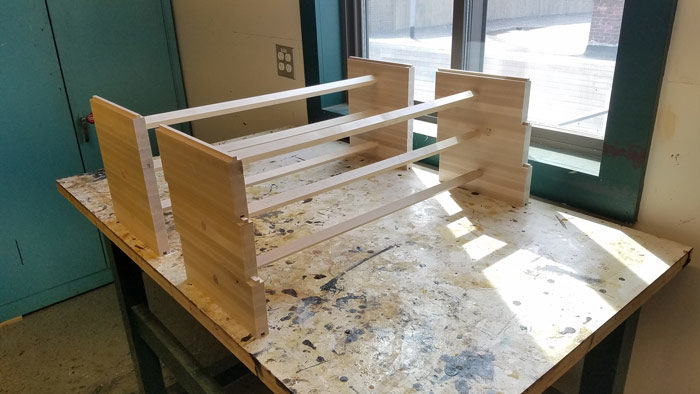
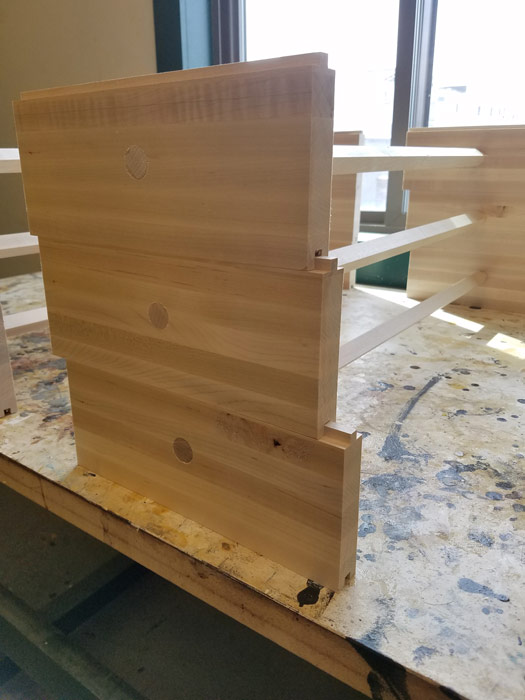 The first is a fairly common stacking rack with 3/4-in.-square beams spanning tongue-and-groove boards on the ends. The beams set into the ends with the corners up. The tongue-and-groove ends stack on one another so that I can go vertical to maximize the limited space in the finishing room. This approach keeps the contact between the rack and the work to a minimum and allows air to flow all around the piece. This rack really shines on multiples of flat work such as cabinet doors and cutting boards.
Small parts finishing basket
The second method was driven into existence by my marking-gauge production. I needed to oil large numbers of small parts and I had to figure out a way to hold them all, allow air to flow around them, and keep them from taking up too much space.
I was stumped for a while, and then inspiration struck in the strangest of places – midway through lunch at a dim-sum place in Chinatown. As I worked my way though a delicious lunch, I suddenly realized the design of the bamboo baskets used to steam dumplings would be PERFECT! They have a consistent-sized rim with a screen spanning the opening; the dumplings sit on the screens and the rims keep the layers separated. Inspiration can come in many forms; this one happened to come in the form of a pork dumpling.
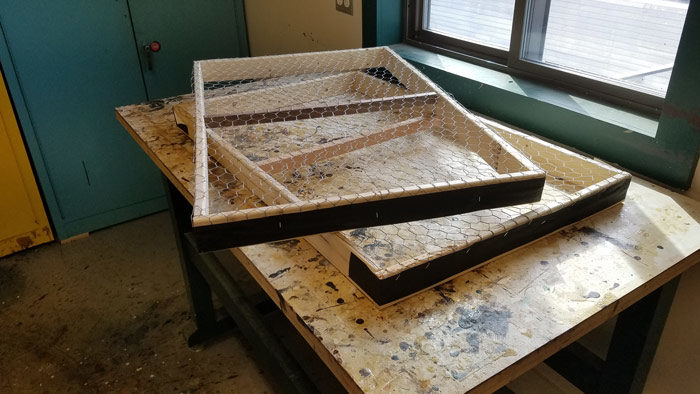
All I needed to do was make a series of same-size frames and then attach a wire mesh to them. I’d be able to finish a layer of gauge parts suspended on the mesh, stack the next basket on top, and finish another layer.
Their construction could not be more simple. I used the cheapest 1×3 pine strapping I could find, put together into a rough frame with a crown stapler. From there I stretched the wire mesh, in this case basic chicken wire, across the frame and stapled it in place. Then, just to make it a little easier to handle, I covered the cut ends of the chicken wire with heavy tape to keep them from snagging stuff as I move them around the shop.
I encourage you to give these two simple racks a try. They will work well to help alleviate the pain of finishing and make the whole process faster, easier, and more effective.
-Bob Miller is a custom furniture maker and woodworker based in the Charlestown neighborhood of Boston. In addition to his own line of work, Bob manages The Charlestown Furniture Makers, an 18-tenant co-op, solar-powered woodshop located in the Sullivan square area of Charlestown.
Bob also teaches for the continuing education department of The North Bennet Street School, primarily teaching Bowl Turning and The Fundamentals of Fine Woodworking.
Fine Woodworking Recommended Products
Diablo ‘SandNet’ Sanding Discs

Osmo Polyx-Oil




Comments
100% doing the chicken wire frames. I always end up leaning small pieces on a piece of scrap in a random area in my shop. This is simple yet brilliant.
Log in or create an account to post a comment.
Sign up Log in