Workshop Tip: Miter box parts on the router table
Using this jig and a V-groove bit, you can cut miters accurately and to length.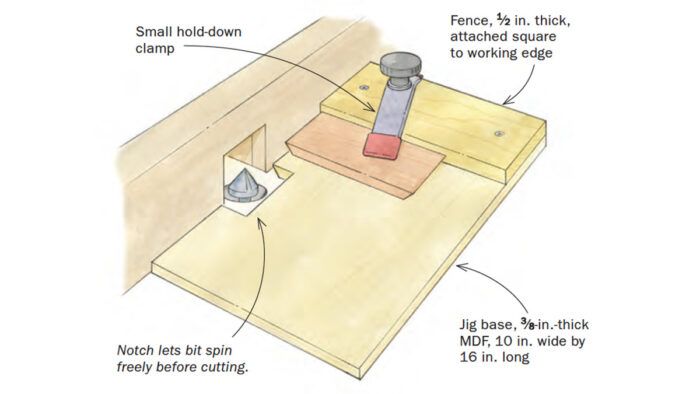
Mitering parts for small boxes is trickier than it seems. You have to cut the angles precisely while cutting parts to uniform lengths. The best approach I’ve found is a router-table jig like this one. I team mine up with a 1-in.-dia., 90° V-groove bit, but any bit with a 45° cutting edge will work. Start by crosscutting all of the pieces to final length. Then adjust the height of the bit and the position of the router-table fence so the bit just reaches the top edge of the workpiece but no farther. This is so you don’t change the length. If anything, leave a tiny square edge at the tip of the miter; it will disappear after the box is assembled and sanded. For uniform results, push the jig and workpiece firmly against the router-table fence as you make the cut, working right to left. Then simply flip the workpiece to miter the other end.
—BRUCE DUDMAN, Hobart, Tasmania, Australia
Illustrations by Dan Thornton
From Fine Woodworking issue #288
Correction from Asa Christiana:
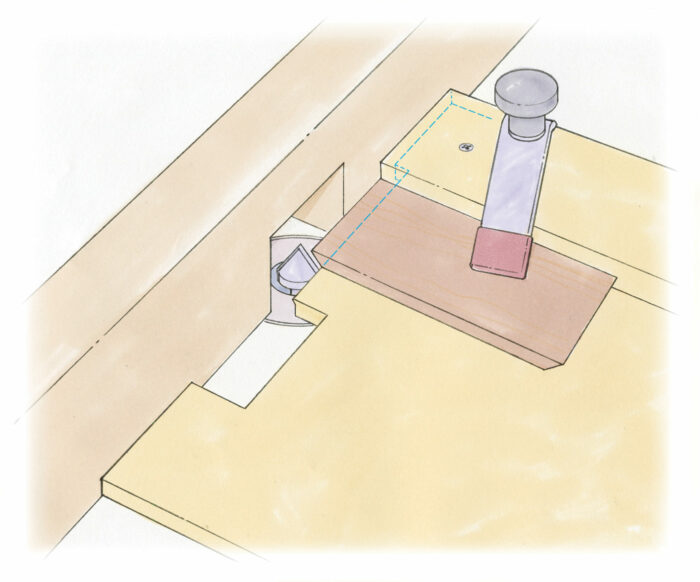
If you look at the drawing that ran in the magazine, you will see that the router bit is not placed high enough, which affects the resulting cutout in the base of the jig. Secondly the cuts in the base of the jig and the workpiece do not line up as they should.
The new drawing has it exactly right, showing The correct bit height, and the resulting cutout in the base of the jig. Also how the front edge of the jig rides the fence on the router table, then part of the jig gets cut away by the bit, and then the cut stops just past the workpiece and the rest of the jig rides securely along the fence.
It’s a small detail, but one that will be very helpful to folks actually trying to understand and use the tip.
Fine Woodworking Recommended Products
Leigh D4R Pro

Festool DF 500 Q-Set Domino Joiner
Incra Miter 1000HD




Comments
That picture can not be accurate. There is no way for the jig to be against the fence while the workpiece is on top of the jig. The jig would be cut by the router bit at the same 45 degree angle but would exit where the cut begins on the work piece. They can't both be up against the fence.
The upper piece on top is what rides against the fence keeping the big lower piece square to the fence. On second thought when I looked at it again you are right. I went into my shop and tried it. Back to the drawing boards. Have seen many successful ways to cut these parts using a sled on the table saw.
I agree and surprised that there is no explanation to your comment. The picture shows a miter on both the jig base and the work piece in different planes. The concept is a good one to keep the work piece from diving into the bit but I still can't figure out how it actually works. Can anyone else?
Would love an explanation here because I can see how there can be the benefit of uniform miters but I’m just not getting it. I, too, went into the shop DougSeagrim and failed as well.
We just updated with a correction.
Don’t know what your correction is but seems to me it requires an upper piece of wood at the front that will ride above the bit and keep it from diving into the bit.
The notch allows the jig to straddle the bit prior to cutting, so it's on the fence the whole time.
This is an interesting jig. I was considering making one for some miters this morning. After a littler research I came upon Matt's video on miters. He doesn't explain how he made the fence he used but looking closely at it it appears to be a zero clearance type. Easy to make. I clamped it to the fence on my Kreg table and went at it. With zero clearance the stock doesn't dive into the bit. Hope that helps someone out there.
Thank you for the updated drawing, Asa. I tried it last night and it worked like a charm:)
Log in or create an account to post a comment.
Sign up Log in