Workshop Tip: Simple splitter for an old table saw
This method makes it easy to line up the tab perfectly with the blade.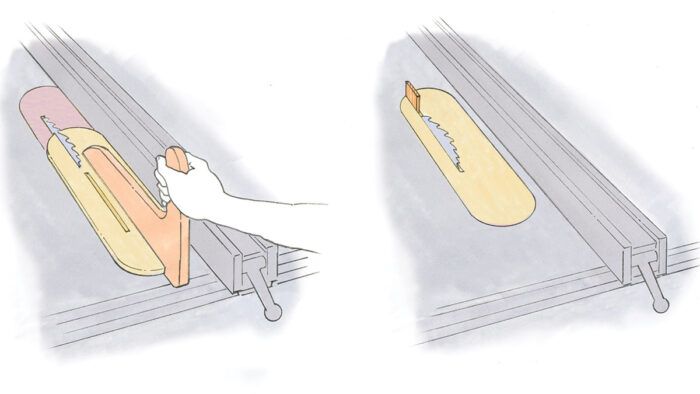
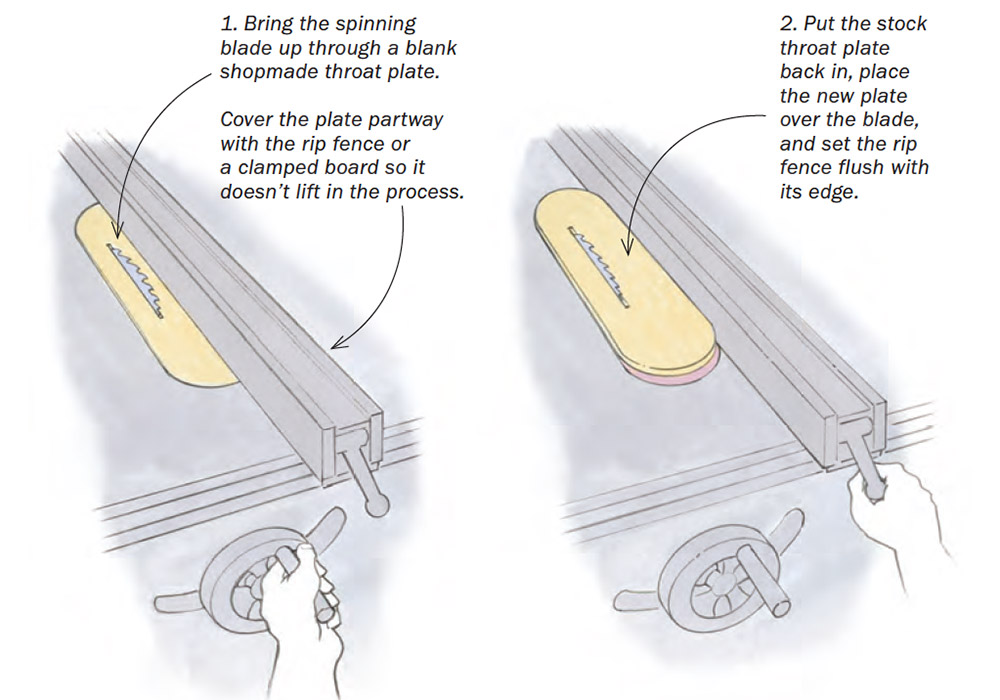
Like many older tablesaws, mine lacks a functional splitter, so I made my own by extending the blade slot in a shopmade throat plate and inserting a small hardwood tab at the back of the slot. This isn’t a new idea, but I’ve refined the process to make it faster and more foolproof. I start by lowering the blade and bringing it up through a blank plate as usual. This creates a zero-clearance slot that prevents tearout on the bottom side of cuts.
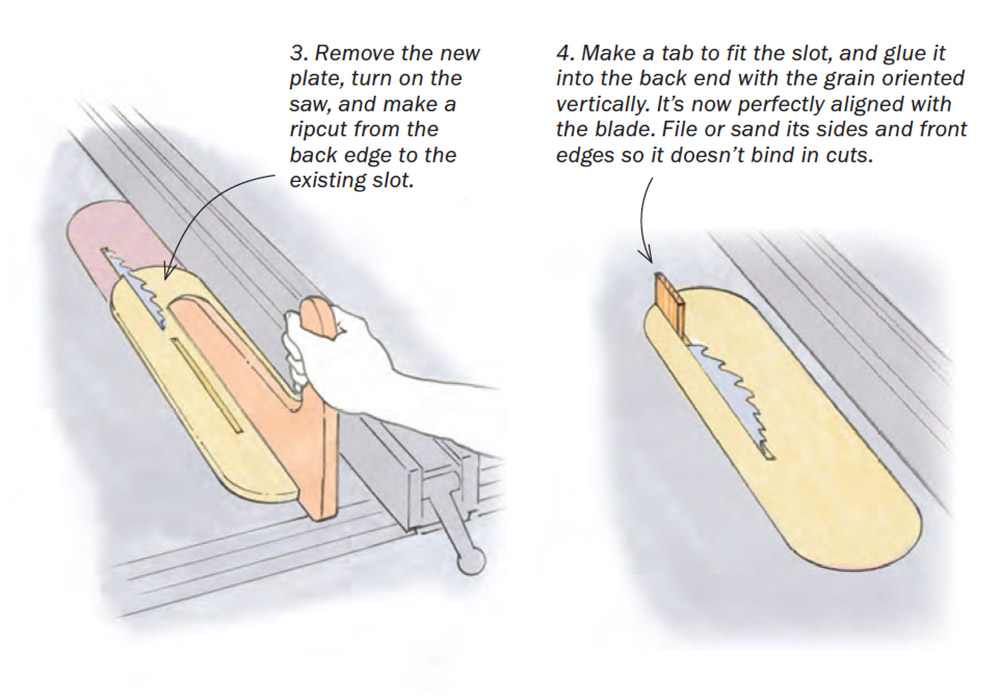
The tricky part is extending the slot safely and also accurately, so the tab will be aligned perfectly with the blade. I do this by putting the stock throat plate back in the table, fitting the new one over the raised blade (with the saw turned off!), and then adjusting the rip fence to meet the edge of the new plate. Then I just pop the plate off the blade and make a ripcut from the back end up to the existing slot. That guarantees perfect alignment.
Next I glue the tab into place, which closes the back of the slot and restores the plate’s strength. You can locate the tab as close as you like to the blade for improved safety. It’s really that simple.
A few important notes on the splitter tab: Start by ripping a strip—using the bandsaw or tablesaw—that fits the blade kerf. Then cut off a piece and orient the grain vertically when gluing it into place, clamping across the plate for a strong joint. If you make multiple throat plates, you can have one tab that sticks up higher and another that sits down low, for cuts that don’t go through the board.
Last, I use a rasp, file, or sanding stick to take a touch off the sides of the tab so it doesn’t bind in the cut, and round and taper the front edge.
—BEN KERNES, Chicago, Ill.
Illustrations by Dan Thornton
From Fine Woodworking issue #289
Fine Woodworking Recommended Products

Stanley Powerlock 16-ft. tape measure
Woodriver Circle Cutting Jig
Makita SP6000J1 Track Saw




Comments
That's a great tip but nothing is perfectly aligned even when you put the fence up to the new throat plate. It has been my experience that that simple act of pushing the fence up to the throat plate, while the blade is up and in its newly cut slot, does not guarantee perfect alignment. In theory it might seems so, but there is always the chance of pushing that fence too hard slightly or because of wobble in the blade that slot has some clearance that results in a slight misalignment. Then when you put that splitter in there it inevitably is slightly off. If you follow all the steps and it works the first time, then you just got lucky. In other words there are tolerances at play here. Not to be a Debbie downer here but talking from experience.
If you push the fence too far, you will feel it pinching when lifting the throat plate back off. If it is not far enough, you will see the gap along the fence. If your blade or arbor has wobble (and true zero clearance is impossible) you will see a gap on either side of the blade and know if it isn’t centered. The benefit of this method to me is how easily it shows you if the fence isn’t in the precise position compared to marking a pencil line or going off a measurement.
I make a throat plate for all my different blade kerfs and various depths of cut using this method and haven’t had any alignment issues.
Log in or create an account to post a comment.
Sign up Log in