Sturdy, knock-down workbench
Clever construction makes small work of big joints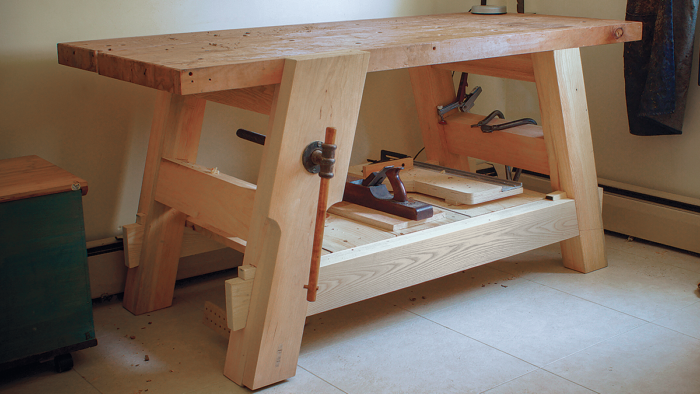
Synopsis: This beefy bench borrows a lot of details from benches that have come before–Roubo benches, timber-framed benches, and most specifically, the Moravian workbench. It’s heavy, portable, and straightforward to make. By laminating the parts for the base, you get a nice heavy workbench, capable of taking a beating, without having to buy expensive thick stock. It also makes the mortise-and-tenon joinery much simpler.
When designing this bench, I pulled on old clichés: big, beefy, bombproof, versatile, stout, smart workholding. I shamelessly took from what came before, especially the Moravian workbench and its angled legs. But I wanted something heartier, so I turned to Roubo benches for proportions. Timber framing then lent a hand with the big knockdown joint. The result is a heavy, portable bench that works so well because, at its core, it’s so unoriginal. I even took the top from my old bench.
This article will focus on building the base and vise. The base’s thick parts are built up by laminating two pieces of 8/4 stock milled as little as possible. The benefit of this lamination isn’t just the lower cost and extra weight, but easy mortise-and-tenons as well, removing some of the pain of working thick parts and adding efficiency instead. The top is just a top, so I won’t spill much more ink on that.
Wood selection
The lumber species are all over the place—white pine, oak, ash, and cherry—but with reason. First, much of it was free, so the price was right. But even if I had bought all the boards, they’re common, affordable North American domestics, so my wallet wouldn’t have taken a huge hit. Then there’s the second, more important reason: The parts straddle the line between workability and weight. The mortised members are pine, while two thirds of what gets tenoned—an easier process—is heavier oak or ash.
Well, the cherry vise chop may not straddle that line. That board was a perfectly sized off-cut from a coworker. Without that serendipity, cherry feels a little premium. But it sure does look nice.
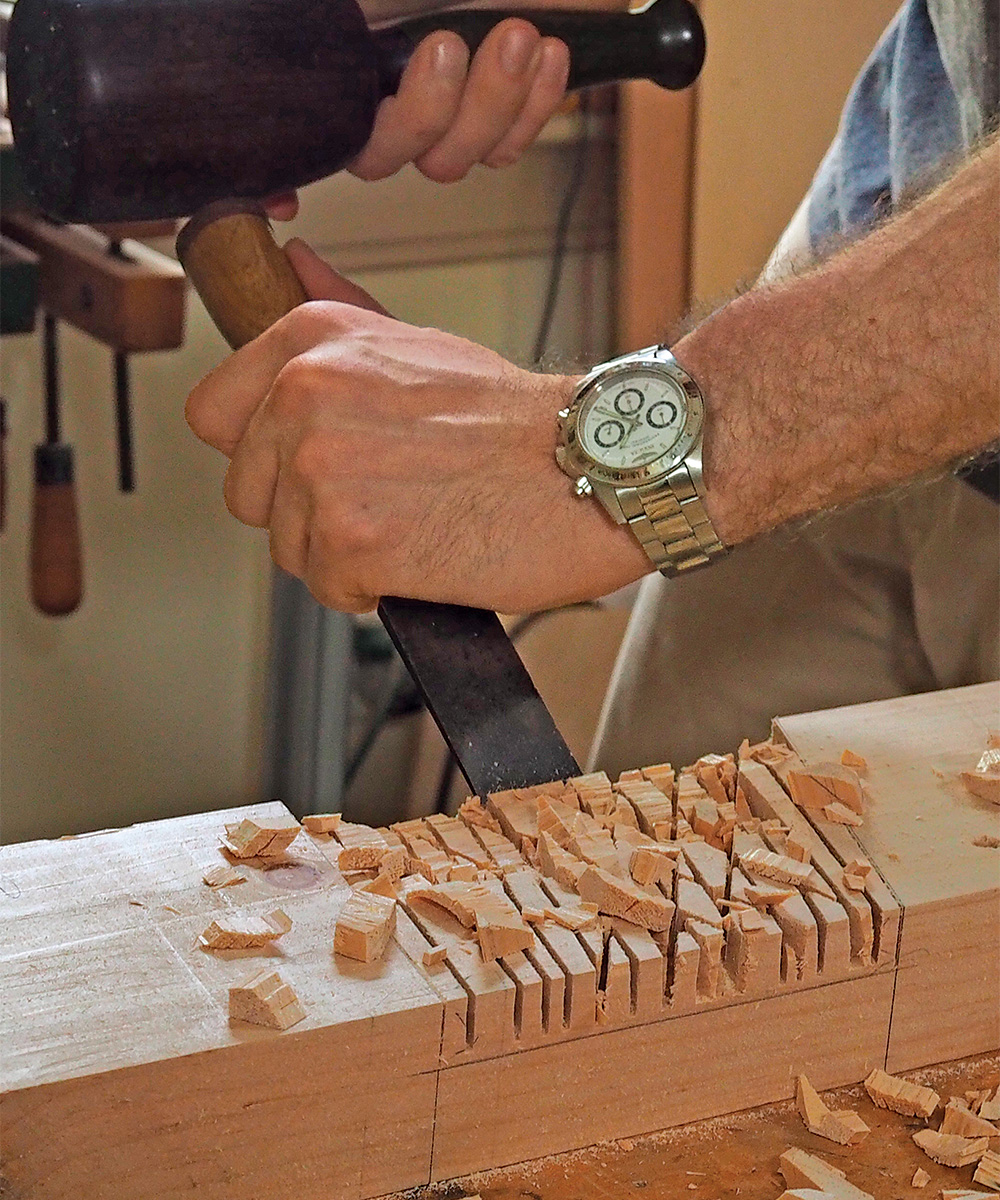
the lamination is the cheeks, and each front board creates the shoulders. The result is huge, fast, bareface tenons. Just be sure to cut all the front boards—the shoulders—to the exact same lengths. Otherwise, the shoulder-to-shoulder dimensions will be off, and your assemblies won’t be square.
First, though, make the legs. Each gets three mortises, two stopped ones for the short stretchers and one through-mortise for the long stretcher. Here’s another benefit of lamination: Instead of cutting this big, deep through-joint in solid stock, you can just form it in each half before glue-up.
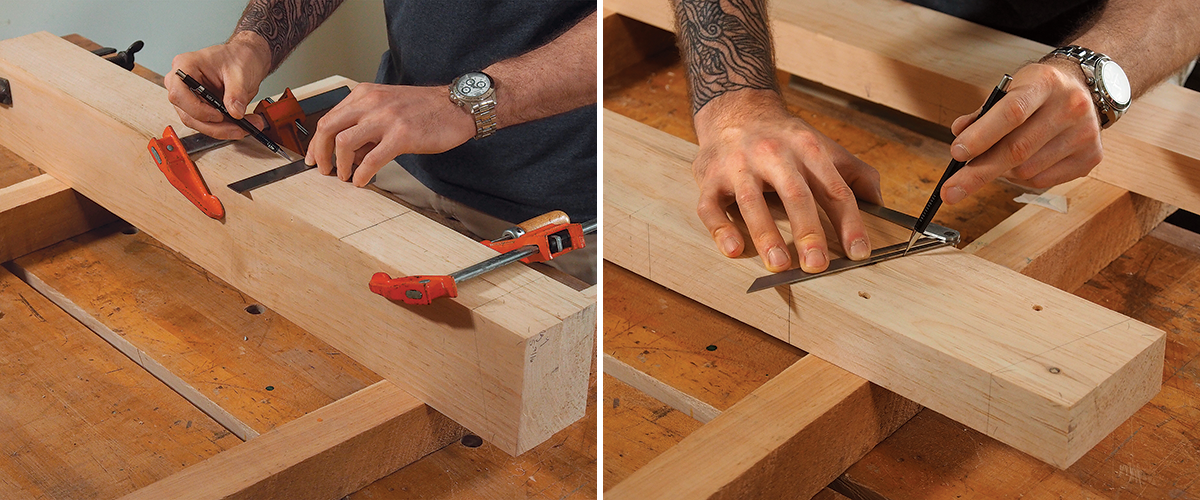
To start, clamp the halves together. Then drill for and install alignment dowels. Doing this when the halves are clamped together guarantees the dowel holes line up. Next, lay out the through-mortises on an edge. The dowels make sure the legs go back together exactly as they are now, letting you pull apart the halves to complete the layout.
From Fine Woodworking #293
To view the entire article, please click the View PDF button below.
Fine Woodworking Recommended Products
WoodRiver Router Bit Storage Case
Woodriver Rechargeable Desiccant Bag





Comments
Was this adapted from the Moravian bench which Will Myers brought back to life?
Yup! That bench was the main inspiration, but not the only one.
Fine Woodworking wastes so much of our time trying to up-sell us. I am a digital subscriber, hate the way Fine Woodworking treats digital subscribers, and want to know where the Sketch-up plans can be downloaded. Thanks.
@JonathanJ - I found what appears to be this project in the Digital Plans Library. It was named "Splay-legged workbench"
Barry, Great design improvements over the other Moravian workbenches! This is the best I've seen.
The Leg Vise looks stout and is integrated into the Front Leg rather than an add-on.
The Half-Dovetail Stretchers with locking wedges are also a cleaner design than the Tusk Tenons on the other benches. You mentioned in the video that you need to tighten the wedges in the winter. If you were to build the bench again would you go with the Half-Dovetail or Tusk Tenon design?
I would love to see a setup video of your bench similar to Matt Kenney's video on Eric Tan's Workbench.
I'm thinking about building a 48" x 21" x 33.5" version of your design as a table saw outfeed / second workbench. The added bonus of the breakdown feature means I could easily transport it offsite instead of just taking sawhorses.
Thank you!
Gary
Hey Gary,
Sorry for my late reply. Thanks for the compliments! I'm proud of the bench, so it's extra flattering to know others dig it too. We talked about doing a fun video for it, a la Matt, but I would have embarrassed myself. This bench's mass and angles make it much less elegant to assemble, so that video would have turned from fun to sad real fast.
Good question about the half dovetails vs. tusk tenons. Honestly, I'd do the half dovetails again. The joint didn't fail as the air dried; in fact, I wouldn't have noticed it loosened had I not checked out of curiosity. So I still think the half dovetails' benefits give them the edge.
I like your idea of having your outfeed table double as a workbench. Very slick. Glad my design can maybe offer a hand.
Cheers,
Barry
Barry, Thank you for your detailed response!
I agree with your thoughts on the dovetails. The benefit when coupled with the Moravian splay design is gravity will work to tighten the joint even if the wedges loosen up with the seasons.
I look forward to seeing you on STL.
Cheers,
Gary
Are there any plans available for the bench? It’s a great design!
Yes, it is a great design by Barry. Check out the PDF above for Barry's plan / article.
The bench was inspired by Will Myers Moravian plan. Link here.
https://woodandshop.com/moravianworkbench/
Cheers, Gary
Also see: https://www.tauntonstore.com/woodworking/project-plans/splay-legged-workbench
This will be my first time building a worktable (build much of anything really) so I've been reading the article and the plans in tandem. I'm a bit lost as to how to drill the dowel holes in matching pieces (#293, page 43):
"To start, clamp the halves together. Then drill for and install alignment dowels. Doing this when the halves are clamped together guarantees the dowel holes line up."
Do I drill a hole through one half and then partly into the other or am I missing something here?
Yup, that's exactly it.
I built the bench because I was looking for something based on the Moravian paradigm. Using the .pdf downloaded file was fine. I adjusted it to some pine boards that had been "baked" under the roof and some planks that I found in a local maderería - worked really well - I just need some time to get it back out from storage whilst I was away for the summer and build something. I also need to work up the courage to drill some holes for the holdfasts. I just brought home a stool that I made about 50 years ago in carpentry classes at school (I was allowed to use Iroko as I was in the upper levels of the class - 2nd place to a fellow student who took his work home to his father's workshop) - looking at it I think I should get going on using a proper workbench rather than an old door on a chipboard and stick frame.
I would like to figure out how to put my Record vice on the end of the worktop - an overhanging top to be outside the undercarriage?
Bye the bye, a colleague built an even more compact version and I thought that he had nearly finished it, so I put my skates on to finish mine, only to find that he had put it into use without gluing up parts of it -he just clamped it together and put it into service!
Hi. I have still not drilled the holdfast holes but I have drilled the guide block to make sure that the holes (Drilled with a brace and bit - I picked up the brace in a charity thrift shop for a fiver (UK) - much better than a modern manufactured one) will be perpendicular to the bench top. The bench went together very well after five months of summer storage under a hot roof. I think that on principle the dovetail with wedges should be stronger than tusk tenons. Having seen how, in the past, craftsmen worked without modern end vices (Scott Landis, "Throwback: 18th-Century Workbench"
issue #65), I will, at least for now, forget about trying to accommodate an end vice. However, I have glued some leather patches to the faces of the holdfasts and hung them up on the cross member just as in the photo in the article (Page 39)!
On the in-elegance of the process of assembling the bench from knocked-down: I agree your decision not to make a video was wise. The components are heavy and lifting them down from overhead storage was a little fraught, but I managed not to drop them: neither on my desk, nor my computer. The heft of the bench does make working on it much pleasanter than my previous rickety bench or the Workmate that I was using whilst making it.
Log in or create an account to post a comment.
Sign up Log in