Mechanical Drawer Slides
Furniture maker Mark Edmundson explains the differences between the three basic slide options: basic bottom-mount slides, side-mount slides, and undermount slides.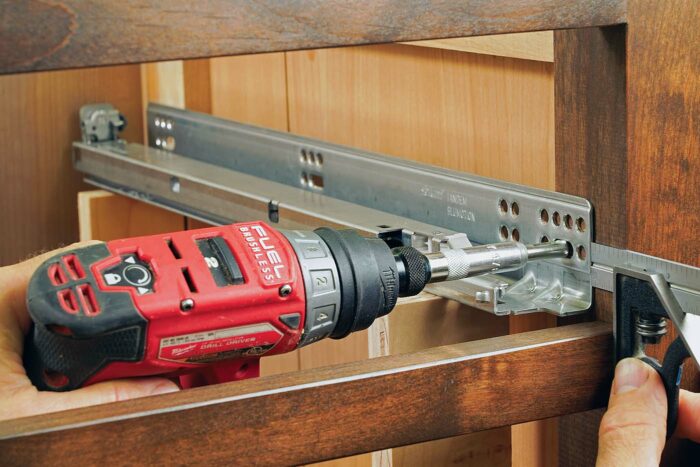
Drawers are the hardest-working parts of a cabinet, carrying their loads in and out, thousands of times over.
In fine furniture, wood drawers usually ride on wood supports. In built-in cabinetry, however, which prioritizes functionality over tradition, mechanical slides—sometimes called commercial slides—are usually a better choice.
While the various wood-on-wood approaches look beautiful, they are affected by seasonal moisture changes and tend to wear over time, leading to sticky drawers and even outright failure in some cases. Most are also a serious test for your woodworking skills.
Three great optionsThe main types of commercial drawer slides haven’t changed, but improvements continue. All are available with a soft-close feature, which pulls the drawer to a gentle stop, and all work very well. Slide length, load capacity, and the soft-close option factor into pricing. |
||
 |
 |
 |
|
Basic bottom-mount slides Price: $8 to $15 Description: Two-part epoxy-coated slides with plastic roller wheels Pros: Inexpensive, very easy to install, soft-close feature now available Cons: Visible when drawer is open, three-quarter drawer extension, slightly noisier than others |
Side-mount slides Price: $15 to $40 Description: Three-part steel slides with ball bearings Pros: Full-extension standard, very long models and heavy load ratings available, can be mounted in any orientation, good problem solvers Cons: Pricier than basic bottom-mounts, visible when open, a bit trickier to install, greasy bearings can capture sawdust |
Undermount slides
Price: $25 to $45 Description: High-tech slides offer best of all worlds. Sliding parts are installed as one piece in cabinet. Slide clicks into locking devices, mounted under drawer box. Pros: Hidden to user and with small gap next to drawer box for a furniture look, easy to install, adjustable in all directions after installation, full-extension, soft-close Cons: Price
|
 |
 |
 |
Mechanical slides, by contrast, will deliver smooth-gliding action for decades. They are made from durable steel, with their moving parts riding on ball bearings or high-density plastic wheels. They also have built-in stops and soft-close mechanisms.
Commercial drawer slides are perfect for the built-in cabinetry that goes into kitchens, bathrooms, laundry rooms, home offices, workshops, and more. But they also work well for any type of storage furniture that will get a lot of use. And they are great problem-solvers, stepping in when the usual wood-on-wood approaches won’t work.
Mechanical slides are used most often with drawer boxes that have a separate drawer front applied. This is an easy way to make drawers and install them. You make the boxes using any joinery method you choose, add the slides and install the boxes in the cabinet, and then attach the drawer fronts as separate parts, perfecting the gaps all around.
While commercial slides are fairly easy to install, they require that you have specific spacing between the drawer boxes and the cabinet sides, so you’ll need to nail the dimensions of the drawer boxes.
There are a number of types of mechanical slides, and a number of ways drawers can be integrated into cabinets. That can make products and their permutations pretty confusing. I’ll show you how to choose the right slides for your needs, and how to install them in the most popular type of built-in cabinetry: European-style cabinets with full-overlay drawers.
Whichever commercial slides you choose, be sure to read the instructions carefully, as key dimensions like slide insets can vary a little.
We focus on full-overlay drawers
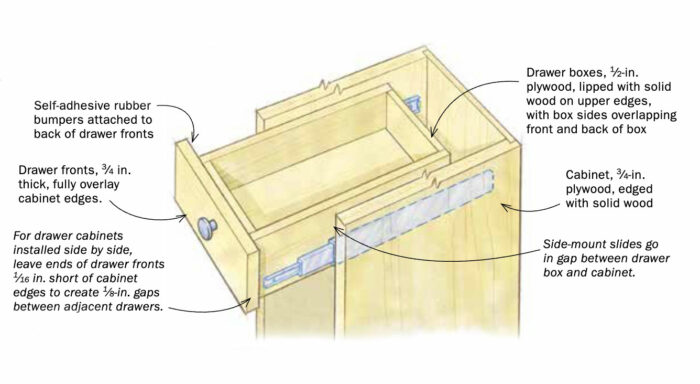
European-style cabinets have no face frame, and their doors and drawer fronts fully overlay the cabinet sides. All you see are the drawer fronts and doors, and the look is very clean and modern.
This format also makes drawer installation easier. As opposed to inset drawers, where the drawer slide acts as the drawer stop, overlay drawers stop when the drawer fronts touch the cabinet. You don’t have to be as precise with the front-to-back location of the slides, because the soft-close mechanism will pull the drawer home once it’s within 1-1/2 in. of the cabinet.
Also, the gaps between overlay fronts tend to be around 1/8 in., making small inaccuracies less obvious than they are in the tight gaps around inset drawers.
For all of these reasons, I’ll focus on the full-overlay approach for the three main slide installations that are described here. Two other common approaches to cabinet design are worth noting, however.
Flush-front face frames are more traditional—For a more traditional, furniture-type look, cabinetmakers add a face frame to their cabinet boxes, combining it with flush, inset drawers. With this approach, the drawer slide acts as the drawer stop, and if the drawer doesn’t end up flush, it’s obvious. Therefore, the slide locations need to be more precise, front to back.
There is usually an offset between the openings in the face frame and the inside of the cabinet box, which further complicates drawer-slide installation.
Mind the gapSize each drawer for the type of glides you are using: |
||
 |
 |
 |
The good news is that there are straightforward solutions to these challenges that work for all three types of slides.
We are ignoring a lower-end approach—There is another common face-frame drawer style called partial overlay, in which the drawers only partially overlap the face frame. This is popular in lower-end cabinetry because there are no gaps or reveals to worry about. But partial overlay has a low-cost look that most custom woodworkers avoid. So I’ll avoid it as well. That said, if you choose this approach—for shop cabinets, for example—the advice in this article will be easy to apply.
Three types of slides
Mechanical drawer slides come in three basic formats, which fall into three price ranges. Each has advantages and disadvantages in terms of cost, visibility, extension, load capacity, performance, and ease of installation. That said, one type is a clear standout.
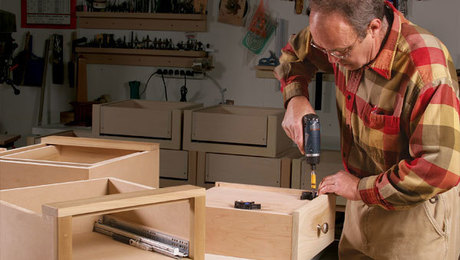
Installing basic bottom-mount slidesIf you build your cabinets and drawer boxes with the right gaps between them, these slides are very easy to install. |
||
 |
 |
 |
| The drawer part of the slide wraps around the bottom of the drawer box and is mounted flush with the box’s front edge. | Drill pilot holes with a self-centering (Vix style) bit (left) so the slide won’t shift when you drive the screws (right). | Mark the cabinet 1/8 in. below where you want the bottoms of the drawer boxes to end up. |
Basic bottom-mounts save you money—The most affordable slides are the white epoxy-coated slides seen in more-basic cabinetry. Unlike the other types, these only allow the drawer to open three-quarters of the way (“3/4 extension”). Also, they are visible when the drawer is open and are a bit noisier than the others.

Make slide supports. In a three-drawer bank like this one, cut support strips for the top and middle drawer slides, and nail them together to form a right angle. This will allow the supports to stand up on their own, and you can rotate them to install slides at both levels. (The third pair of slides is mounted at the bottom of the cabinet.)
|
 |
Set the inset. Read the instructions to determine the proper inset for the drawer/cabinet configuration you are using. |
 |
Three screws will do it. Use a self-centering bit to drill pilot holes for the screws so the slide doesn’t shift. Start with the first screw, recheck the inset, and then drill and drive two more screws. | |
 |
Check your work. Use a straightedge to make sure each drawer is installed squarely, with its front face even with the cabinet or slightly inset. The slides have alternate screw holes for adjusting the slide positions. |
On the plus side, basic bottom-mount slides are durable, easy to install, and less than half the price of the other types. In addition, they have a solid load rating of 60 lb. to 75 lb. I used bottom-mount slides in my own kitchen cabinets, and they have been doing their job for 25 years.
 |
 |
 |
| Next one down. To install the next set of slides, rotate the supports to use the lower parts. Install these slides the way you did the upper ones, using a combo square to set the inset and a self-centering bit to drill pilot holes. | Bottom pair. These go at the bottom of the cabinet. There is a bump under their front edge, so place a 1/8-in.-thick spacer just behind it. This will keep the slide level and ensure that the drawer part won’t rub on the cabinet. | One last check. Once you have installed all three drawers, make sure they are flush with each other when closed. Use the alternate attachment holes to adjust slides fore and aft if necessary. |
 |
| Fronts go on last. The drawer fronts can overlap the top or bottom edges of the cabinets (as well as overlaying their sides). To position them, apply double-stick tape to the drawer boxes, shim and press each front into place, and then pull out the drawers to drive screws from the inside. |
These slides now offer a soft-close option, which eliminates the main drawback of past models: a hard bump when the drawer is closed. They are priced at $8 to $15 for an 18-in. pair.
Installing side-mount slidesThese can be installed anywhere in the drawer, which can be disorienting. Follow the instructions below to simplify things. |
|
 |
 |
| Pull the slides apart. Push this small lever to separate the drawer section of the slide from the other two sections. | Install the cabinet part of the slide. Again, use two-part supports to position the slides as you attach them to the cabinet. |
Side-mount slides are problem-solvers—Like the bottom-mounts, side-mount slides are visible when the drawer is open, and adjustment is limited to a few slotted attachment holes. But side-mount slides have a few distinct advantages.
Unlike basic bottom-mounts, they offer full extension. Side-mount slides are unique in how far they can travel and how much weight they can support.
 Same approach as before. Use a combo square to lock in the inset from the front edge of the cabinet, and a self-centering bit to drill pilot holes before driving screws. The cabinet part of the slide has an extra section, which you’ll slide fore and aft to expose the screw holes. |
You can buy side-mount slides as long as 60 in. or more, with weight ratings in the hundreds or even thousands of pounds. A typical pair runs between $30 and $40.
 Mark the drawer boxes. If you position the top edge of the drawer section of the slide 1-1/4 in. above the bottom edge of the drawer box, the box will end up in the right spot. Make marks at the front and back of the drawer box. Mark the drawer boxes. If you position the top edge of the drawer section of the slide 1-1/4 in. above the bottom edge of the drawer box, the box will end up in the right spot. Make marks at the front and back of the drawer box. |
 Check your work. As before, use a straightedge to make sure that the boxes are level with each other and even with the front edge of the cabinet. There are alternate holes on the slides for attaching them in slightly different positions. Check your work. As before, use a straightedge to make sure that the boxes are level with each other and even with the front edge of the cabinet. There are alternate holes on the slides for attaching them in slightly different positions. |
 Install the drawer section. Read the instructions to determine the right inset for the front end of the slide, and use a combo square to position it correctly. Again, a self-centering bit ensures that the slide won’t shift when you drive the screws. Install the drawer section. Read the instructions to determine the right inset for the front end of the slide, and use a combo square to position it correctly. Again, a self-centering bit ensures that the slide won’t shift when you drive the screws. |
In kitchens of the past, you would often see white bottom-mount slides on most of the drawers, and heftier side-mount slides on the deep drawers for pots and pans. Side-mounts are also great for shop drawers with heavy contents. In addition, they are great problem-solvers for irregular drawer shapes, because they can be mounted underneath a drawer (although they can’t support quite as heavy a load in that configuration)
Installing undermount slidesUndermount slides require additional installation steps, but they are quick and easy, and the slides can be adjusted in every direction after installation. |

Same type of install supports. The two sliding parts stay together and are attached to the cabinet as one unit. Use L-shaped supports to install the upper and middle slides level with each other. |
Undermount slides are unbeatable—A much more recent innovation than the two other types, undermount drawer slides are significantly different. Thanks to their unbeatable combination of attributes, they have come to dominate the kitchen and bath markets. You’ll pay for their advantages—18-in. slides start at $30 a pair—but these mechanical marvels are worth the cost for top-notch cabinetry.
 |
 |
| Bottom two pairs. Rotate the supports to install the middle pair of slides. The lower pair goes against the cabinet bottom. | |
Tucked under the drawer bottom, an undermount is the only type of mechanical drawer slide that’s invisible when the drawer is open. The slide location also means that the gap between the drawer side and cabinet side is 1/4 in. or less, so the drawer box fills the opening for a furniture-quality look. Because of how these slides never come apart, and how they support the drawer bottom, load capacity isn’t an issue for household use. Just to be safe, though, make sure your slides are rated for 90 lb. to 100 lb. Undermounts are also the smoothest and quietest of the three types, with soft-close and full-extension standard.
Drill the drawerThe drawer boxes need holes drilled at the front and back for attaching the locking devices and capturing the small hook at the end of each slide. The Rockler drilling guide positions the holes perfectly, though they can also be drilled without the guide. |
||
 Drill the drawer back. Use the guide to drill the two small holes needed at the back of each drawer. (The notches are cut before the drawer is assembled.) Drill the drawer back. Use the guide to drill the two small holes needed at the back of each drawer. (The notches are cut before the drawer is assembled.)
|
 |
 Same guide works up front. Tilt the guide to line it up for drilling angled pilot holes in the front of the drawer box. Same guide works up front. Tilt the guide to line it up for drilling angled pilot holes in the front of the drawer box. |
Undermount slides are also the easiest to install. And once installed, they let you adjust the drawers in every direction. When the cabinets themselves are being installed on-site, the cabinets and drawers tend to shift, so these adjustments can be a lifesaver.
 Attach the locking devices. These tuck under the drawer bottom and are screwed to the drawer box using the pilot holes described at the bottom of the previous page. Attach the locking devices. These tuck under the drawer bottom and are screwed to the drawer box using the pilot holes described at the bottom of the previous page. |

Slide the drawers into place. The notches in the drawer back fit over the slides and guide the drawer box as you push it backward. |
 Rear hooks grab the box. Each of the small holes at the back of the drawer fits onto a little hook at the back of the drawer slide. Rear hooks grab the box. Each of the small holes at the back of the drawer fits onto a little hook at the back of the drawer slide. |
 Click the slides into the locking devices. Pull the sliding sections forward to click them into the locking devices. The drawer is installed. Click the slides into the locking devices. Pull the sliding sections forward to click them into the locking devices. The drawer is installed. |
Blum Blumotion is my favorite undermount slide, but similar models are also available. In most cases, I recommend shopping for slides at a large woodworking-specific supplier. We got most of ours from Rockler. These suppliers sift through the mountain of options, curating those that are most useful to fine woodworkers and avoiding off-brand models that don’t perform as well. They also offer additional installation guides in some cases.
Three helpful adjustmentsUndermount slides have a number of adjusters. You can use these to align the drawer boxes before installing the fronts, or to help align the fronts with each other afterward. |
||
 |
 |
 |
If you’ve never given mechanical drawer slides a try, I hope you will now. Combined with 35mm cup hinges for doors, commercial slides make cabinetry functional, durable, and easy to build.
Mark Edmundson is a furniture maker and cabinetmaker in Sandpoint, Idaho.
Fine Woodworking Recommended Products

Blum Drawer Front Adjuster Marking Template






Comments
Jigs are made for mounting these kinds of slides. And they're practically foolproof. If you intend to do a lot of them, a jig is easily worth it.
The “View PDF” link does not work. Can it be fixed?
Weird. Sorry about that. Fixed
Thank you!
Log in or create an account to post a comment.
Sign up Log in