Painting and Carving the Coffer Chest
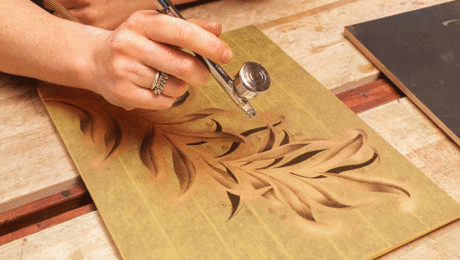
As if building the coffer weren’t fun enough, painting and carving it notch up the excitement. A choice of paints and colors and endless design possibilities for carving can change the look and feel of the piece.To paint the exterior of my coffer, I use a linseed oil paint if I can allow a week for it to dry. If I don’t have the luxury of time, I use acrylic. After the paint is nice and hard, you can cut through the paint to decorate the coffer. Some cultures used carving gouges. Others used engraving tools that were pulled against a straightedge or inserted in a compass to make arcs.
 |
 |
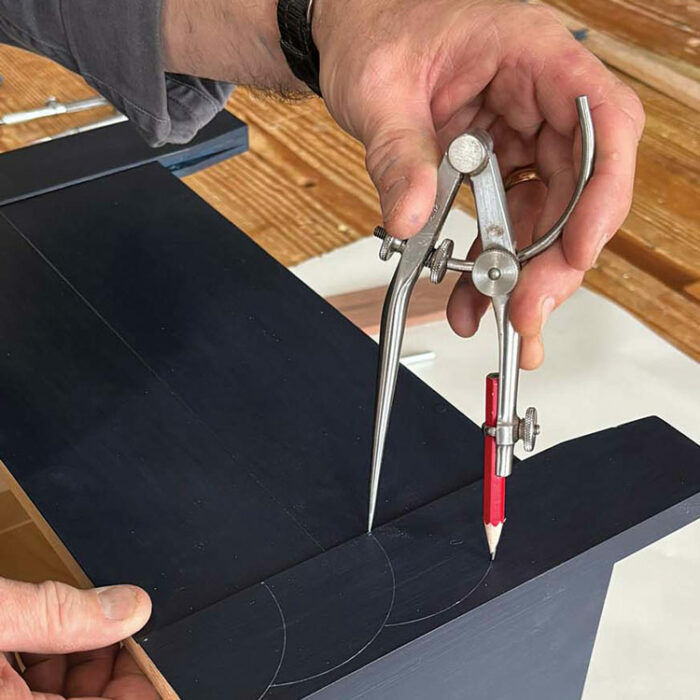
My engraving tool is a simple cutter used to trim the welds on vinyl floors. I hold it with an inexpensive craft knife. I turn down the soft aluminum handle of the blade to fit into my compass. The coffer here is made of pine and poplar, which is easy to engrave. Basswood is another easy-to-engrave option. Most diffuse-porous woods are easily engraved.
 |
 |
| Circles and arcs. You don’t have to lay out every line of the carving. For example, if you pencil in the largest of the arcs on the leg and use them to guide your first cuts, you can then simply adjust the compass to cut smaller concentric arcs without having to pencil them in. The same goes with concentric circles. | |
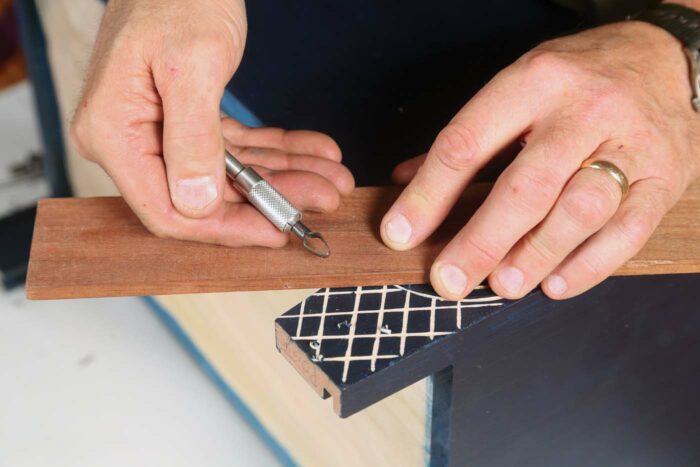
The engravings shown on this coffer are protection glyphs common throughout Europe. Each culture has its own special set of symbols that guard people from sickness, famine, or loneliness.
 |
 |
A little searching through the ethnological literature of your ancestors’ culture will likely turn up lots of ideas for shapes and symbols. You are the only limitation to the design you choose to engrave.
 |
 |
—Christopher Schwarz is a furniture maker and writer in Covington, Ky.
Click here to download the chapter, “Some Common Symbols and Spells in Europe,” from American Peasant by Christopher Schwarz.


Comments
Great article. Thank you for sharing. Have looked for the vinyl cutter with no luck. Can you provide a more specific name?
Carolg,
I found them on Amazon searching on Exacto Router Flooring Blades Diamond Pear Shape. Basically it's just blades that fit the K2 Medium Duty Aluminum Hobby Knife (3 pack) available on Amazon too.
And I ordered the ZLKSKER Wing Compass with Pencil Holder (8 inch), hoping to make that work with the knife. Won't get them until next week so keeping my fingers crossed.
Amazon has the tapered wood nails, but only in a bag of 300. I'm going to try bamboo skewers for my prjoject. If everything goes well and I want to build more coffers I may order the nails.
Any word on how the compass worked with the knife holder yet?
After receiving compass opted to send it back as it seemed a little rough and the mount for the pencil/knife holder mounted to the outside, which I read somewhere that Chris said didn’t work as well.
I ordered a 6” Osborne which more closely resembles what Chris uses (Starrett) but at a lower cost. Haven’t had a chance to try it yet but hoping in a couple weeks to give it a try after actually building the coffer.
Thanks. Let us know how the new compass turns out. I would like to try the carving technique on a project as some point.
FYI - found the best tool for the job - https://lostartpress.com/products/crucible-engraving-tool
When I looked it was out of stock and what you get is a pair of cutters and the holder, which has been turned down to a pencil-sized shaft allowing it to fit the compass/divider, which is not part of the cost.
I bought a set of three Excel knives and a set of ten cutters well under that. I will have to turn the shaft down but wanted to give that a go.
Had the cost been for what’s pictured I would have done that in a heartbeat.
Was able to order tool from lost art press. Thanks for the redirect. Agree the Starrett is pricey. Was going to try the Groz winged-compass. Similar shape but the cutter is held on the outside of the compass leg.
Getting closer. Pic is of the Osborne compass and my version of the engraver. Turned (on drill press with a file) the utility knife at the right into what you see with cutter installed. Everything is resting on the lid panel glueup. Painting after that and then sharpen cutter. After a little practice I’ll commit to the coffer.
Log in or create an account to post a comment.
Sign up Log in