Layout Kit for Dovetails
Mike Pekovich shares his tools of the trade for dovetail layout.
The thought of cutting dovetails can be stressful. A big challenge is that it doesn’t consist of a single task. Instead, it requires a number of steps that involve multiple skill sets. This is not to say that it needs to be a daunting proposition. Rather, success lies in understanding the process and having a sound approach to each step.
While the prospect of cutting this relatively complex joint with a handsaw may demand much of our attention (and cause stress), it is actually a small and not particularly important part of the process. In teaching hundreds of students to cut dovetails, I have found that the most challenging and important step is transferring the location of the tails onto the pin board before cutting the second half of the joint. The angle and spacing of the tails themselves are not critical. When you transfer the tail locations directly to the pin board, you can end up with a gap-free joint no matter how badly you missed your lines when cutting the tails.
The real key to success when cutting dovetails lies in accurate layout. If you cut exactly to a line but the line is in the wrong place, there’s still a lot of work to do. For that reason, I take time and care when laying out the joint before I start cutting. If I do a good job of it, the rest goes easily and accurately.
Over the years, I’ve developed a simple process for layout that incorporates a pair of alignment jigs and helps my students get off to a good start. After that, it’s just a matter of building skills and confidence.

Aids for accurate dovetail layout
There are a lot of challenges to address when transferring the tail locations to the pin board. The boards must be aligned accurately side to side and end to end. They must be aligned square along their length as well. Once the boards are positioned correctly, you must hold them steady as you scribe. Any movement while scribing will result in errant lines. Finally, you must be able to see your knife line easily, and you need some indication of which side of the line you should be cutting on. Cutting on the wrong side of even a precisely positioned knife line will result in gaps before you even begin fitting.
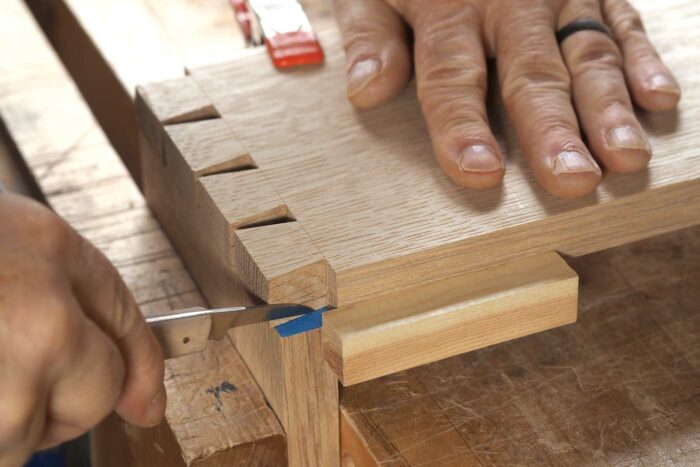
Applying blue tape along the end grain of the pin board takes care of the last two concerns. By scribing through the tape and peeling it away from the waste areas, you are left with a clear road map for cutting. The tape also serves as a guide for paring.
The most critical part of layout is positioning the tail board accurately for scribing. A tip I learned from Steve Latta many years ago is to cut a shallow rabbet along the inside face of the tail board even with the shoulder line. The rabbet then acts as a positive stop when aligning the boards.
While this is an effective alignment method, cutting the rabbet introduces its own challenges. Once you alter the thickness of the tail board by rabbeting, you need a second marking-gauge setting to scribe the baseline for the pins. So instead of using the rabbet, I use a shoulder guide, clamping a piece of 1/4-in. MDF along the inside face of the tail board adjacent to the shoulder line. To aid in side-to-side alignment, I glue a fence to the end of the MDF that registers against the edge of the pin board.
 |
 |
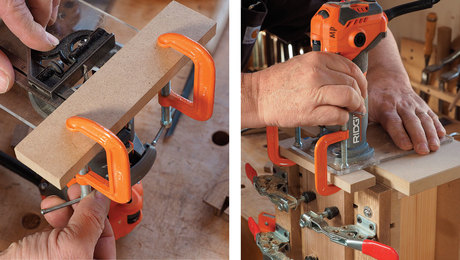
Using the flip blockTo help hold everything in place for scribing, I make a flip block: a square length of stock with a 1/4-in. MDF strip glued to one face to create a lip. To position the pin board in the vise, pinch the flip block against the pin board with its lip flush to the board’s top edge. Lower them together until the block contacts the bench, and tighten the vise. Next, lay the flip block flat on the bench to support the far end of the tail board. This lets you apply pressure on the tail board during scribing while keeping your off-hand out of the way and stationary. I used to lay a plane on its side for this, but the block is faster, and means one less tool on the bench.
Clamp the pin board in the vise. To set the height of the pin board, pinch the flip block against the board with its lip flush against the end. Lower them together into the vise until the block contacts the benchtop.
Clamp the pin board in the vise. To set the height of the pin board, pinch the flip block against the board with its lip flush against the end. Lower them together into the vise until the block contacts the benchtop.
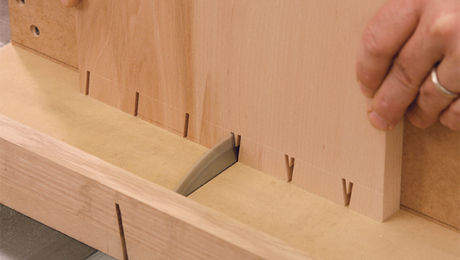
Flip the block and use it to support the far end of the tail board. This creates a bridge that allows you to apply plenty of pressure while keeping your free hand clear while you scribe. |


Dial in the fit with a shoulder guide
The placement of the shoulder guide in relation to the scribe line can alter the fit of the joint for better or worse. When working with hardwoods that have little to no compression, align the guide right at the scribe line. You don’t want to cover it up, nor should you leave a line of stock between the guide and the scribe line. This would create a joint that is too tight. When using softwoods like pine that compress easily when fitting, I often cheat the guide lower than the scribe line for a snug-fitting joint.
 |
 |
Slide it to the line. Position the shoulder guide on the underside of the tail board. Register the fence along the edge and slide the guide forward until it is adjacent to the baseline. Use a spring clamp to hold the guide in place.
 |
 |
Everything in place for scribing. Gently slide the tail board forward until the shoulder guide registers against the inside face of the pin board. Then slide it over until the guide’s fence contacts the edge of the pin board. Apply pressure with your off-hand to keep the board in place while scribing.
Using the right knife
|

 |
 |
 |
Once you’re finished scribing, peel away the tape from the waste areas. To check your work, leave the shoulder guide in place and position the tail board back over the pin board. The tail board should lock in place between the remaining tape areas. Look closely, using a light if you need to; there should be no gaps between the tails and the tape. If there are slivers of wood visible, just remove the tape, put on a fresh layer, and try it again. A big benefit of the tape is that even if you need to make a couple of tries, you won’t be guessing between multiple scribe lines when making a cut. Taking the time to get this step right provides a big payoff later.

The last step is to strike a pencil line down the face at each pin location. This provides a visual guide during sawing and offers clues when you’re paring the walls vertically during fitting. If it’s been a while since you used your dovetail saw, clamp an offcut into your vise, scribe some vertical lines down the face, and take a few warm-up cuts. If you hit the line more often than not, you’re ready to cut dovetails.
 |
 |
Saw to the tape. Aim to start the cut adjacent to the tape without cutting into it. Look for any remaining waste between tape and kerf (far right), and mark those spots. They can help when you’re dialing in the final fit.
Tips for final fitting
 |
 |
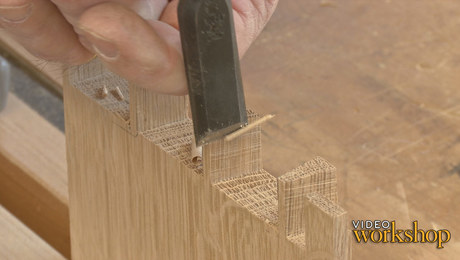
As my friend and mentor Bob Van Dyke is fond of saying, all that is left is to get rid of the waste without cutting into the good stuff. First, make sure that the sawn walls of the pins are vertical. The pencil line comes in handy here. I also use a small combination square. It’s critical for the pins to be vertical before you attempt to fit the joint. Register a square against the pins and look for light. If there’s a gap at the top, it means that the pin is wider at the bottom and could cause the boards to split when they’re driven home. Use a chisel to square up the pin. Once I am sure that the pin walls are square, I turn my attention to fitting.

First, I take a look to see where I may have sawn outside my tape lines. I don’t pare anything just yet, but I note where I may need to trim. Then I set the tail board in place. If you’ve sawn close to the tape, there’s a good chance the joint will seat at one end or the other. If you’ve done excellent sawing, the joint may fit right off the saw. In that case, great job! If there is still some work to do, use the tape as a guide when paring, making sure to keep the walls vertical. If you’ve done a careful job with the layout, paring to the tape should be all that you need to do.
 |
 |
—Michael Pekovich is Fine Woodworking’s editor and creative director.
Fine Woodworking Recommended Products
Leigh Super 18 Jig
Stanley Powerlock 16-ft. tape measure
Starrett 4" Double Square


Log in or create an account to post a comment.
Sign up Log in