Sapling Stool: Drill ramp and spacer method for stretchers
Myko uses a digital gauge and scrap wood to make an accurate drilling guide. Mar 26, 2025

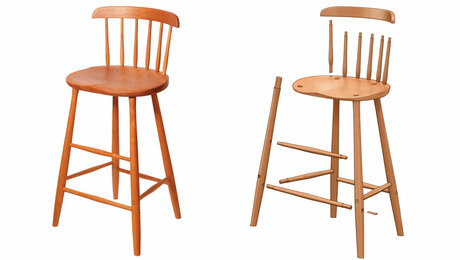
While building a stool using maple sapling sections for legs, I came to the point of drilling for stretchers. The four legs were irregular in width and seemed out of plane in all directions. I needed to drill connecting holes through each of the four pairs of legs. For stick chairs I will tape a leveled straightedge to the pair of legs and eyeball the drilling, but this did not work well for these actual sticks.
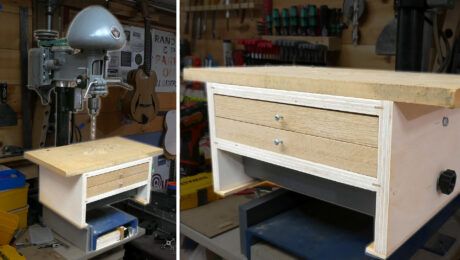
The solution I came up with is twofold: a leveling ramp for the drill and a system of guide rails and spacers clamped to the benchtop. First, I measured the grip angle of my Milwaukee drill as it stood on the nice flat-bottom battery and made a ramp to counter the angle. I chucked a length of drill rod into the drill and stood it on the bench. There is a little flex built into the battery connection, so I felt for what that is and aimed to halve it. Then I clamped a vertical support in the vise and inched the drill toward it until I thought I was there. The support kept the whole thing stable as I checked the angle.

I used a Wixey digital angle gauge and a level to measure out at 13.4°. The built-in magnets made life easy. You could measure manually by taking vertical measurements at the chuck and at the end of the rod, drawing it on paper and using a protractor. Lay out your angle on a long block, cut it at the bandsaw, and clean up the surface. I ran mine over the jointer before cutting it to length. Looking back, I think a quick coat of something would have helped the tape stick better.

The bottom of the drill was covered with painter’s tape, and two-sided tape meant for securing items to a CNC table fastened the drill to the ramp. The drill needs to be perfectly centered side-to-side on the face of the ramp because the edge of the ramp gets used for registration both left to right and right to left. I used the cutoff from the ramp cut to put under the drill during setup to keep it from peeling itself off the ramp. (Ask me how I learned this!)

I clamped a guide rail to the very edge of the bench. It needed to be thick enough to allow for adding spacers under the drill to change elevation to separate the front-to-back and side-to-side stretchers. For this stool I drilled the S-S holes with the drill on a ½-in. riser and the F-B holes with the stool on the ½-in. riser, giving me an inch of offset between perpendicular centers. I think I would have liked the finished piece better with a bit more offset.

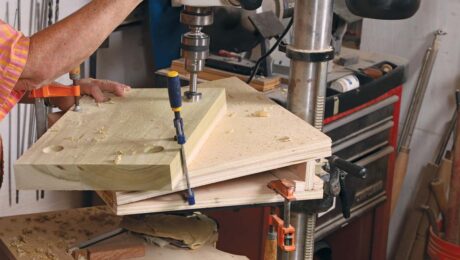
I chucked a small brad-point bit into the drill and pressed a pair of legs against the guide rail. Then I introduced the drill to a leg by sliding it along the guide rail. Had it not landed in the center of the leg, I would have needed to add spacers either to the drill or the leg to get it there.

With the bit centered, I moved to the other side and repeated the process. I went back and forth until the drill hit dead nuts on both sides using the SAME spacer for the drill. (Only the leg spacers can vary.) The legs were now set with the drill points parallel to the guide rail and collinear with each other. I added some weight to the top to help keep the chair in place and drilled through from both sides. A bit of stiff wire tells the tale …

If you know which bit you will use for the stretchers, it will never be easier to drill them than right now. Use the same spacers and follow the pilot holes through before moving on to the other three sides. As a bonus, drilling from the outside of every hole in every leg moves most potential blowout to the less visible interior side of the joints.
After 35 years in architectural photography, Myko now works as a consultant, employing the same skill set toward environmental compliance. He holds three U.S. patents and is the inventor and manufacturer of Tailspin Collinear Marking Tools. A woodworker of 50 years, he got started with an X-Acto carving set and a block of balsa on his 10th birthday and just kept going.


Log in or create an account to post a comment.
Sign up Log in