Shopmade Recessed Pulls
Owain Harris's inset pulls add an elegant, ergonomic touch to doors and drawers.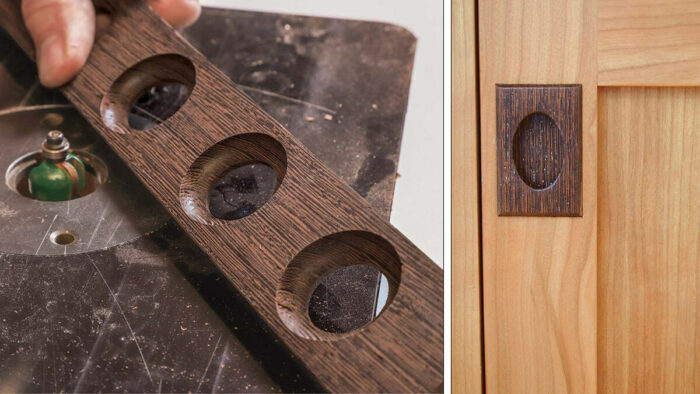
When I first started to build furniture, the pulls were often an afterthought in my design process. I would get most of the way through building a piece only to realize that I needed some way to open up the cabinet doors and drawers. The common result was a piece of hardware that never felt fully integrated into the overall feel of the cabinet. Now I try to consider my options for pulls from the very first sketches.

This inset pull is one I have developed over the last few years and have used successfully in many pieces of furniture. The design and materials can be changed to suit a wide array of different furniture forms and styles. You can select wood for the pulls to introduce a contrasting or complementary tone. I often pick dark wood, and wenge is a favorite. It’s helpful if the wood you choose has fairly straight grain so that tearout is less of a concern during the fabrication process.
Resawn blanks
These pulls are made by resawing a blank, shaping finger holes in the thicker half, gluing the two pieces back together, and then crosscutting the blank into individual pulls. To perform all the operations safely, it’s important to use long blanks. Even if you only plan to make one or two pulls, I recommend milling a blank at least 16 in. to 18 in. long. The pulls need to be thick enough so they’re comfortable to use when you insert a finger into the recess, but not so thick that inlaying the pull into the door becomes a problem. I typically set the pulls in a mortise 3/8 in. deep, and the front of the pull sits proud of the door or drawer front by 1/16 in. to 1/8 in. You lose a little thickness when you resaw the blank apart, so I find that 5/8 in. is a good starting thickness for it. The blank’s width should be about 1/8 in. over the final width of the pull; this allows for some trimming after the blank is reassembled.

Start by milling the blank, then resaw it, cutting a 1/8-in.-thick slice off of what will be the back of the pulls. This lets you bore holes through the main body of the blank and shape a cove into the backside of the finger openings. I like the bandsaw for the resawing, but it could be done on the table saw. After separating the two parts, skim the sawn faces with a pass through the planer to prepare them for being glued back together. I use a melamine auxiliary bed in the planer when running these thin parts.
Openings

Next, you’ll lay out and cut the openings for the pulls. A circular hole is the easiest to produce, as it can be cut using a Forstner bit in the drill press. If another shape is desired—an oval, for example—most of the pull-making steps are identical, but you’ll need to create a router template for the opening. (To see how I make a template for oval pulls, go to FineWoodworking.com/316.)
For pulls with round openings, lay out centerpoints along the body of the blank. To establish the spacing between centerpoints, factor in the length of the pulls plus an extra 1/4 in. of waste between pulls for final trimming. Chuck a Forstner bit in your drill press and set a fence so the holes will be centered in the width of the blank. Then drill out each hole all the way through the piece.

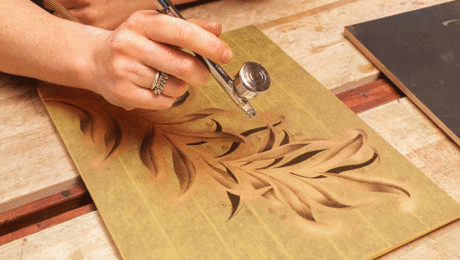
Whether you’ve made round holes or oval ones, it’s now time to shape the underside of the cutout to make it more pleasing to the touch. For this operation, I use a bearing-guided coving bit at the router table. The bearing will trace the inside shape of the cutout and create a 1/4-in. cove on the inside edge that’s perfect for a fingertip to drop into.

For safety’s sake, it’s essential to make this cut in multiple light passes, each taking no more than 1/32 in. Raise the bit slightly after each pass. If you take too heavy a pass, there’s a risk that the excessive vibration could cause you to lose control of the piece and let go, which is especially dangerous with the bit inside a closed loop. So creep up slowly on the cut, making sure that all the openings get a pass at each height before you raise the bit. Also, make sure to cut in the correct direction; a climb cut here is dangerous. I keep raising the bit until the flat above the cove is a little more than 1/16 in. wide.

Once the underside of each opening is shaped, the two halves of the blank can be reunited. Before gluing them back together, do any final hand-shaping and sanding on the lip and in the cove. It’s important that the pull be enjoyable to interact with, so the edges need to be softened, and the parts that will come into contact with the fingertips need to be silky smooth. I don’t always apply finish to the interior of these pulls, but if you would like to, now would be the time to do so. Just make sure to tape off the glue surfaces so the blank can be laminated back together.

Glue management is the name of the game when doing this assembly. It’s basically impossible to clean up any squeeze-out in the interior cavity, so only apply as much glue as strictly needed, and keep it away from inside edges as much as possible. Use a couple of small clamps to manage the tendency for the two halves to want to slide apart, and then clamp the whole thing down to the edge of a rigid surface with a caul on top to distribute the pressure evenly.
 |
 |
 |
 |
Cut apart and shape the pulls

When the glue is dry, trim the blank to final width. Double-check to make sure the cutouts are centered in the pull, and rip accordingly. Then crosscut the blanks to separate the pulls. Use a miter gauge or crosscut sled at the table saw, and use a stop block to ensure all the pulls are the same size.

I break the outside edges of each pull at this point with either a small roundover or a chamfer. It helps the edge of the pull flow into the door and makes the overall effect more cohesive. Once that’s done, the pulls could be installed as they are, and I have certainly done it that way. But with experience I realized that cutting a shallow rabbet around the perimeter of the pull makes the joint between it and the door much cleaner and easier to hide. And the small lip at the top of the rabbet provides some insurance against glue squeeze-out.

When cutting the rabbet, it’s important to set up your router table to prevent tearout and to make this operation with small pieces safe. I start by laying an MDF cover sheet over the top of the router table. The cover sheet, which has just a small cutout for the bit and another cutout for the height-adjustment knob, eliminates any inconsistencies between the lift plate, the throat, and the table, so the small parts can’t get hung up on an edge.

I cut the rabbet with a Whiteside 1305 mortising bit, which is relatively inexpensive and has a shearing cut that helps to ensure a clean edge. To protect the wood fibers at the delicate top edge of the pull, and to maximize safety, it is important to have a zero-clearance auxiliary fence as well. A piece of 3/4-in. MDF is my choice here. A piece of 1/2-in. MDF could work, but anything thinner has too much flex in it. Clamp it onto your router-table fence, making sure the clamps are above the height of the pulls so they don’t interfere. The rabbet will be 1/8 in. deep at most, so it’s not necessary for the bit to extend any more than that through the face of the auxiliary fence.
When cutting the rabbets, use a hold-down paddle and a backer block to keep the small pieces flat to the table and square to the fence and your hands away from the bit. The order of cuts is important. Make the first cut across an end-grain side; that way, any tearout at the corner will be removed as you make the subsequent pass down the long-grain edge. Ditto for the two following passes.
Cut the mortises and install the pulls

You now have pulls ready to be inlaid into the door. I use a router and template to cut the mortise. For one or two pulls you could lay out the mortise, rout the waste freehand, and chisel to your layout lines. But even for just a few pulls, I find it easy enough and much more accurate to make a template and pattern-rout the mortises. I use a pattern-cutting bit with a top-mounted bearing to do the mortising, so my template can be one-to-one with the pull.
I make the template using 1/2-in. MDF and the assembly method. First, I rip a piece of MDF to the exact width of the pull. I crosscut that piece in two and then glue those two pieces between larger pieces of MDF. I separate the two small pieces to match the length of the pull, creating a window that perfectly fits the pull. Make sure the template is large enough to accommodate clamps. If you have multiple doors or drawer fronts with pulls in the same location, you can add a fence to the template to help locate it relative to the edge of the workpiece.
 |
 |
To rout the pocket, clamp the template in place and plunge the bit into the door or drawer front. A plunge router is the best option for this, but a fixed-base router can be used; you will just have to tip the bit into the cut. Depending on the bit you are using and the material you are cutting into, this may need to be done in a few passes, which is another good reason to use a plunge router. When installed, the pull should bottom out completely in the mortise, taking advantage of the long-grain glue surface there without leaving a gap at the top edge.

I finish the doors and the pulls separately before glue-up. It’s much easier to finish a door or drawer front when it’s flat, and the pull when it can be handled. To glue the pulls in, I use a block with a cork face as a caul. Make sure not to put too much glue in the mortise, as it will have nowhere to go and could prevent the pull from seating fully.
Creating Pulls With an Oval Opening

First, decide on the shape and draw it out on a piece of 1/4-in. MDF. A drafting ellipse template is a great tool for this. The template needs to have enough length on either side of the cut-out for it to be attached to the pull blank with double-stick tape. A couple of inches on either side is good.
Drill a hole on the waste side of the template and cut as close to the line as you can with a coping saw or scrollsaw. Then use a round backed rasp or file to fine-tune the shape. It’s important to get this shape right, as it will be the template for all of the subsequent cut-outs.
 |
 |
Now lay out the strip with the location and shape of the cutouts. I make sure to leave at least 1/4 in. of waste between each pull for final trimming. Each one will need to be fully traced out using the template.


To remove the waste, drill overlapping holes and then cut to the layout line with a coping saw or a scrollsaw. The goal is to have as much of the waste removed from inside the opening as possible, while leaving 1/32 in. to 1/16 in. to rout off using the template.

Carefully secure the template into place above the rough-sawn cutout with double-stick tape, and use a 1/4-in. bottom-bearing flush-cut bit mounted in a router table to clean the remaining waste away. Make sure that the bit is small enough that it can’t get trapped inside the closed hole and turn the entire blank into a spinning weapon. And make sure you are routing in the right direction.
 |
 |

Once all the holes are trimmed to the layout line, put a bearing-guided coving bit in the router table and cut a cove for finger purchase on the back face of the blank. Make these coves very gradually in a series of small cuts—I raise the bit just 1/32 in. between passes. The photo above shows round holes, but the coves for the oval ones are routed in just the same way.
—Owain Harris makes custom furniture in Gonic, N.H.
Fine Woodworking Recommended Products
Blackwing Pencils
Circle Guide
Suizan Japanese Pull Saw


Log in or create an account to post a comment.
Sign up Log in