Scratch Stocks
Use these simple handmade tools to shape small details on furniture.

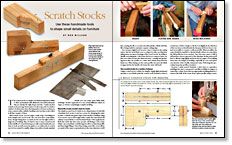
Synopsis: A scratch stock is a simple tool, but it has an impressive ability to dress up furniture with distinctive decorative elements that are the right shape and size for the piece you’re working on. Rob Millard offers instruction on the construction and use of handmade scratch stocks, used to fashion beading, flutes, reeds, and molding for furniture and turnings. Though most of these details can be achieved with a router, the results promise to be more satisfying when done by hand. Described in this article are steps to construct the cutter and wooden body.
The scratch stock is a simple tool with an impressive ability to dress up furniture with distinctive decorative elements that are exactly the right shape and size. I made my first scratch stock years ago from a piece of oak scrap, and I’ve made a number of others since then. My shopmade tools aren’t as fancy as some commercially available beading tools, but they work, which is all that I require of them.
With scratch stocks, you can shape a wide range of moldings in both straight and curved work. The tool does have some limitations, though. Being slow, a scratch stock is not the right tool for a large run of molding. Also, it’s hard to start or stop a scratch stock in the middle of a board (leaving you with some handwork); nor does it work as well across the grain or on softwoods. A scratch stock is best suited for smaller shapes, but with a closely matched handle you can create some fairly wide moldings. Another approach is to use several different cutters, in stages, to obtain a surprisingly complex molding.
The simplest scratch stock I make is an L-shaped piece of oak with a bandsaw kerf cut into it and two screws for clamping the cutter in place. I chamfer the guide edges of the handle to facilitate using it on concave curves with a tight radius. I make the cutters from old cabinet-scraper blades or used bandsaw blades. I first apply layout fluid (the metal dye that some people call bluing) to the cutter blank. I use a machinist’s carbide-tipped scriber to draw the profile and then begin filing to those lines using coarse files. Don’t allow too much of the cutter to protrude above the vise; otherwise, it will flex, causing the file to screech and dull quickly. I finish with fine files, being careful to maintain a square cutting edge.
You can put a slight bevel on your cutter to improve the cutting action. But the bevel limits you to using it in only one direction, taking away one great advantage of the scratch stock—its ability to handle reversing grain. I also hone the faces to remove burrs. For this I use a fine, pocket-size diamond stone. I usually end up having more than one profile on a cutter, and I always keep them for future use. When laying out the cutter profile, the more the blade is supported by the handle, the better the cutter will work.
Using a scratch stock couldn’t be simpler: Apply light downward pressure as you firmly push the scratch stock forward or draw it toward you.
For the full article, download the PDF below:
From Fine Woodworking #163
Fine Woodworking Recommended Products

Estwing Dead-Blow Mallet

Starrett 4" Double Square

Tite-Mark Marking Gauge


Log in or create an account to post a comment.
Sign up Log in