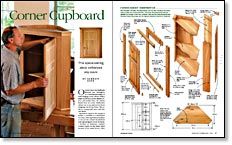
Corner Cupboard
This space-saving piece enhances any room
Synopsis: This project was inspired by a small hanging corner cabinet with a single curved door, shaped cornice, and molded base, that author Garrett Hack admired at the Shelburne Museum in Vermont. Hack took that inspiration and made it his own design: a country-style piece with delicate details. The shelves are cut with a curved front. Decorative crown molding and a frame-and-panel door complete the piece, which can get a dramatically different appearance depending on the style of the moldings and panels used.
On every trip to the Shelburne Museum near Burlington, Vt., I visit a favorite object—a small hanging corner cabinet. With a single curved door, nicely shaped cornice, and molded base, the cabinet beams from its corner. Shelburne’s cabinet was on my mind as I set about designing one for my house. The result is a country-style piece with delicate details.
Because so much of the carcase is hidden, a possibility is to build most of it from a less-expensive secondary wood, and the cabinet’s facade from some special figured wood. However, I decided on butternut, walnut’s country cousin, for the entire piece because of its warm brown color pleasing grain, and delightful workability with plane and chisel.
Use a full-size plan to help cut parts with odd angles
A full-size plan helps me visualize the parts, their angles, and the way they join together. It also allows me to lift dimensions and joinery details directly from the drawing, which results in fewer errors.
Mill the sides, the back, the two shelves, and the door panels at the same time, as they are all the same 1 ⁄2-in. thickness. The most economical and efficient way to do this is to resaw an 8/4 plank, grain-match the pieces, and glue up the parts. If you have some wide boards, so much the better. Then mill the door stiles and rails, the face frame, the wings, and the top and bottom to their 3 ⁄4-in. thickness. Leave every part square edged for now.
Now cut the shelves, top, and bottom to shape, measuring from the plan. A useful way to get all of these parts the same size is to clamp them together and plane each set of four edges at once. Check with a large square that the two sides are angled at 90°.
The top and bottom are rabbeted on all edges but the front, to produce a tongue to be fitted into the dadoes in the back, sides, and wings. When rabbeting the bottom of the top, note that it’s a visible surface. Finish planing the inside surface of the bottom (the first shelf) before creating the tongue, so as not to change its size. I used a rabbet plane to fit each tongue in a dado cut in scrap to avoid damaging the actual piece. Chamfer the edges of the tongue so that it will enter the dado easily when gluing up.
Cut to length the sides, wings, and back, and lay out the four dado cuts on one of the parts. I cut the dadoes on a tablesaw, but they also could be cut using a router. Reference each dado cut from the bottom of each part, and run the same dado on the back, wings, and sides with each setup. The dadoes are 1 ⁄4 in. deep by 7 ⁄16 in. wide; the shelves are planed to a snug fit. Be sure to run the same dado on a scrap or two to aid fitting the top and bottom later.
From Fine Woodworking #175
For the full article, download the PDF below:

Get the Plan
CAD-drawn plans and a cutlist for this project are available in the Fine Woodworking store.


Log in or create an account to post a comment.
Sign up Log in