Building an Arts and Crafts-style Sideboard, Part I
Start with a solid, carefully constructed carcase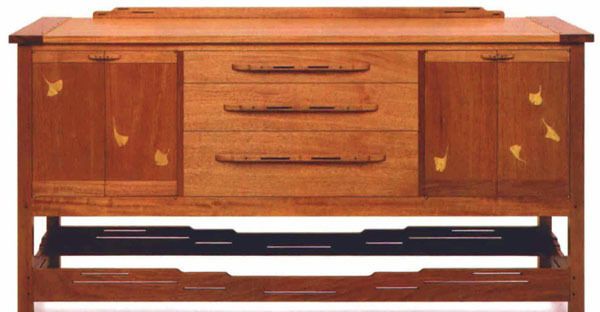
Synopsis: This is the first of three articles in which Gary Rogowski builds an Arts-and-Crafts sideboard. Rogowski designed the piece to look like a Greene and Greene piece, but with a more contemporary and less ornate feel. This challenging sideboard has many pieces, joints, and cuts, so the key to successful completion is breaking the project into manageable sections, then splicing them together. Rogowski explains how planning, drawings, and design are important to do first, and then he talks about how to mill your stock. Then construction starts. You begin with the ends, connect them with the rails and stretchers, and divide the carcase for doors and drawers. Then you make and fit the back. Multiple detailed project plans, step-by-step photographs, and side explanations accompany the article. And Rogowski includes information on making a jig for centering grooves and dovetails.
When I was asked to build a sideboard that had a Greene and Greene feel to it, I decided to use an original piece as a springboard for my own interpretation. But I wanted to do more than just copy something designed in the early 1900s by these famous brothers.
I tried to soak up as much visual information on the style as I could. I pored over designs of the Greene brothers and their contemporaries. Then I closed all the books and sat down at the drawing board. What I came up with is more contemporary and less ornate than the Greenes’ work (see the photo above). This sideboard, made of Honduras mahogany, had to work as a backdrop for my inlay work as well as have the overall grace of a Greene and Greene piece. I didn’t want it to dominate a room.
It’s mind-boggling how many pieces, joints and cuts are in this sideboard. The key to successful completion of this project is breaking it down into manageable sections and then figuring out how to splice them together.
That’s how I planned construction of this sideboard, and that’s how the articles in this and the next two issues of Fine Woodworking are organized. After I worked out an overall design, I concentrated on the structure of the carcase, which is the subject of this article. The next consideration was the interior of the piece—how the drawers would be supported and how the doors would be hung. That’s covered in the second article. Finally, there are the details—knobs, pulls, carved inlay and other decoration that make a piece distinctive. You’ll find all of that discussed in the third and last article of the series.
The more planning, drawings and design work you do up front, the fewer headaches you’ll have later. I find it more than worthwhile to do full-scale joinery drawings; they help me avoid unpleasant surprises.
Millwork lays the foundation
A poorly laid foundation for a house causes problems from framing to finishing. Similarly, if you build a piece of furniture with stock that’s not straight and square, you’re bound to run into trouble.
First I rough-mill the stock and let it acclimate to my shop. I cut boards to within in. of finished length and joint one face and an edge. I leave stock in. over in width and thickness. Then I sticker all the boards for a few days. If any boards cup, bow, twist or check, they’re replaced. I take the boards down to their finished dimensions when I need to cut the joinery.
From Fine Woodworking #125
For the full article, download the PDF below:
Fine Woodworking Recommended Products

Starrett 12-in. combination square
Dubuque Clamp Works Bar Clamps - 4 pack

Blackwing Pencils





Log in or create an account to post a comment.
Sign up Log in