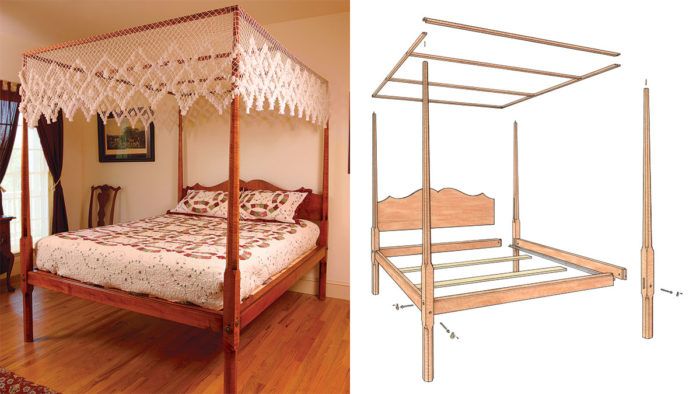
Build a Pencil-Post Bed
Figured wood, subtle details, and a rich finish bring charm and elegance to this traditional design
Synopsis: Popular for centuries, the pencil-post bed can be adapted to fit a variety of settings, from contemporary to traditional. Contributing editor Lonnie Bird’s design features posts with simple octagonal feet and the classic tapered octagon on top. Hand-carved lamb’s tongues, a tester frame, and figured wood help lend a period look to the piece. Bird takes readers through the project step by step, from milling and tapering the posts to cutting the tapered chamfers, hand carving the lamb’s tongues, and constructing the frame. Enhanced by an antique-tiger maple finish, this piece lives up to its billing as a classic.
The pencil-post bed remains popular several centuries after it was introduced—and for good reason. The design is classic yet highly adaptable. By varying the wood, the headboard shape, the post form, and even the finish, this bed will fit comfortably in a wide variety of settings, from traditional to contemporary.
The bed described here is one of the more popular variations on this timeless design. Unlike other early American beds, many of which have turned feet on the posts, this version features posts with simple octagonal feet and the classic tapered octagon on top. To add to the traditional period look, I hand-carved lamb’s tongues at the ends of all the chamfers, added a tester frame on top, and used highly figured tiger maple, finished with rich amber shellac.
Tips for milling figured wood
There are relatively few parts to mill up for a bed project, but almost all of the parts are large. Although sometimes I’ll edge-glue boards to create a wide headboard, I never glue up bedposts to add thickness. In a figured wood like tiger maple, the seams would distract from the facets and chamfers in the posts. Therefore, you’ll need 12/4 stock for the 80-in.-tall posts. If you can’t find that at your local lumberyard, it’s available through specialty lumber dealers (there are sources on the Web and in the back pages of Fine Woodworking). The stock doesn’t have to be perfectly clear. you can live with small defects as long as they are located in areas that will be cut away for the tapers.
Begin by cutting the posts to rough length. Next, joint two adjacent faces square, and then run the stock through the planer to bring it to its finished 2 1/2-in. thickness. Tiger maple can be difficult to plane without tearout, so be sure that the knives in your jointer and planer are razor sharp (when milling figured woods, I put new knives in my machines). Take very light passes with a slow feed rate. If you still get tearout with those precautions, moisten the wood surfaces with water just before you run the stock through the machine. The water will soften the fibers, making them less brittle.
Octagonal posts require no turning
The posts taper to a delicate 1 in. at the top. Begin by drawing the outline of the taper on one side of each post using a fullsize pattern made from 1/4-in.-thick plywood. When the layout is complete, use a bandsaw to cut carefully to the layout line. For a smooth cut in the figured stock, use a wide, sharp blade (1/2 in. wide, 4 teeth per inch). Hold onto the offcuts; you’ll use them later when cutting the mortises for the headboard.
From Fine Woodworking #184
For the full article, download the PDF below:
Fine Woodworking Recommended Products

Dividers

Drafting Tools

Blackwing Pencils

Get the Plan
CAD-drawn plans and a cutlist for this project are available in the Fine Woodworking store.


Log in or create an account to post a comment.
Sign up Log in