Hickory and Ash Blanket Chest
Floating tenons and a consistent angle keep joinery manageable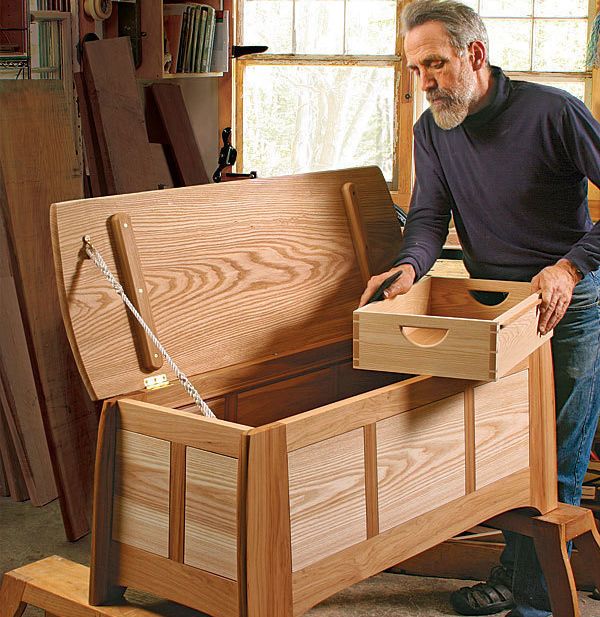
Synopsis: Peter Turner’s blanket chest combines angled joinery with straightforward construction. The legs of the frame-and-panel chest serve as end pieces for the front, back, and end frames. Battens help keep the one-piece top flat. All thicknesses are beefy for heft, with double floating tenons for strength. To emphasize the length of the chest, the grain of the panels runs horizontally. To keep the construction manageable, all the angles are the same, off from square by 3°. Floating tenons make for secure angled joints with little fuss.
Peter Turner’s finish recipe is also available for this project.
From Fine Woodworking #203
Editor’s note: Updated PDF file 7/10/2009 to fix an error on the blanket chest plan. The dimensions for the bottom panels are 10-3/4 in. wide by 11-1/2 in. long.
When thumbing through furniture books, I find myself drawn to long, low chests, similar to the wooden chests my folks had in our living room when I was a kid. So when I was invited to participate as a guest artist in the new Hampshire Furniture Masters association’s 2008 auction, a blanket chest was one of the three proposals I submitted, and this is the piece the jury chose.
To present my proposal, I offered scaled drawings that gave top, front, and end views. The process of drawing usually lets my mind walk through the fabrication so that I’m sure the piece will work. Everything comes off the drawings. When things get tricky, like angled or intricate joinery, I go back to them, laying pieces right on the full-size drawings to physically check measurements and angles. I did full-sizers of the leg blank and the ends, and to be extra sure I made story sticks to lay out the frames and panels.
The legs of this frame-and-panel chest serve as end pieces for the front, back, and end frames. The top and panels are ash; the frames are hickory. I applied battens to the one-piece top to keep it flat. I kept all thicknesses beefy for heft and used double floating tenons for strength. To emphasize the length of the chest, the grain of the panels runs horizontally.
To keep the construction manageable, all the angles are the same, off from square by 3°. First, the angle is found on the outside top and bottom of each leg. Next, the end frames and panels also get the 3° angle, but the front and back frames and panels don’t, which means the end joinery is angled but the front and rear are not. The front and rear assemblies lean into the angle on the end assemblies, so the tops of all the long top rails will need the angle, too.
I favor floating tenons because of their efficiency when dealing with angled joinery. They are as strong as any integral tenon, and you don’t need to fit angled shoulders—you just make simple butt joints. After planing my tenon stock to fit a test mortise, I rounded both edges of the stock on the router table and scored both faces with two shallow kerfs for glue relief. With a few crosscuts, I had my tenons.
Create compound-angled legs: Generally, I like to start with the trickiest joinery. That way, I can get the most difficult parts finished and know it will only get easier as I go. On this chest, the mortises on the legs and rail ends called loudest to go first.
For the full article, download the PDF below:







Log in or create an account to post a comment.
Sign up Log in