A Better Way to Build Wall Cabinets
Sliding dovetails and an unorthodox face frame make the case stronger, better looking, and easier to build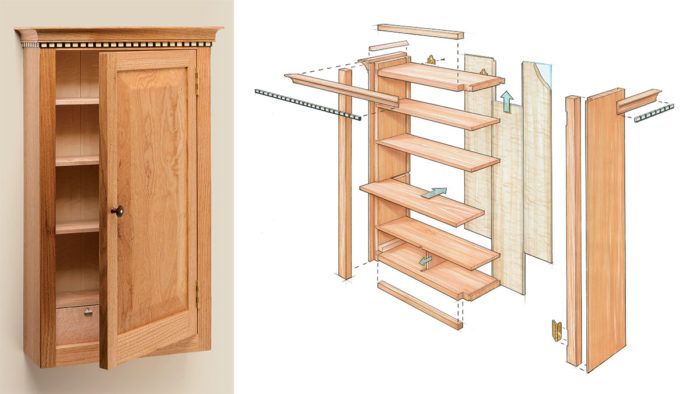
Synopsis: Learn to make a strong, attractive wall-hung cabinet like this one by Garrett Hack. The smart sliding-dovetail case construction creates a very sturdy cabinet and makes it easy to attach decorative moldings. Hack’s unique design also includes an unorthodox face frame that blends seamlessly into the case. The face frame makes shelf construction is easier since you can run through-dadoes for the shelves. Although best for hanging cabinets, this design works for standing cabinets as well.
I made this nice little wall-hung cabinet to hold tools, but it could easily find a spot inside a home and hold small knickknacks. What’s interesting about this project is the uncommon way I build the case. The process is efficient, and it yields a strong and very attractive piece with a lot of room for design variations.
The main joints are sliding dovetails, which are rock-solid and easily made with a tablesaw and router. Using sliding dovetails forces me to inset the top and bottom of the cabinet, but that works to my advantage, as you’ll see.
Also, I use an unusual face-frame variation, which blends more seamlessly with the case. Basically, I cut a deep rabbet in the front edges of the case and glue the stiles into that rabbet. That leaves the glueline very close to the corner, where I can disguise it easily with a chamfer, a bead, or a bit of banding, for a variety of looks. Note that the rails are added later, simply glued to the top and bottom of the case. These also act as blocking for any moldings you want to add.
You might ask, why have a face frame at all? The first reason is that the sides are thin and a face frame allows you to create whatever thickness looks best at the front edges. Also, it lets you run through-dadoes for the shelves. Without a face frame, you would have to cut stopped dadoes to create a clean look at the front. Finally, it is easier to cut hinge mortises in the faceframe stiles while they are loose than it is to cut them in the sides themselves.
The design is best for hanging cabinets, but it works for floor-standing cabinets as well. The “ears” (the part of the sides that extends above the sliding dovetails) can be as short as 3⁄4 in. and hid behind a molding. Or an overhanging top can be added.
Banding determines the cabinet width
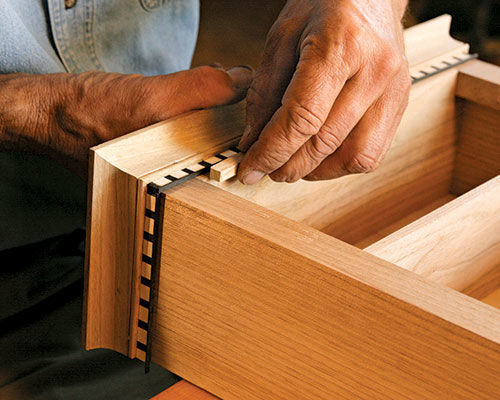
I often add a banding under the crown molding to serve as a transition between the molding and the case. It might seem like an unusual place to start, but to get the cabinet width and the length of the top and bottom pieces, I need to know this banding length. The idea is to end up with a uniform black square on each end of the banding.
So after I ripped up the black and white pieces (ebony and holly) on the tablesaw, I laid out the sandwich and then used it to tick off the full banding length on a story stick.
From Fine Woodworking #210
For the full article, download the PDF below:
Fine Woodworking Recommended Products

Blum Drawer Front Adjuster Marking Template






Comments
All video links for issue 210 return a 404 error
Loved the design. I made it for my bathroom, with nothing at all intended to go in it. Lol. Just because it made me happy.
(I took a page from Matt Kenney and his philosophy on boxes)
I had no holly so I used Osage Orange in its place. I think that turned out nicely. I need to work on my door frame construction but I am extremely proud of my door panel glue up. It’s near impossible to find the glue line.
Rockler had spalted maple on sale and that goes with our “farmhouse” design so that’s what I used. I fished it with 3 coats of waterlox of which I added a few drops of grey dye to.
Log in or create an account to post a comment.
Sign up Log in