String Inlay
Fine lines of contrasting woods add an elegant touch to furniture
Synopsis: Garrett Hack says that applying string inlay is one of those techniques that looks more difficult than it really is. There are three main steps: cutting the groove, making the inlay, and fitting the string to the groove. He likes working with string that is 1/16 in. wide or narrower and 3/32 in. deep; it’s delicate in appearance, yet strong enough that it won’t be missed. Hack uses simple shop-made hand tools to cut the groove, and offers tips and information on the tools needed to cut straight and curved grooves. Black or white inlays hold color better, and he details what materials he uses. Then he explains how to fit the string to the groove. He also explains how to end inlay, or have it terminate into a cuff inlay.
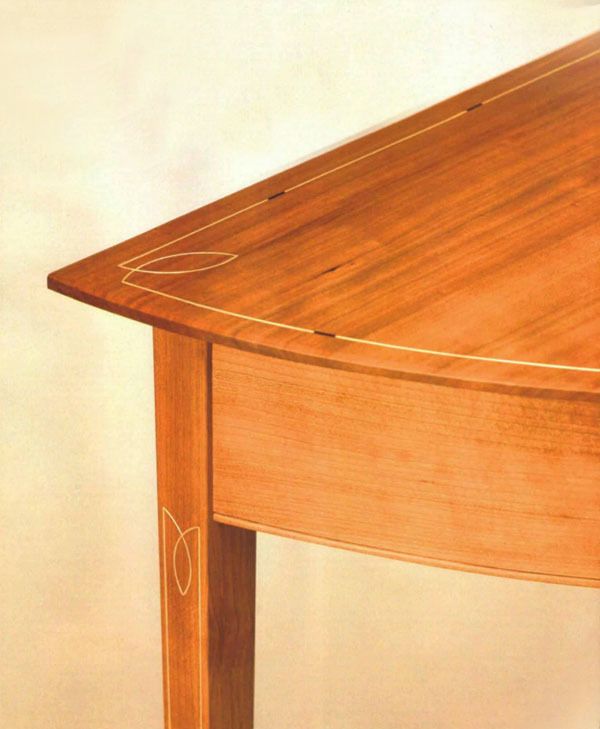
Early American furnituremakers used string inlay for much the same reason they used moldings—to outline and highlight parts of their furniture. In rooms where dim light was often the norm, the narrow bands of inlay emphasized the vertical lines of a table leg (see the photo at left) or carried the eye around a curved apron. String inlay is most common on pieces from the Federal, or Hepplewhite, era (late 18th century through the first quarter of the 19th century). Designs from that period are among my favorites because the lines of the furniture are simple, yet the stringing adds highstyle sophistication. That combination still works well today.
At one time, applying string inlay looked intimidating to me. Surprisingly, it’s one of those techniques that looks more difficult than it really is. There are three main steps: cutting the groove, making the inlay and fitting the string to the groove.
Cutting the groove
I’ve always liked fine inlay, single-color strings no wider than in. and about in. deep. String this thin is very delicate in appearance and adds subtle detail, yet it’s strong enough visually that it won’t be missed. To inlay thin string, you must cut a very narrow groove in the workpiece. Most of the time, the best way to do this is with simple shop-made hand tools. I’ve come to distrust the power of a router, which can ruin work in an instant. Just the same, a template-guided router may be the best way of cutting grooves with complex curves. It’s certainly the most efficient method, but you have to be prepared for the consequences of a momentary slip, because things happen quickly at 20,000 rpm. Each situation has its own best solution.
Cutting straight or gently curved grooves—Most grooves I cut can be made with a modified marking gauge. I removed the pin, used a bandsaw to cut a slot lengthwise on the beam of the marking gauge and inserted a cutter made from an old heavy-duty (about in. thick) hacksaw blade. The cutter, held in place with a pair of small nuts and bolts, is ground so that a tooth protrudes about in., with sides beveled at approximately 5°. The bevel helps the inlay go into the groove more easily. When grinding the tooth, I cool it often to avoid removing the temper, which would be easy with such a small profile. After grinding, I hone the four sides and bottom so that all of the edges are very sharp.
From Fine Woodworking #116
For the full article, download the PDF below:
Fine Woodworking Recommended Products

Bahco 6-Inch Card Scraper

Whiteside 9500 Solid Brass Router Inlay Router Bit Set


Log in or create an account to post a comment.
Sign up Log in