Wood Planes Made Easy
Make a smoothing plane to rival the best metal ones on the market
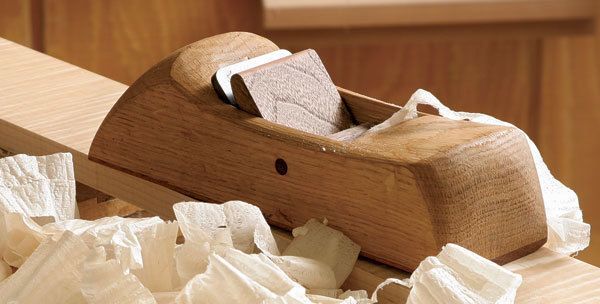
Synopsis: Make a wood plane and it will reward you with flat, gleaming wood surfaces and an unmatched planing experience. Make it the way David Finck does, and you’ll be surprised how easy it is. Wood planes offer great value. They far exceed the quality and performance of less-expensive metal planes, and you can build several of them for the price of one high-end plane. Their thick blades make freehand honing easy, and the high-quality steel holds a great edge. Last, they are shaped to fit your hands, so the comfort factor alone is a good reason to explore them.
Make a wood plane and it will reward you with flat, gleaming wood surfaces and an unmatched planing experience. Make it the way I describe here, and you’ll be surprised how easy it is. Wood planes offer great value, too. They far exceed the quality and performance of less-expensive metal planes, and you can build several of them for the price of one high-end plane. Their thick blades make freehand honing easy, and the high-quality steel holds a great edge. Last, they are shaped to fit your hands, so the comfort factor alone is a good reason to explore them.
Often called a Krenov plane, this plane style is closely associated with cabinet maker and author James Krenov, who adapted the design of commercially made European wooden planes. Gluing on cheeks eliminates the need to hollow a solid block.
Plane-making is not difficult, and it is a great way to learn many fundamentals of woodworking. This article should serve intermediate-level woodworkers well; for those seeking more guidance, my book, Making and Mastering Wood Hand Planes, (Sterling, 2005) starts at square one.
Prepare the plane blank
Straight-grained stock will yield a stable body. Choose well-dried wood of good density and durability. Among domestics, oak, ash, hard maple, Osage orange, mulberry, and applewood are good choices.
To make a smoothing plane, square up a thick block (this can be glued up from thinner pieces) 31⁄16 in. wide by 10 in. long by 2 1/2 to 3 in. tall, with its two sides parallel and square to the bottom. The top can be left rough-sawn as it will be trimmed away when shaping the plane. Examine the side of the blank. If the grain slopes noticeably, choose the front of the plane so that the grain direction slopes downward from front to back. This helps the plane slide smoothly and prevents chipout on the bottom.
From Fine Woodworking #196
For the full article, download the PDF below:
Fine Woodworking Recommended Products

Marking knife: Hock Double-Bevel Violin Knife, 3/4 in.

Bahco 6-Inch Card Scraper

Veritas Micro-Adjust Wheel Marking Gauge


Log in or create an account to post a comment.
Sign up Log in