Accurate Joinery Starts with a Marking Knife
The basics of using and choosing a marking knife, an essential layout tool.

Synopsis: Whether you’re cutting with machines or by hand, working to a single clean line is essential. Mario Rodriguez works to a reliable scribed line, so it will withstand smudgy fingerprints, sweat stains, and wood dust. In this article, he explains the differences between marking knives and marking gauges and discusses different knife blades and how to sharpen them.
One of the secrets to achieving fine, crisp work is to lay out the joints carefully. Whether you’re cutting with machines or by hand, working to a single clean line is essential. Instead of relying on a thick, blurry pencil line, I work to a reliable scribed line cut into the wood surface. Alongside smudged fingerprints, sweat stains, and wood dust, it remains unmistakable.
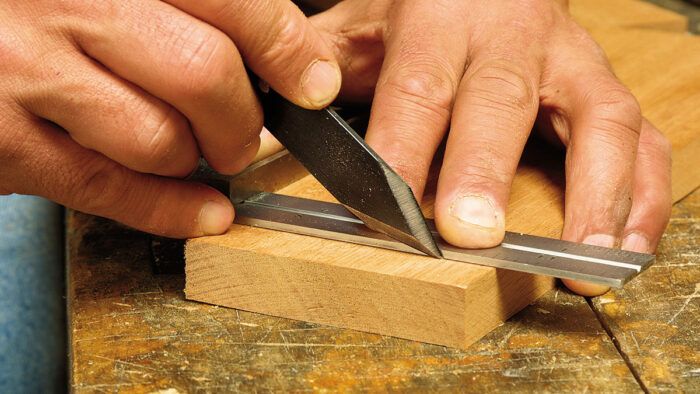
A marking knife cuts a straight, accurate line, highlighting exactly where to stop your cut. Besides offering a clear visual reference, this fine groove also leaves a positive starting point for any wood removal.
On antique furniture, the remnants of the craftsman’s layout lines are often taken as visible proof that the piece was handmade.
Marking knife has many uses
A marking knife is so versatile that you need at least one in the shop. It can be used for hardware installation, for inlay work, scoring cutlines to avoid a blowout, and for laying out dovetails.
When setting hinges, locks, and other hardware, not only does the marking knife produce a clear outline for the shallow mortise, but it also provides a fine notch for your chisel tip when you’re removing the last of the waste.
More advanced use of the marking knife is setting inlay and marquetry into a wood surface. Just as when mortising hinges, accurate work becomes as easy as putting the item in place, cutting a fine line around it, and removing the waste.
A marking knife can also be used to eliminate blowout on the back of veneered panels or plywood being cut on the tablesaw or bandsaw. For clean crosscuts, cut a layout line across the bottom exactly at the panel’s final dimension.
For me, however, the most indispensable use of the marking knife is laying out hand-cut dovetails. One of the keys to a gap-free fit is crisp, careful layout. Once I mark out the joint, the single line left by the marking knife provides the perfect boundary.
To view the entire article, please click the View PDF button below:
Fine Woodworking Recommended Products

Tite-Mark Marking Gauge

Stanley Powerlock 16-ft. tape measure

Estwing Dead-Blow Mallet


Log in or create an account to post a comment.
Sign up Log in