Turning a Parking Place into a Great Shop Space
Expansion and a thoughtful layout make an excellent professional workshop from a two-car garage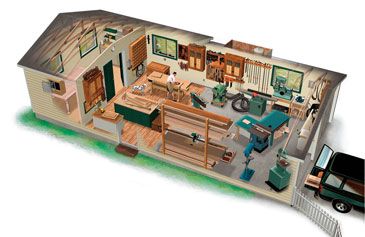
When my wife and I bought our house 15 years ago, I set up my first real shop in the freestanding two-car garage. Built in the 1940s, the garage was 18 ft. by 20 ft. with a concrete slab and wood siding. I entered and exited through the overhead garage doors, attempted to heat the space with electric radiators, and worked with low ceilings, no insulation, a lot of airborne dust, and very little natural light. I loved it. At least for a while. As I acquired more tools and machines, the space quickly became crowded. In the mean time, I had quit my job and begun making furniture full time. When I took that step, I realized I needed to retrofit the shop completely. I took the opportunity not just to enlarge the space but to revamp the layout using all that I’d learned about the way I work. (Watch a video tour of Gochnour’s completed shop.)
Several core decisions have made my shop a pleasant and efficient place to work. Most important, I divided the shop’s layout according to the three main activities of my work–machine work, bench work, and finishing. Then, within those three areas, I arranged the machines and tools to reflect the flow of work while keeping the layout as fluid as possible so that it could be changed to accommodate different projects. To store hand tools, hardware, and accessories for various machines, I built a number of smaller cabinets rather than several large ones. This enabled me to place tools and equipment right where they are most often used. I also put a lot of effort into aesthetic improvements. For instance, I took the time to build handsome cabinets for tool storage instead of whacking them together from scrap.
Most of the ideas I’ve built my shop around can be adapted to any workspace. Even so, I don’t expect them all to suit yours, because designing a personal workshop is just that–personal. The best design is the one that responds directly to the way you work. But I’ve put a lot of effort into the slow process of evolving my shop, and I hope you’ll find some tips here that help.
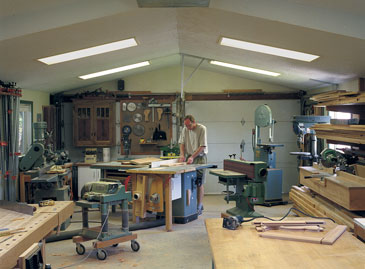 |
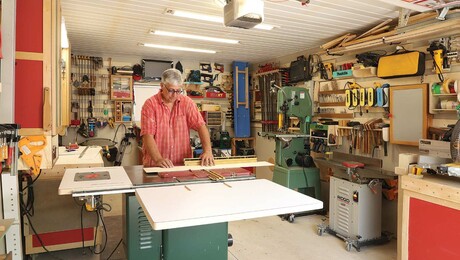
| The tablesaw is king. In the machine area, the tablesaw stands fixed near the center, and the other machines are arranged around it. |
Enlarging my garage
Because the lot is small and my budget was modest, it made sense to enlarge the garage rather than to put up a separate shop building. I started the renovation by making my best decision first: I chose not to tackle the whole job myself. As a furniture maker, I may be familiar with a carpenter’s tools, but that doesn’t make me a carpenter. So I hired a contractor friend and signed myself up as a laborer.
The roof was the key to the renovation. We placed the old rafters and collar tics with scissors trusses. And where I used to have a flat 8 ft. ceiling, I suddenly had a ceiling that is 8 ft. at the side walls and rises to 11 ft. at the center. Hallelujah.
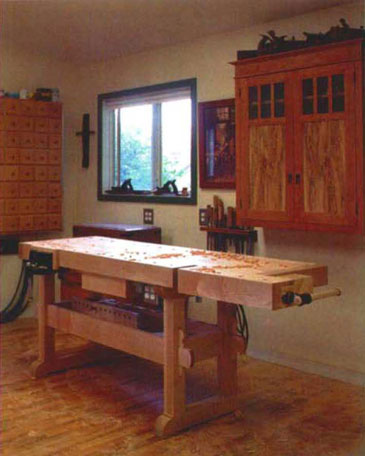 |
| The importance of aesthetics. In building his storage cabinets, shop furniture and cabinetmaker’s bench, the author took the time to make things that would be visually pleasing as well as functional. |
Along with a higher ceiling, I brought far better lighting to the renovated shop. The first improvement came with installing two large windows in the bench area. The added natural light throughout the shop helps with color matching and simply makes me feel better. In addition, instead of reinstalling the suspended fluorescent lights I had before, I recessed some fluorescent fixtures in the ceiling and covered them with Lexan. This was a miraculous improvement. It looked much better, provided even illumination, and meant there’d be no more whacking of dust-laden light fixtures with the end of a board.
To help retain the heat (and the noise), I added better wall insulation and replaced the old garage doors with insulated metal ones. I installed a basic dust-collection system, placing the collector outside in a small shed attached to the building, which reduces the noise and makes it less messy to empty. I supplemented the dust collector with a ceiling-mounted dust filter.
In the end, the only parts of the original shop that were preserved were the concrete slab floor and the front and side walls. The whole job took about seven weeks and cost about $13,000. Although I can’t claim that the outlay was painless, in most ways the renovation was extremely low impact. Even though the headroom had increased dramatically and the floor space had doubled to 720 sq. ft., if you were looking at the garage from the street, you’d never guess that anything had changed.
 |
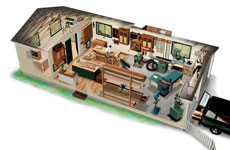
| A well-designed shop. The author expanded a typical two-car garage shop, doubling the space by adding on at the back. As he rebuilt and rearranged the shop, he based his decisions on aesthetics as well as efficiency, creating a space that is a pleasure to work in. |
Machine area
The space once occupied by automobiles became my machine area. It was in the right place in terms of workflow–just inside the overhead doors–and it had a good floor for heavy machines: the garage’s original concrete slab.
All of my work starts with rough lumber, so I built my lumber rack near the one still operable garage door, along the side wall. When I buy lumber, I back my truck up to the garage door and unload the wood directly onto the rack. The rack I made has a pair of vertical posts bolted to the wall and support arms cantilevered from the posts. This provides unobstructed access to the wood and takes up the least possible space in the shop.
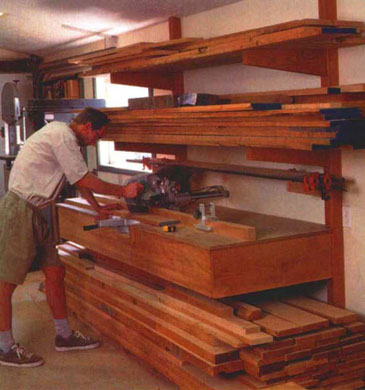 |
| Lumber and a place to cut it. A system of cantilevered arms provides easy-access lumber storage as well as support for a chopsaw table designed for rough-cutting planks. |
I use a chopsaw for rough-cutting lumber to length, and I wanted it right where the lumber was. So I cleared out a shelf of lumber and used the same cantilevered support system to hang a chopsaw table. I built the table using torsion-box construction and attached the chopsaw to a small, removable section at the middle of the table. When I need the saw on an installation, I simply unscrew two bolts and lift the saw and its small platform out of the table.
In arranging the major machines, I started by placing the tablesaw, with its huge demand for infeed, outfeed, and side support, in the center of the machine space. All of the other machines were placed on the periphery, arranged to work in harmony with the tablesaw.
|
Drawing: Peter Goncalves @ Design Core |
Whenever feasible, I put my machines on wheels. Flexibility in the layout of a small shop is imperative, and wheels help tremendously with this. I have all of my major standing machines on wheels except for my tablesaw and jointer.
The jointer and planer are near the tablesaw, which makes sense from the perspective of workflow, and it also helps with dust collection. Arranged this way, these three primary generators of dust can share the two hoses that I have hooked up to my dust collector. In my old shop, I had ceiling-mounted PVC pipe running to every machine. I found it to be overkill, and it produced enough static electricity to keep my hair standing on end much of the time. These days I simply have flexible hose running on the floor. It may be a slight nuisance to step over, but it works fine, is a more adaptable system, and doesn’t mess with my hair.
The tablesaw took precedence not only in laying out the machine area but also in my tool budget. My theory of machine purchases is this: For machines I use most heavily and rely on most for precision work–tablesaw, jointer, planer, mortiser, pin-router–I cough up the money for high-quality, heavy-duty equipment. For more peripheral machines, where accuracy is less critical–edge sander, grinder, dust collector–I tend toward Taiwanese knock-offs.
Bench area
The two main work surfaces in my bench area summarize the work I do there. One is a traditional cabinetmaker’s bench, and the other is a broad assembly table. Having the two in proximity–they are parallel and stand about 6 ft. apart–is extremely functional. Both are movable (with some effort), and I can change their locations depending on what I am building.
Whereas the cabinetmaker’s bench is open underneath, the assembly table is packed solid: I utilized the large space beneath the top by filling it with cabinets and heavy-duty drawers. These hold all of my handheld power tools and their accessories and much hardware. This way, the tools are stored within arm’s length of where they are used. The drawers are also easily reached from the workbench. The assembly table has several outlets built in under the top, and I added one to the workbench as well.
The cabinetmaker’s bench is fairly traditional, but I did make a few departures. One was to leave out a tool trough in favor of a larger work surface. I built in a tail vise, which is invaluable, but in place of a traditional shoulder vise I opted for a commercial metal side vise. I find a shoulder vise to be a bit of an impediment, and these metal vises are hard to beat with their convenient quick release, great holding power, and easy installation.
Building my own bench meant I could design it for just the way I work. Working with handplanes a lot, as I do, a good, solid bench is almost as important as a sharp blade. You want all of your energy transferred into the workpiece and the cutting action–not into a rickety bench that racks and wobbles with every stroke.
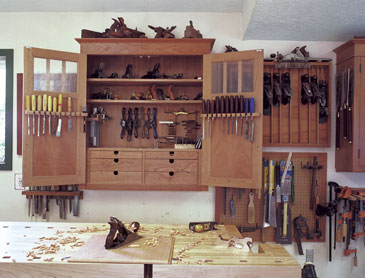
For tools used primarily at the workbench, I built shallow, two-door cabinets and hung them on the wall by the bench. They store chisels, handplanes, scrapers, spokeshaves, and other supplies. Storing tools and supplies behind doors helps with dust problems, and keeping the cabinets shallow makes for simpler storage and easier retrieval of the tools.
My approach in building storage cabinets is a little different from some. Instead of building shop furniture quickly and cheaply, I put real effort into building it. If I can save some labor or money, I do–two of the tool cabinets were extras from custom kitchens I built. But considering how much time I spend in my shop, it makes sense to please myself with the environment there. And the effort is not lost on clients who visit my shop. The cabinets demonstrate the type of work I do and the pride I take in my work and my tools.
My bench area has a third table, where I do most of my sanding. I may be a handplane fanatic, but I am practical enough to know that sanding is a reality. When I must sand, I want it to be as painless as possible. Thus, I built a dedicated sanding station. It is essentially a big box with a perforated top surface and a couple of vacuum motors below: One vacuum motor pulls the sanding dust down through a series of furnace filters; the other works as a hold-down system to keep the workpiece in place without clamps. The thing works so well that I don’t need a dust mask, even when sanding with aggressive paper. I placed the station next to a window so that my time spent sanding is enriched by the changes of the seasons in my backyard. I still don’t love sanding, but this device has certainly taken the sting out of it.
I put a hardwood floor in the bench area. The wood floor is easier on my feet and back and more forgiving if I drop a tool. Better yet, the wood is honestly more inspiring to work on. I’ve even draped off a wall and used the bench area as a place to photograph my work.
Finish room
I decided to separate the finish area from the rest of the shop, and I’m glad I did. Having it walled off keeps the dust in the workshop and the fumes in the finish room. I kept the ceilings high and installed large double doors that lead to the bench area. Even though the floor space in the finish room is fairly limited, the high ceilings and wide doorway make it easy to move even dining tables and tall case pieces in and out. It is also nice to be able to close the doors and not see the oversprayed walls and the clutter in there.
Perhaps as important as anything else in a finish room is the lighting. Two large windows bring in natural light. The natural light helps in matching color when mixing stains and in seeing just how a coat of lacquer is laying down. And the windows, in combination with the door and an explosion-proof fan, provide good ventilation. I also have fluorescent lights recessed in the ceiling. To make them explosion-proof, I put the lights behind sheets of Lexan that are sealed at the perimeter with a rubber gasket. I also ran the switch to the bench area. To provide raking light for bringing out the details of a finish, I use a couple of portable halogen spotlights.
The floor in my finish room is just plywood. That way I don’t feel so bad about lacquer overspray or stray splashes of pigments and stains. I keep all of my supplies in a metal cabinet and have a small work area for pouring and mixing finishes.
It has been six years now since I renovated the shop. With the added space, functional layout, and aesthetically pleasing surroundings, it’s been a great place to make furniture. But the evolution continues. Future improvements include more windows, upgraded electrical service, and, perhaps most important, a better place for my wife to park.
Photos by Jonathan Binzen





Log in or create an account to post a comment.
Sign up Log in