Drawing Big Curves
Let drawing tools, jigs, and a little intuition help you design graceful furniture.
Synopsis: Creating a piece of furniture that uses long, curved lines and graceful shapes isn’t difficult, designer Paul Schürch says. It’s a matter of trusting your instinct and knowing how to use the right tools and jigs. This primer on drawing curves illustrates how to make jigs that will help you to craft such basic shapes as arcs, fair curves, and ellipses.
For centuries, wooden-boat builders have been drawing templates and designing components that feature long, curved lines and surfaces, thus creating boats of grace, beauty, and strength. The term fairing a curve comes from boatbuilding and refers to the process of creating an organically flowing line that continues gracefully without flat spots or kinks, bringing various curved surfaces into alignment. If a line is not fair in a boat design, it can undermine the boat’s beauty and strength. Having worked as a boat builder early in my career, I find that creating pleasing curves is equally as important when designing furniture.
Everyone has the ability to look critically at a curve, but I find that many woodworkers distrust their intuition. When evaluating whether or not a line works in a piece of furniture, it comes down to instinct and gut feelings. Just as important as trusting your design sense, though, is having the right tools and jigs to draw and shape curved furniture components.
Tools for drawing circles
One of the most basic curves that can be incorporated into a furniture piece is the radius curve or arc. These are prevalent in every type of woodworking, from tabletops to aprons to the doors on a cabinet.
Producing an arc is relatively straightforward. We’re all familiar with drawing a portion of a circle with a compass. The only adjustments you can make are to increase or decrease the radius.
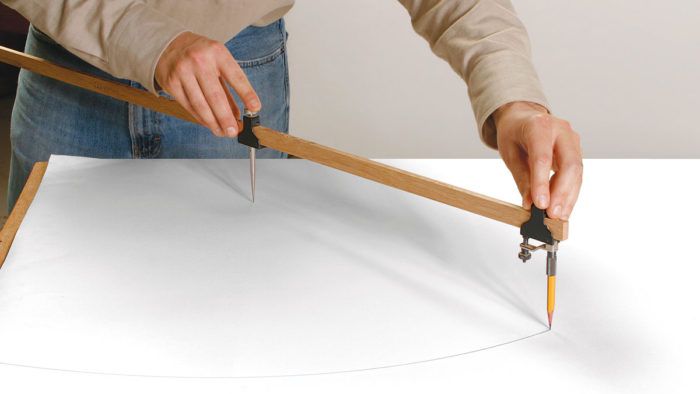
When it comes to drafting furniture components, you often will require large-scale radii. To draw these large-radius arcs you need trammel points, which are standard drawing aids available from many woodworking-, art-, and drafting-supply dealers. Trammel points act like an oversize compass when mounted to a beam. The only limitation to the size of the radius they can draw is the length of the beam. You can create a simple trammel using a stick, a nail (for the pivot point), and a pencil that is secured to the stick.
To draw a curve with a trammel, tape your drawing paper to a large, flat surface, such as a sheet of smooth plywood, melamine, or medium-density fiberboard (MDF), and then draw a centerline beyond the paper, at least the length of the desired radius. Plant the pivot point of the trammel along the centerline and draw an arc with the secured pencil. If the radius seems too dramatic, you can flatten out the arc simply by moving the pivot point farther away from the centerline.
From Fine Woodworking #175
For the full article, download the PDF below:
Fine Woodworking Recommended Products

Starrett 12-in. combination square

Dubuque Clamp Works Bar Clamps - 4 pack

MicroJig Matchfit dovetail clamps


Log in or create an account to post a comment.
Sign up Log in