Ultimate Crosscut Sled
Achieve the accuracy of a sliding tablesaw for a fraction of the price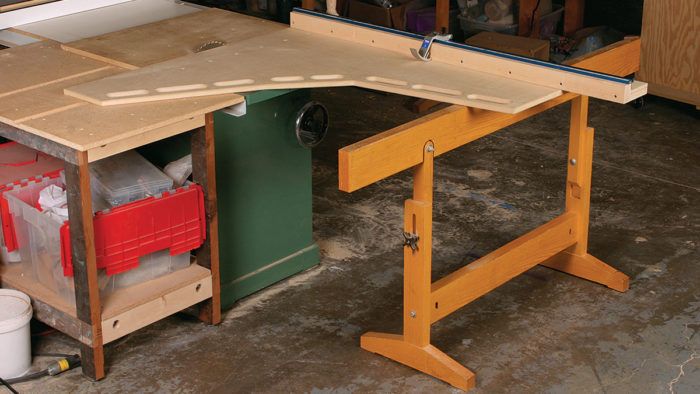
Synopsis: This unusual crosscut sled goes miles beyond the basic carpenter’s sled with runners that slide in a tablesaw’s miter-gauge grooves. This sled, used with an accompanying sled horse, allows you to crosscut large panels and long boards safely, accurately, and repeatably. The unusual triangular shape and cutouts make the sled easier to handle. The sled rides in the left-hand miter gauge slot, positioning your body safely to the left of the blade when in use. The two-part fence is designed not to warp and has a flat face that can be adjusted to stay flat and perfectly square to the blade.
With a bit of support at the outfeed end, most tablesaws excel at ripping— whether wide panels or long boards. Crosscutting these pieces is a different story.
Many commercial shops own large, industrial sliding-table tablesaws that make these cuts safely and accurately. But the options for a one-man shop on a limited budget are less attractive. Even an expensive aftermarket miter gauge has a relatively short stroke, and cutting steadily is difficult because of friction between the workpiece and the saw table. Many folks make a traditional carpenter’s crosscut sled, with front and back hardwood fences and a pair of runners to engage the miter-gauge grooves. when accurate, these sleds are very useful, but the fences tend to warp and bow, and you have to shim them with masking tape. Another disadvantage is that these sleds lack a built-in measuring tape and stop system. The resulting cuts are seldom truly square or accurate. last, the back fence limits the crosscut capacity.
A third alternative is to build this sliding crosscut sled that I first encountered at the Program in Artisanry at Boston University. Carefully made, it will crosscut large panels and long boards accurately, squarely, repeatably, and safely. This wide sled relies on extra support at its outboard end.
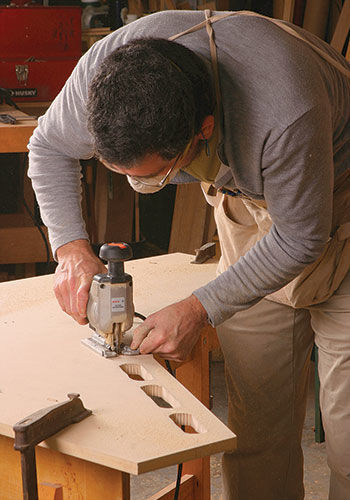
Construct the bed and an adjustable fence
The bed of the sled is made from 3⁄4-in.-thick medium-density fiberboard (MDF), which is flat and durable. Cut the initial square on the tablesaw, and then use a jigsaw to remove the triangular waste piece and make the cutouts. Round over the edges of the cutouts and just the upper edges around the perimeter. Keep the lower edges square to reduce dust getting under the sled.
Mark the location of the miter-slot bar so that the sled overhangs the sawblade position by 1/4 in. This will be cut flush once the sled is finished.
A plywood fence is screwed to the bed
To get perfectly square crosscuts on any length of wood, the fence must be absolutely straight over its length. To achieve this, the fence has two parts: a plywood rear section that is screwed to the bed of the sled, and a hardwood face that is added later. The rear piece gives the fence its stiffness. It consists of two layers of 3/4-in.-thick Baltic-birch plywood laminated into a 1 1/2-in.-thick by 4 1/4-in.-wide bar. True this up after lamination.
From Fine Woodworking #199
For the full article, download the PDF below:
Fine Woodworking Recommended Products
Double Sided Tape
Woodriver Circle Cutting Jig
MicroJig Matchfit dovetail clamps




Comments
Is there any particular reason that you did not build this to utilize the right miter slot? Most folks have more room to the fence side and you could eliminate the use of the saw horse. What am I missing?
I think that depends on the fence and shop space you have. Some saws come with a 52" fence, in which case, this jig doesn't make much sense. If you have the 36" fence and in a small shop space (~10' wide), the saw may be next to the wall. For me, this means I can rip really long boards which I often do with solid materials, but can only crosscut up to ~30" on the table saw (even less because the dust collector is just beyond the tablesaw). Most of my crosscutting is done on the miter-saw, but this isn't practical for sheet goods. So... excess room is left of the blade. For me, I have about 50" left of the blade before I start bumping into cabinets/tools on the other side of the room.
Log in or create an account to post a comment.
Sign up Log in