A Guide to Guide Bushings
7 simple jigs make it easy to rout mortises, slots, holes, and more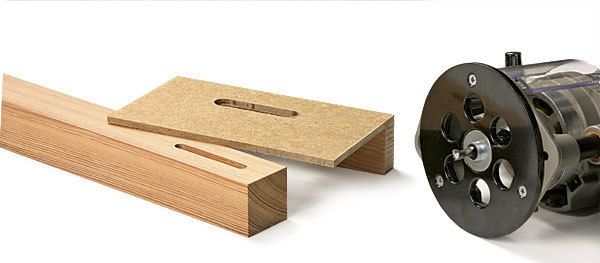
Synopsis: A router equipped with a guide bushing is often the simplest way to make accurate and repeatable router cuts. Used with simple shopmade templates, bushings make it easy to cut mortises, bore dowel and shelf-pin holes, and rout evenly spaced stopped dadoes in a carcase. With bushings, you can plunge-cut and use spiral bits, cut into the middle of a workpiece, and avoid the worry of burnishing the edge of the work. Gregory Paolini shares seven simple templates and patterns that will make your router much more versatile.
From Fine Woodworking #207
Routers need guidance, something firm and fixed to make sure the bit goes only where you want it to. Think bearing-guided bits, edge guides, and fences.
But there’s a type of guide that woodworkers often overlook: the guide bushing. It’s often the simplest, fastest way to make accurate and repeatable cuts—some of them difficult or impossible with any other type of guide. Used with simple shopmade templates, bushings make it easy to cut mortises, bore dowel and shelf-pin holes, and rout evenly spaced stopped dadoes in a carcase.
Bushings have several unique strengths. They allow you to plunge-cut and use spiral bits, which aren’t available with bearings. You can cut into the middle of a workpiece, not just along its edge. And you never have to worry about a bearing wearing out and seizing up during a cut or burnishing the edge of the work.
Don’t forget the offset: The most important thing to learn about using bushings is the offset—the distance between the cutting edge of the router bit and the outside edge of the bushing. The offset is the key to creating jigs and templates to cut the sizes and shapes you want. To determine the offset, subtract the bit diameter from the bushing diameter and divide by two. For example, with a 3⁄4-in.-dia. bushing and a 1⁄2-in.-dia. bit, the difference is 1⁄4 in. Half that, or 1⁄8 in., is the offset, so the edge of the template must be 1⁄8 in. from the edge of the cut.
Second, be sure the offset is large enough for chips to exit the cut. That’s critical if you use a spiral upcutting bit to cut mortises. The bit helps clear out chips that inevitably build up and pack the slot, but you have to give the chips somewhere to go. I like to use a bushing with a 1⁄2-in. or 5⁄8-in. outside diameter and a 1⁄4-in.-dia. bit.
Third, be sure the bushing isn’t longer than your template is thick. Otherwise, the bushing will hit the workpiece and you’ll be dead in the water. Either make the template out of thicker material or trim the bushing as shown at right.
The other key is that the bit and guide bushing are very close to concentric; otherwise, the offset will be greater on one side of the router than the other. That can produce a too-narrow mortise or a slot with a wavy edge. Some router manufacturers sell centering cones to help adjust the offset, but I use a simpler method (see tips at right). To adjust the bushing location on most routers, you’ll need to adjust the base. You may need to enlarge the mounting holes or replace the baseplate.
For the full article, download the PDF below:
Fine Woodworking Recommended Products
Rockler Deluxe Panel Clamp

Stanley Powerlock 16-ft. tape measure

Craftsman Random Orbit Sander







Log in or create an account to post a comment.
Sign up Log in