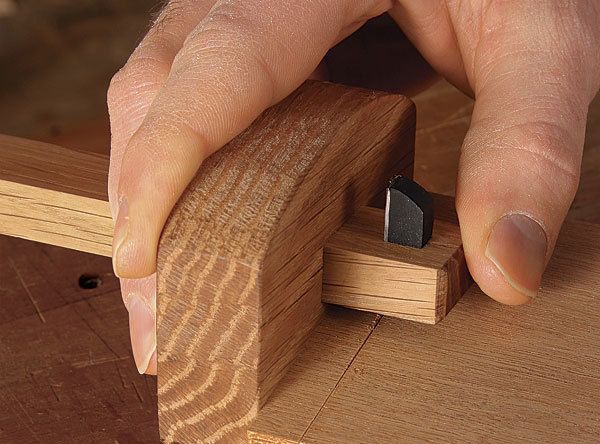
Make Your Own Marking Gauge
This shopmade marking gauge works better than anything on the market.

Synopsis: If you haven’t found a commercial marking gauge that’s exactly to your liking, take a page from Matt Kenney’s book and make your own. His version cuts a much cleaner line across the grain than a pin-style gauge, and won’t catch a grainline and get off track when cutting with the grain. It has a spear point, so it can be used in both directions, and an easy-to-adjust thumbscrew. When you make your own, you can locate the thumbscrew and shape the fence to fit your hand, and you can make different sizes for specific tasks.
I use a marking gauge for many things— mortises, tenons, dovetails—but I’ve never found one exactly to my liking. Western-style marking gauges typically use a sharpened pin or cutting wheel to incise a line in the stock. These tend not to cut crisply, and the pins especially have a bad habit of following the grain. Japanese gauges have great knives, but they use a wedge rather than a thumbscrew to apply pressure on the bar. The wedge makes adjustment finicky and, in my experience, can work itself loose.
This design combines the best from East and West. It has a knife that cuts a clean line no matter which way the grain is running, and a thumbscrew that is easy to adjust. Also, my cutter has a spear point, so it can be used in both directions. There are similar cutting gauges available commercially, but they all have design quirks—the shape of the fence or the location of the thumbscrew—that make them uncomfortable to use. When you make your own, you can shape the fence and locate the thumbscrew to fit your hand. Also, once you know-how, you can make others for specific tasks. For example, I made a small one to scribe dovetail shoulders. Last but not least: There’s a real joy that comes from using a hand tool that you made yourself.
Fit the fence around the bar
The trickiest part of making a marking gauge is getting the bar that holds the cutter to fit nicely in the mortise that goes through the fence. I find it tedious to try and fit the bar into a mortise cut into a solid piece of wood, so I glue up the fence around the bar.
Use a hardwood such as white oak or maple for the fence and bar; quartersawn stock will be more stable. Start with a 4/4 board about 4 in. wide and 18 in. long. Joint and plane it to 7⁄8 in. thick. Next, rip three strips in this order: 7⁄8 in. wide, 1⁄2 in. wide, and 7⁄8 in. wide. If you assemble the pieces in the order they come out of the board, you’ll have a good grain match and less-obvious glue lines. Use a handplane to remove the sawmarks.
From Fine Woodworking #211
For the full article, download the PDF below:
Fine Woodworking Recommended Products

Olfa Knife

Starrett 4" Double Square

Stanley Powerlock 16-ft. tape measure


Log in or create an account to post a comment.
Sign up Log in