The Lee Valley panel and slicing gauge caught my fancy, not having a panel gauge but sometimes being in need of one. But the Veritas item seems expensive for what it is; and I can’t buy one in the UK anyway, so buying and importing from Canada would add another 50% or more to the cost.
https://www.leevalley.com/en-ca/shop/tools/hand-tools/marking-and-measuring/marking-gauges/110788-lee-valley-panel-gauge?item=15N0601
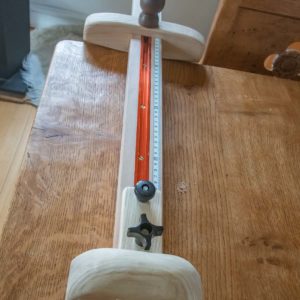
Why not make one, then? So I did, from scrap bits mostly (beech and ash) but using commercial jig-making parts.
In rooting about for design details of older panel & slicing gauges (such as the Stanley that the Veritas model is loosely based on) I came across another similar item – a marking-out gauge. It’s a simple but versatile design published by Woodsmith magazine, consisting of a piece of T-track with a basic fence and some pencil holding sliders.
So I combined this with some of the Veritas slicing gauge details and the original Stanley tool details to make a multi-purpose long (75cm) gauge. Stage One is complete, with a Stage Two to come, which will see additions to expand it’s functionality to being a trammel bar (for marking out circles and curves) as well as a dado marker (two knife-wheels marking out the parallel lines on a panel to be given one or more housing grooves).
Stage Three will be a general tidy-up, with saw cut and chisel marks removed, some fairing of the shapes, sanding then finishing.
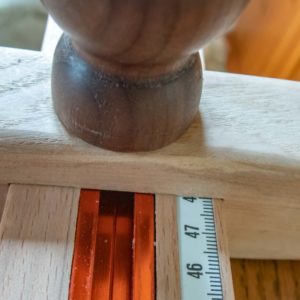
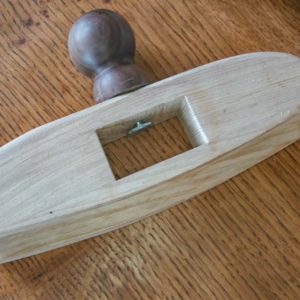
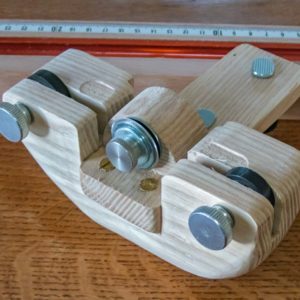
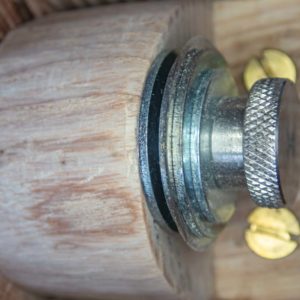
Stage One has a single Veritas-style cutting wheel and stabiliser-gripper at the end of the bar and a sliding fence with a curved-shoe sliding on the bar, to help move the long gauge effectively without losing the intended line. The fence is locked to the bar with a knob attached to the T-bolt sliding in the dovetail-profiled T-bar let into the beech beam.
The cutting wheel is a 28mm diameter double-bevel wheel meant for a fabric cutter, bolstered each side by steel washers having the same 5mm axle-hole and 3mm less in diameter than the cutting wheel. The wheel can therefore cut up to 1.5mm (1/16″) deep. The double bevel seems no issue in practice as the cutting wheel is very thin and the bevels very steep.
An alternative holder to the cutting wheel holder on the bar end is a simple tab to which a Veritas trammel point or pencil can be attached. This works well without the need for any stabiliser wheels. The steel or pencil tips are in exactly the same line as is the cutting wheel, so a scale along the bar gives the same reading at the fence for both cutting wheel and trammel points. It’s accurate to a small fraction of a millimetre – maybe 1/32″ or even 1/64″.
The Veritas trammel points can also be mounted on sliding tags along the bar, for use in pencilling out dadoes in the middle of a panel, hinge positions on a door and so forth. It probably needs another scale, running the other way, on the alternate edge of the beam – the other side of the red T-track from the extant scale. The fence rather than the end cutter wheel/pencil will then be the zero point, when pushed up to the stop at the other end of the bar from the cutting wheel end.
Another post with Stage Two details will be made when it’s done.
Lataxe
 Shop Talk Live Podcast
 Our favorite articles and videos


Replies
Some photos of the gauge in the marking-out mode.
Great looking tool. I like that fabric cutting wheel.
E,
Those fabric cutting wheels cost me a mere £12 for 10. They have one drawback, which is that in making the gubbins holding the cutting wheel, I sliced my fingers three times! (Just little bluddy nicks but a nuisance for days afterwards, as they catch on everything I touch).
This is more cuts than I've had from WW activities in the previous decade.
Happily there's no inclination of the rascal to cut a finger when in use on the gauge. It just got me as I handled the gubbins to screw-in parts, file parts and so forth.
Lataxe
That is fantastic, very thoughtful.
Very nice work and thoughtfulness to multi purposeful concerns. Well done.
There's a short section of that orange dovetail-section T-track left so I'm going to make a conventionally-shaped short cutting gauge with it, using another fabric cutting wheel on the end rather than a small knife - rather like a traditional wooden version of the Titemark or Veritas-style round-faced metal gauge with the wee cutting wheel on the end.
A sliding bolt in the T-track to tighten the gauge face on the shaft seems a better way to lock such a gauge, as the traditional ones often end up dinging the shaft as the end of the brass locking bolt digs in to the shaft, even if it's bolstered with a brass strip. This can make it difficult, subsequently, to set the gauge exactly where you want it as it wants to go where the brass locking bolt end has made an indentation in the shaft, rather than 0.7mm further along where you want it.
Better gauges have a non-marring shoe at the bottom of the brass locking bolt, I know. But most don't - or not an effective one, as they are often too small or drop out and disappear in the sawdust & shavings.
Lataxe
Nice work and looks great. Appears all the blud stains are well concealed :)
This forum post is now archived. Commenting has been disabled