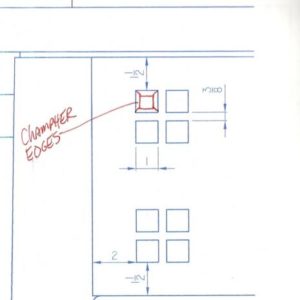
Accurate method to inlay 1″ square ebony pegs with chamfered edges?
Job: white oak fireplace surround and bookcases.
The front facade of this mantel I’m building is based on a design by Mario Rodrigeuz. I’ve never had to do something like this before. The substrate is white oak ply with an ebony inlay.
I have 16 of these inlays to do. Anyone have a jig for this task and for making the pegs?
Thanks for any and all help.
Brian


Replies
Square pegs
The current issue of Popular Woodworking has an article that describes the process and the two home-made jigs to accomplish the tasks.
Thanks I'll check it out.
Block Plane
UBC,
Have you considered a block plane to chamfer the pegs by hand. I'm thinking to chamfer the ends of a piece of stock, slice off the peg on a bandsaw, chamfer the next, slice... etc.
They will all be just a little different which will make them perfect in their imprefection as compared to 16 identical, jigged pegs. The work will go fast. I'd make 20 or more and then pick the best 16.
I think the eye will appreciate the character created by the handwork.
Frank
Maybe a belt sander would be better as you wouldn't have to worry about tearout but a block plane will do. I made a jig from 1/2" plywood. See the photos below.
Works great. Best part is I can cut all 4 mortises at one setup. For those unfamiliar with this:
layout what you want on the ply.
Raise tablesaw blade to half the thickness of your plywood jig material - in my case 1/4".
Set the tablesaw fence to cut on the lines.
Make the needed number of passes.
Setup a router with a small flush trim bit (the smaller the bit, the smaller the radius will be in the corners).
Using a drill larger than the diameter of your flush trim bit, drill a hole(s) through the center of the template where your mortise will be.
Set the depth of the flush trim bit so the bearing will ride on the material that remains.
Secure template and plunge flush trim bit through the hole you drilled and trim away the excess.
Now it's a matter of setting up another router with a guide bushing and a down cutting straight bit. In my case a 5/16" O.D. guide and a 1/8" down cutting spiral bit.
The downcutting action will eliminate tearing up the face veneer.
Brian
Here's a test run.
Looks like you have the mortise part worked out.
Post a picture of the finished results here when you're done.
Frank
Worked out good. Hardest part
Worked out good. I admit the squares vary a bit in size, about 1/32 ! Hardest part was squaring up the corners. I tried my spring loaded corner chisel first but that didn't go well - found it hard to register the chisel accurately. So I chopped 'em by hand.
I cut the inlays to size and fine tuned them on the belt sander. I also made a jig to chamfer the edges uniformly.
Brian
This forum post is now archived. Commenting has been disabled